Pusser’s Painkillers: Barbados Delight

Pusser's Painkiller

Happy Sunday! Let your Sunday be a “fun” day.

When I used to work in a restaurant, I worked every weekend as that was when I would make the most money. Our clientele mainly consisted of the average 9-5 people who couldn’t wait for Friday and Saturday nights out. Surely, we could meet up with “everyone else” after work, but we mostly missed out on these moments for several reasons: There would only be about an hour or two left before the bars would close, our feet were too sore, and our shirts reeked of oil. So attractive.

The crazy nights out for the restaurant people were on Sundays; many of us were off Mondays, and better than the 9-5 people, we didn’t have to wake up early the next day! Most of us did not have work again until 4-5 p.m. Sunday Funday became a tradition in my restaurant because it was the one day of the weekend that we could participate in fully.

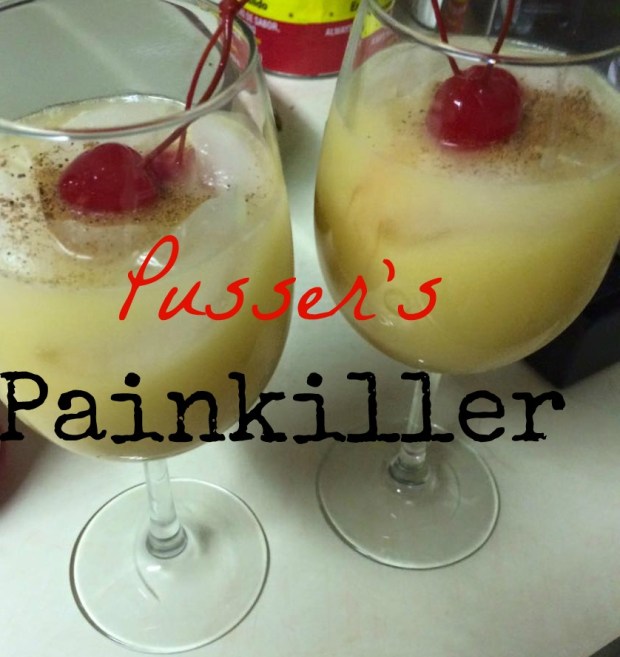
Speaking of fun, these Pusser’s Painkillers are the perfect accompaniment for your Sunday Funday. They go down smoothly, pack a punch, and cure all the typical Sunday woes of the 9-5 worker. I love waking up Sunday mornings, but I hate Sunday evenings; I bemoan the thought of having to get up early for work the next day. I just want time to stop on Sundays.

And although I don’t quite have a time machine, I believe these painkillers, as the name so cleverly implies, will soothe you of your troubles and woes.  I served these for my future mother-in-law and her best friend, and they were a big hit–there’s even a claim that they took away physical joint pain. 🙂

The drink is relatively simple to make, but I will be a stickler about ingredients. I refuse to use any rum other than Pusser’s. No, they did not sponsor this post, but I have tried to make them with similar dark rums and it didn’t quite taste right. You also need to use cream of coconut–do not try to use coconut milk or sweetened condensed milk. This is the original recipe that is served in Barbados, so use it and drink up! This drink tastes very authentic in its pineapple endeavor.

P.S: If you’re like me and accidentally threw out your cocktail shaker (do not judge me), you can use a travel coffee cup and cover the hole with your index finger to shake, not stir, this lovely cocktail. 🙂

The Medicine Cabinet

This makes one strong drink, but I usually double, triple, quadruple the recipe to make a bunch of servings at once!

2 oz Pusser’s Rum
4 oz pineapple juice
1 oz orange juice
1 oz cream of coconut (or more–depends on how sweet you like drinks)
Fresh grated nutmeg (I use McCormick’s Gourmet Ground Nutmeg)

If you’re making for two drinks for four people (8 total) for a small party, then the ratio would be this:

16 oz Pusser’s Rum
32 oz pineapple juice
8 oz orange juice
8 oz cream of coconut (or more–depends on how sweet you like drinks)
Fresh grated nutmeg (I use McCormick’s Gourmet Ground Nutmeg)

Doctor’s Orders

  1. Add liquid ingredients to a cocktail shaker and shake vigorously.
  2. Alternatively, pour all ingredients into a travel coffee mug and cover the hole with your index finger to shake.
  3. Once shaken, put into the freezer (if you want to drink it quickly) or refrigerate in a pitcher. I
  4. If you’re freezing your mixture, try to leave it in for at least 5-10 minutes.
  5. Once properly chilled, pour into a big glass or goblet filled with ice. Grate fresh nutmeg on top and enjoy! Garnish with an optional Maraschino cherry.
  6. If you’re feeling bold, make a “rum float” on top. This means you can pour more rum on top if you like an even stronger drink. 🙂


Mongolian Beef Noodles

Mongolian Beef Noodles.jpg

Happy Sunday!

I go on kicks each and every time I eat something amazing. I’ll eat sushi, and I will want it for a week straight. I have lasagna one day, and I’ll want ricotta for years. I become obsessive, and I’ll fall in love so deeply in that moment.

It kind of reminds me of teenaged infatuation; I have my “flavor of the week,” but eventually get over it and find something better. 🙂

Today, I had absolutely no inspiration whatsoever. I also knew I had to blog this weekend–eep. I decided that I needed to, after spending an hour in the grocery store roaming, just make something quick and delicious–and bam–I thought about making Mongolian Beef Noodles.

Stir frying is my go-to weeknight strategy because everything cooks so quickly. It’s also great for when I have a temptation to call for some take-out Chinese. I think that many people feel that they cannot make Chinese food themselves, and I am really not sure why. Chinese food isn’t difficult to make at all! Make a bucket list of your favorites from your local joint, and then go figure it out. One of my personal favorites is what I am making today.

Mongolian Beef Noodles has a perfect balance of sweet and salty. I like to add mini sweet bell peppers to get some natural sweetness in my vegetables, and it gives the dish a nice bright flair. I also add honey, mandarin oranges, and brown sugar to enhance the sweet flavor. The salty, savory factor comes from the green onions, garlic, and ginger. In terms of vegetables, you can use whatever you want. I like to throw in broccoli as beef and broccoli are an amazing pairing in the Chinese realm. I have seen people make it with coleslaw mix (note: NOT mayonnaise-laden prepared coleslaw, but rather, the vegetables). You could add whatever vegetables you like! Seriously! If you’re not too creative, think about what vegetables you actually enjoy eating when you dig through that white take-out container.

In terms of the beef, use flank steak, and make sure the meat is sliced thinly. To expedite the cooking process, the meat needs to be cooked not only thinly, but in smaller pieces (go for bite size.) I am also a big fan of marinating your meat whenever possible. Flank is not particularly tender, so I think it needs to sit for a little bit. More time is best, but if you don’t have all the time in the world, look to marinate your meat in the soy sauce/corn starch slurry immediately while you prep your vegetables–the half an hour bath will do just fine. The soy sauce, rice vinegar, and sesame oil will tenderize the meat.

There are two reasons why you want to add cornstarch to your meat: 1.) it thickens the sauce to make a succulent brown sauce, and 2.) it prevents the meat from overcooking and becoming tough. If you don’t have cornstarch, you can use flour, but I think cornstarch is the best way to get the traditional Chinese results.

Alright, enough talking–let’s get to dinner.

Marry the Meat

  • 1 pound flank steak, cut across the grain into 1/8″ thin slices, then cut into 2” length pieces (think bite size)
  • 1 tablespoon soy sauce
  • 1 tablespoon of rice wine vinegar (if you don’t have it, skip it–but I like it!)
  • 1 tablespoon of sesame oil* (Again, you could skip, but it’s another step closer to authentic Chinese)
  • 1 Mandarian orange (Cuties, Halos, whatever brand), juice squeezed** (optional, but I   like the acidity and sweetness; alternatively, pour in 2 tablespoons of orange juice!)
  • 1/4 cup cornstarch

Fry on the Fly

  • 2 tablespoons of canola oil
  • 3 cups broccoli florets (I just microwaved a bag of frozen florets)
  • 6 mini bell peppers, sliced thinly (no seeds, please!)–you could also used 1 whole bell pepper so long as its sweet!
  • 6 green onions, chopped (2 green onions reserved for garnish, the rest is for the stir fry itself)
  • 6 garlic cloves, minced
  • 1 tablespoon freshly grated ginger (If you don’t have any, you can leave it out, but ginger is another authentic Asian aromatic!)
  • 1 box of Rice Noodles (cook to directions)–if you’re really in a bind, you can use pasta (shhh!) or white rice

The Slurry in a Hurry

  • 1 Mandarian orange, juice squeezed** (optional, but I like the acidity and sweetness; alternatively, pour in 2 tablespoons of orange juice!)
  • 1/2 cup low sodium soy sauce
  • 1/2 cup water
  • 1/3 cup brown sugar, packed (add more if you like sweeter sauces)
  • 1/4 cup Asian sweet chili sauce (optional–I just used Sriracha because I ran out of Sambal Oelek)
  • 2 tablespoons mirin/sweet Japanese rice wine or rice wine vinegar
  • 1 tablespoon hoisin sauce
  • 1 teaspoon salt
  • 1/4 teaspoon pepper
  • 2 teaspoons cornstarch
  • 1-2 teaspoons Sriracha
  • 2 tablespoons of honey
Directions
  1. Make your rice noodles to the package’s directions. You can cook them by boiling water (like pasta) in ten minutes, or you can soak them in cold water (takes longer, but is a traditional method) for about 45 minutes.
  2. Next, slice your beef on a diagonal to the size specifications above. Add the meat to a large freezer bag along with 1 tablespoon soy sauce,. Toss to evenly coat. Add 1/4 cup cornstarch and toss to evenly coat. Let sit at room temperature 30-60 minutes at the very minimum.
  3. Slice your peppers thinly, and slice the green onions. Take out garlic cloves and  1 inch piece of ginger; press both through a garlic press. Alternatively, mince garlic and ginger finely with a chef’s knife.
  4. Once your ingredients are prepped, then begin your sauce. Whisk the sauce ingredients together in a small bowl. Set aside.
  5. Heat 1 tablespoon canola oil a large nonstick skillet or a wok (I prefer using a wok) over high heat until very hot and sizzling. Add beef to the skillet and break up any clumps; cook without stirring for 1 minute, then stir and cook until beef is browned and almost cooked through, about 1-2 minutes (it will cook more in the sauce). Don’t overcook or it won’t be as tender! Transfer beef to a large plate and cover it up so it doesn’t get cold.
  6. Add 1 tablespoon oil to the pan and saute the peppers. Throw the meat back in and add the garlic (use a garlic press, if you have one.) Stir frequently with tongs. Throw in almost all of the green onions (reserve some for garnish.)
  7. Microwave the broccoli to the directions on the package (about 5 minutes), and once it is cooked, add it to the pan. Once the noodles are cooked and drained, add to the wok/skillet, too.
  8. Return the beef to the skillet and toss to combine. Whisk the sauce to recombine then add to the skillet. Cook, stirring constantly with tongs, until the sauce is thickened, the beef is cooked and vegetables are crisp tender, about 1-2 minutes. Taste and add additional sriracha, sweet chili sauce, if you would like. Add the rest green onions as a garnish. If you have sesame seeds, you could add these also! Tip: If the sauce isn’t thickening, turn the heat up to a simmer, and then drop it low. Also, you may need to add more cornstarch. 
  9. Eat immediately. Try to use chopsticks without making a mess. 🙂 Slurp away!

Pulled Pork and Smoked Gouda Cheddar Mac and Cheese with a Panko Parmesan Topping

pulledpork

Happy Monday!

Zach always wants macaroni and cheese. This past weekend in particular, he told me to make some. I haven’t made this Gouda Cheddar Macaroni and Cheese in over year; apparently, the last time I made it was around Valentine’s day. I say that’s too long for this decadent goodness. Who doesn’t love this childhood cult favorite? You know, the southern side dish that immediately increases waistlines upon impact?

I will tell you this–this macaroni and cheese recipe is a lot more work than its blue box counterpart, but this recipe makes plenty and is so rich. It’s worth it–otherwise, I wouldn’t post it! You’ll get at least ten heaping servings, and I made this only for Zach and me. You guessed it–I’ll be eating macaroni and cheese for the rest of the week. I am certain this is illegal. This is made with butter, heavy cream, milk, and four cheeses (cream cheese, cheddar, smoked gouda, and parmesan.) To me, the smoked gouda comes out the most flavor wise, the cream cheese helps smooth the sauce over, and the cheddar helps round out the gouda. This was made very diet conscious indeed…

This would be great to make for a potluck or for a holiday  I am sure between Lent and New Year’s that everyone will be craving something fattening!) I love the topping; the crunchy Panko and the salty Parmesan truly work wonders with the melted butter. I am not always a fan of macaroni and cheese with a topping, but this one does the trick. The flavors here are also more complex through the use of sautéed onions and (optional) bacon. If you don’t use bacon, that’s fine–just make sure you make pulled pork. There’s something about barbecued foods that make this mac and cheese really shine. If you don’t feel like making pulled pork, feel free to go to a reputable barbecue joint by you; Zach and I love Mission BBQ for a chain.  Again, if you want to just make the macaroni and cheese by itself, that’s fine too, but the hint of BBQ sauce that seeps through does pull this dish together.

Get Jiggy With It
The ‘Roni
  • 1 box of Rotini macaroni, cooked and drained (or any other pasta you want to use, like elbow)
  • 4 tablespoons of butter
  • 1 medium onion, diced
  • ½ cup flour
  • 1 cup chicken broth
  • 1½ cup milk
  • 1¼ cup heavy cream
  • 2 teaspoons kosher salt
  • 1 teaspoon ground black pepper
  • 1 teaspoon dry mustard powder
  • 2 teaspoons Worcestershire
  • ½ lb smoked gouda cheese, shredded
  • ½ lb sharp cheddar cheese, shredded
  • 8 oz cream cheese, cubed
The Topping
  • 2 cups Panko bread crumbs
  • 4 Tbsp butter, melted
  • 4-6 slices bacon crumbled *** (optional!)
  • ½ cup Parmesan cheese
  • ½ cup bacon crumbled** (optional!)

Jazzercise For Your Thighs!

  1. Prepare your macaroni according to package directions. Set aside in a large pan (9X13 or larger would work!)
  2. Do your prep work! Shred all your cheeses (except parmesan and cream cheese). Dice your onion.
  3. In a large pan, melt butter over medium high heat. Saute chopped onions until translucent and just starting to caramelize.
  4. Reduce heat to medium and sprinkle in flour. Next, whisk until mixed with butter and onion. Cook on medium heat for one minute. You need to form a roux.
  5. Combine milk, cream and broth in a large measuring cup and add all at one time to mixture in pan. Whisk over medium heat for 1-2 minutes. Mixture will thicken considerably. If it doesn’t thicken, raise the heat a bit until it does so, and then lower it once it bubbles up.
  6. Add salt, pepper, mustard and Worcestershire sauce. Then you should reduce the heat to low and continue to cook for 2-3 minutes.
  7. Add the cheeses to the pan and stir to thoroughly combine.
  8. Add cooked macaroni to cheese mixture and stir to combine; reduce heat and cook on low for 5 minutes for everything to meld together and get hot. Smooth top.
  9. Combine panko bread crumbs, melted butter, bacon and Parmesan cheese together and mix well. Sprinkle over the top of the noodle casserole and broil the dish until the top is just starting to brown. Mine broiled in less than five minutes–so make sure you keep your eye on it!
  10. Devour politely. 😉

Heart Shaped Strawberry Banana Bread

Heart Shaped Strawberry Banana Bread2

Happy Wednesday!

Banana bread is the ultimate breakfast/dessert that almost everyone loves, and yet, there are thousands among thousands of recipes. Banana bread is fantastic because it allows for people to use up those bananas that we forgotten about. The longer they’ve been sitting out, the better. If they are spotted brown or even black, use them up! The natural sweetness is truly enhanced over time. Please do not make banana bread with fresh bananas–it is truly a disservice to this delicious sweet bread.

Banana bread, in addition to being tasty, has almost no prep work. All you need is a mixing bowl, a whisk, and a spatula. Once the mixture is made, you plop it (nicely) in your pan of choice. It’s so easy it should be illegal.

The only thing I don’t like about banana bread is how long it takes to cook. I mean, who wants to wait an hour plus time for cooling? If you make banana bread in a different pan (like a muffin pan or my mini heart shaped cake pan, for example), it will cook faster and taste just as good. My banana bread took approximately 25 minutes (but be mindful–the larger the pan, the longer the cook time!) Personally, I used my heart shaped cake pan because I was one of those suckers that buys heart shaped everything. Just because it’s not Valentine’s day any more does not mean that I can’t express my love any other time…to banana bread, I mean Zach. Plus, if you use a smaller pan, you won’t have too many crumbs like you would if you were to use a loaf pan and had to cut individual slices.

Strawberries and bananas just go so well together. They’re really good buds. I was on a chocolate covered strawberry kick from Valentine’s day, so I bought two pounds of strawberries…for myself. Yes, I know, it’s absurd. Once I got the idea of chocolate covered strawberries out of my system, I realized I needed to make some better use out of the strawberries, and voila–strawberry banana bread was born.

The real peel

  • 1 large egg
  • 1/2 cup light brown sugar, packed
  • 1/3 cup canola or vegetable oil
  • 1/4 cup granulated sugar
  • 1/4 cup sour cream
  • 2 teaspoons vanilla extract
  • 1 1/4 cups all-purpose flour
  • 1/2  teaspoon baking powder
  • 1/2  teaspoon baking soda
  • 1/2 teaspoon salt
  • 1 cup mashed ripe bananas (about 2 large or 3 small bananas)
  • 1 1/2 cups fresh strawberries, quartered and tossed in 3 tablespoons all-purpose flour (helps prevent sinking to bottom of the pan)

Go bananas!

  1. Preheat oven to 350F. Spray your muffin/cake pan/loaf pan of choice.
  2. In a large bowl, mix egg, light brown sugar, canola oil, granulated sugar, sour cream and vanilla. Use a whisk!
  3. Once combined, add 1 1/4 cups flour, baking powder, baking soda, salt, and fold with spatula or stir gently with a spoon until just combine– don’t overmix. You don’t want to make your bread tough.
  4. Add the bananas and fold gently to combine. I squished the bananas with my hands, but feel free to mash them with a masher or fork beforehand.
  5. Quarter your strawberries. First cut across to take off the tops (if you’re using fresh). Next cut it lengthwise in half. Lastly, quarter each half piece. Toss strawberries in flour as you go (lightly); you will add the strawberries tossed in about 3 tablespoons flour or so and fold gently to combine.
  6. Turn batter out into the prepared pan , smoothing the top lightly with a spatula.
  7. Bake for about  25-30 minutes if you are using a mini cake pan. If you are using a traditional loaf pan, bake for 55 to 65 minutes (I baked 60 minutes) or until the top is golden and a toothpick can come out clean.
  8. Leave banana bread in its respective pan for about 15 minutes, and then transfer carefully to a cooling rack.
  9. Baking times will vary based on moisture content of bananas and strawberries, so be sure to check every ten minutes or so. Eat immediately or within the week; you may freeze the bread for 6 months, alternatively.

Spinach, Mozzarella, and Ricotta Pie


SpinachMozzarellaandRicottaPie.jpgHappy Monday!

If I could eat one thing for the rest of my life, it would be Spanakopita, the Greek spinach pie that is layered in heavily buttered phyllo. I will post that recipe…eventually. That’s almost like my tiramisu recipe: it’s top secret. I need to see some real commitment on behalf of my viewers before I unveil this Greek aristocracy.

I seriously have an obsession with spinach! I eat it often as a salad (one of my favorites is grilled chicken, goat cheese crumbles, crushed walnuts/pecans, and dried cranberries/orange cutie pieces with pear gorgonzola dressing). I eat it as a side dish (like a classic creamed spinach), and I’ll eat it in a pie–any pie–phyllo or Pillsbury. I don’t discriminate when it comes to Popeye and I’s favorite.

Speaking of Pillsbury, I took a shortcut today and used a ready made crust. I am all for making homemade everything, even when it’s not necessary. Feel free to be complicated like I usually am, but unfortunately, time is my kryptonite today!

I am not going to say that this Spinach pie replaces my aforementioned, beloved, Spanakopita, but if you’re looking for comfort and ease, this is the recipe for you.

  • 1 box of Pillsbury refrigerated pie crust (alternatively, you could use another brand, or your own homemade)–make sure you have two crusts!
  • 1 yellow onion, diced
  • 4 cloves of garlic, minced
  • 2-3 tablespoon flour
  • 1 10-ounce package frozen chopped spinach, thawed, and squeezed out dry (I also added two cups of fresh spinach because I had some leftover! Spinach always wilts, so feel free to add more if you have it!)
  • Salt and pepper (to taste–approximately 1.5 tablespoons of each)
  • 1 teaspoon of nutmeg (optional–it’s an acquired taste! Please don’t add too much!)
  • 1 15-ounce container ricotta cheese
  • 1 cup mozzarella cheese, shredded (maybe more)
  • 1/3 cup grated Parmesan cheese (I always do more–oops)
  • 2 large eggs, beaten- plus 1 extra egg for brushing on the pastry crust.

Directions:

  1. Preheat oven to 350°F.
  2. In the meantime, prep your onion (diced) and garlic (minced).
  3. In a saute pan, heat to medium high heat and add combination of olive oil and butter for onions. Stir occasionally.
  4. Add small amounts of water every two minutes (about two tablespoons) so the onions become translucent more quickly.
  5. Once the onions are almost caramelized and translucent, add the minced garlic. Stir around–don’t burn the garlic! It’s a sin.
  6. Next, add your spinach. If you’re using fresh, cover the saute pan with a lid for a minute–it’ll expedite the wilting process of the spinach. Be sure to stir the spinach, onions, and garlic so nothing burns. If it gets too hot, take it off the burner.
  7. Cool the mixture for a few minutes (or if you have no time, add everything below EXCEPT the egg–you don’t want to cook eggs.)
  8. In a bowl, mix the spinach, ricotta, mozzarella, Parmesan cheese.  Fold in the 2 beaten eggs and blend well. Set aside. Add salt, pepper, nutmeg** (nutmeg is acquired) to taste.
  9. Unfold the pie crusts. Butter your pie pan/cast iron pan. Sprinkle surface with flour and press or roll out fold lines with rolling pin.  If crust cracks, wet fingers and push edges together to seal. Place crust, floured side down, in 9-inch-diameter glass pie dish to cast iron pan.
  10. Spoon mixture into pie crust. Top with second crust, fold edges under and crimp decoratively. I seriously used a nightlight (that I bought at the dollar store) to create a design. Feel free to use a cookie cutter to make it more elegant (like an open face pie with leaves over the top; I think that would be beautiful!)
  11. Beat the extra egg with a teaspoon of water then brush (with pastry brush) the outside of the crust with the egg mixture. You do not need the whole egg mixture!
  12. Place on the middle rack in the oven and bake until brown on top, about 40-50 minutes (but check on it every 10-15 minutes.) Let stand at least 15 minutes before cutting. Devour politely. 🙂


Kahlua and Bacardi Tiramisu

KahluaandBacardiTiramisu.jpg

This is my absolute favorite dessert I make. Seriously. It’s one of those recipes that your grandmother makes on special occasions, but never will tell you quite everything that’s in it when everyone asks. Grandma does not want her notoriety to vanish for the sake of appeasing your curiosity. It’s so alluring and delicious that as grandma, you are expected to make it, and as the envious family member, you are expected not to be able to ever learn how to make it!

This is my traditional, go-to-and-impress-him dessert for Valentine’s Day, but don’t feel the need to wait for a holiday. Make this because it’s Wednesday. Make this because you love chocolate and coffee. Make this because you love yourself-you don’t need a special occasion at all. There’s something about its layered espresso goodness that makes everyone smile. Tiramisu, which literally means “pick me up,” has plenty of coffee, espresso, liqueur, and rum to keep you going!

Once she starts making Tiramisu, she will be just fine!

What’s the best thing about making Tiramisu? It’s fancy and tasty without the need for an oven. There is technically no baking involved, but you will need a good stand mixer (or regular electric mixer) because you will need to make sure you get the consistency of the mascarpone and whipped cream mixture right. Other than that, this is the perfect dessert to make for your sweetheart. You can make it in about forty minutes of prep work, leave it overnight, and wake up to a decadent treat.

Cast of Characters (Ingredients):

2 cups strong brewed coffee, room temperature
1 1/2tablespoons instant espresso powder
6 1/2 tablespoons Kahlua, divided, 2 1/2 tablespoons Bacardi Rum
6 egg yolks
2/3 cup sugar
1/4 teaspoon salt
3/4 cup cold heavy cream, divided
24 ounces mascarpone cheese
14 ounces dried ladyfingers (savoiardi) <–Typically, two boxes worth.
3 1/2 tablespoons Dutch-processed cocoa powder <–Go for unsweetened! I used Hershey’s Cocoa Unsweetened.

The most expensive and probably difficult ingredients to find if you do not live in an Italian neighborhood are mascarpone and ladyfingers. When I asked for the mascarpone cheese in my neighborhood grocery store, the attendant asked me if it was similar to parmigiana cheese. Uh, no! This is a sweet, Italian cream cheese! Although he could not help me, I eventually found what I was looking for by the chocolate covered strawberries. Maybe other people see that this, too, is the best Valentine’s Day/anniversary/romantic occasion dessert? The secret must be out…

Can you use regular Philadelphia cream cheese instead? No. If you need to order it from Amazon.com because you live in Minnesota, then so be it. It’s worth the wait. I will say that if you are feeling extra creative, you can make your own savoiardi (ladyfingers), but the ones that come from Italian bakeries are more than excellent.

Okay, as with any baking where you are whipping a cream, you need to make sure your bowls that you are mixing with are chilled. If you really are short on time, throw them in a freezer and start to prepare everything else in the meantime. Cold bowls will help get the nice, fluffy peak you need out of your mixture.

To begin, you need the following:

A stand-mixer (or electric mixer–DO NOT MIX BY HAND WITH A WHISK)

Two mixing bowls (chilled)

A 13 x 9 inch Pyrex (you can do any similar size if needed, but you may have more or less mixture needed)

A rubber spatula

Get on the Grind

1. Prepare the ladyfinger coffee mixture. Brew two cups of coffee (and if you have, you can also brew one shot of espresso) and pour into a large bowl. Measure 2 1/2 tablespoons of Kahlua, 2 1/2 tablespoons Bacardi Rum, and  1 1/2 tablespoon of Instant Espresso Powder. Stir all ingredients into the espresso powder has dissolved.

2. Crack eggs and separate whites from yolks. In bowl of standing mixer fitted with whisk attachment, beat yolks at low speed until just combined. Gradually add sugar and salt and beat at medium-high speed until pale yellow, 1 1/2 to 2 minutes, scraping down bowl with rubber spatula once or twice. Add 1/3 cup of the heavy cream to yolks and beat at medium speed until just combined, 20 to 30 seconds, and then scrape bowl. Do not over beat!

***If you have pasterurized eggs and want to eat Tiramisu traditionally, proceed. For those of you who are bothered by the concept of a raw egg, you can do this optional step to cook the eggs lightly.***

OPTIONAL: Set the bowl with yolks over a medium saucepan containing 1 inch of gently simmering water; cook, constantly scraping along bottom and sides of bowl with heatproof rubber spatula, until mixture coats back of spoon and registers 160 degrees on instant-read thermometer, 4 to 7 minutes. Remove from heat and stir vigorously to cool slightly, then set aside to cool to room temperature, about 15 minutes.

3. Whisk in remaining 4 tablespoons Kahlua until combined. Transfer bowl to standing mixer fitted with whisk attachment, add mascarpone, and beat at medium speed until no lumps remain, 30 to 45 seconds. Transfer mixture to large bowl and set aside. DO NOT OVERBEAT! IF IT IS LIQUIFIED, YOU CANNOT FIX IT.

4. In now-empty mixer bowl, beat the remaining heavy cream at medium speed until frothy, 1 to 1 1/2minutes. Increase speed to high and continue to beat until the cream holds stiff peaks, 1 to 1 1/2minutes longer. Using a rubber spatula, fold one-third of the whipped cream into mascarpone mixture to lighten, then gently fold in remaining whipped cream until no white streaks remain. Set mascarpone mixture aside.

5. Assemble your lady fingers by soaking them first, one-by-one, into a 13 x 9 Pyrex. Grab one ladyfinger, drop and roll in the coffee/rum mixture for about two seconds. Do not let it get soggy! Because it will be sit overnight, it will continue to get very moist. In fact, by the third day of leftovers, it may be almost “too wet.” It’s just an excuse to eat it all right away.

6. For each ladyfinger you soak, you must put the cookie on the bottom of the Pyrex. You are making one layer with just soaked ladyfingers first. You may have to break some in half to fit perfectly for your individual pan.

7. Apply the first half of mascarpone mixture over ladyfingers; use rubber spatula to spread mixture to sides and into corners of dish and smooth surface. Place 2 tablespoons cocoa in fine-mesh strainer and dust cocoa over mascarpone or simply sprinkle it on. You can also sprinkle a little espresso powder for more oomph!

8. Repeat dipping and arrangement process of ladyfingers by placing the newly soaked ladyfingers on top of mascarpone mixture; spread remaining mascarpone mixture over ladyfingers and dust with remaining 1 1/2 tablespoons cocoa. Cover with plastic wrap and refrigerate overnight or at least 6-8 hours. Cut into pieces and serve chilled. Leftovers can be stored, tightly wrapped, in the refrigerator for up to 3 days.

Chicken Parmigiana with Homemade Plum Tomato Basil Sauce

Happy Valentine’s Day!

chickenparm

Sorry I am late in posting; between traveling by plane and catching up with last minute grading, I have been swamped!

I believe that Valentine’s Day is perfect for trying to impress your loved one; however, sometimes simple is best. My best friend’s (soon-to-be) husband loves chicken parmesan, and really wouldn’t be craving something gourmet or fancy. He has simple taste and there is nothing wrong with that. If anything, you should be glad. Your life is much easier knowing you don’t have to break the bank or that you don’t need to be particularly talented in cooking to make what he or she wants.

I, on the other hand, requested for Zach to make lobster tail, crab legs, and lamb. Valentine’s Day, and any other special, intimate occasion (such as an anniversary) requires you to know what your significant other desires. Whether this person has a simple palette, or an extremely expensive one does not matter. To show your love, you need to make something that will be impressive, but more importantly, thoughtful. Make a dish that shows that you were thinking of what he or she would love most. Impressive is not always expensive–it’s all about effort and thought. Period.

I made this chicken parmigiana (or parmesan for you non-Italian people) last night for my best friend, her fiancé, Zach, and me, but I figured it would be nice to share this for those of you who need last minute ideas to enjoy your Valentine’s Day in. You could alternatively go out to eat today, but as a former waitress, I can assure you that there is nothing worse than going out today. Your food will take forever to come out, the service will be subpar, and you might feel rushed by the massive amounts of people waiting for you and your honey to scoot. I say stay in for this day. Besides, nothing says love like effort, right? It could be equally romantic to eat-in, if not, more so. 🙂

Stay tuned for tomorow’s post! For those of you who are looking for the ultimate Italian dessert,  I will be posting my infamous tiramisu on Monday. Unfortunately, it is not a dessert you can make last minute; you need to make it the night before, but is absolutely divine! 🙂

The Sawwwwce

  • 1 (28 ounces) can whole tomatoes (Please try to get plum tomatoes–and if available, San Marzano!)
  • 1 {28 ounces) can diced tomatoes
  • 1 (28 ounces) can crushed tomato
  • 1 stick of butter
  • 1 yellow onion finely diced
  • 4 cloves of garlic, minced (use a garlic press if you have it!)
  • 12-18 leaves of fresh basil chiffonade
  • 1 tablespoon of dried oregano
  • 1 tablespoon of garlic powder
  • 1 tablespoon of onion powder
  • 1/2 tablespoon of crushed red pepper
  • 1/3 cup of sugar (do it in small increments! This is to counteract the bitterness of the tomatoes, but too much sugar isn’t good either!)
  • 1/2 cup of dry red wine
  1. Mince up your garlic cloves, and dice up your onion finely.
  2. In a large pot, pour some olive oil and sauté your onion. Stir around frequently.
  3. Once the onion becomes aromatic, add the garlic. DO NOT BURN THE GARLIC. It’s an Italian sin. Stir baby, stir!
  4. Now that the garlic and onion have been cooking together for about two minutes, add your half a cup of dry red wine and reduce for 3-5 minutes.
  5. Next, add your crushed tomatoes. Stir. As the sauce is bubbling, hand crush the tomatoes (whole tomatoes) so they are chunky, and add the diced tomatoes. As you stir, mush up the tomatoes (diced) with the back of a wooden spoon.
  6. Throw in all the spices (reserve the butter towards the end of the sauce process.)
  7. Leave the sauce to simmer on medium for at least an hour. The longer, the better.
  8. Towards the end, add sugar (small bits at a time) until the acidity is counteracted. Right before you’re about to fry the chicken at the end, add the butter and more fresh basil, if desired. Taste your sauce–always! Leave the sauce to simmer on low while you’re making the pasta and chicken.

The Pollo

  • 2 1/2 cups of Seasoned Italian Bread Crumbs
  • 6 skinless boneless chicken breast (buy them thinly sliced or pound them thinly!)
  • 3 large eggs
  • 1¼ cups all-purpose flour
  • 3 tablespoons of garlic powder (divided in two: 1 1/2 in seasoned breadcrumbs and 1 1/2 in with whisked eggs)
  • 1 tablespoon of salt
  • 1 tablespoon of pepper
  • 6  tablespoons extra-virgin olive oil, divided
  • 6 cups of my sauce, your sauce, or the jarred sauce (eep!)
  • 3 cups coarsely-grated, well-drained fresh water-packed mozzarella, divided
  • 1 cup freshly-grated Parmesan cheese, divided
  • 1 cup freshly-grated Pecorino Romano cheese, divided** (optional, but recommended)
  1. Pre-heat your oven 350 degrees, set up your dredging stations, and get your chicken out of the refrigerator.
  2. Place chicken breast halves between sheets of plastic wrap.  Using a meat mallet, pound chicken breasts to 1/3-inch thickness.  Alternatively, go to the butcher/grocery store and purchase chicken breasts that are thinly sliced. Sprinkle both sides of chicken with salt & pepper.
  3. Place flour in a large dish and add salt and pepper.  Whisk eggs to blend in a separate large dish. Add parmesan cheese and garlic powder to the eggs and whisk. Place breadcrumbs in yet another large dish.  Add more parmesan and garlic powder to the breadcrumbs. Coat each chicken breast with flour, then eggs, then breadcrumbs. Make sure you have a dry and a wet hand!
  4. Preheat oven to 350°F.  Heat 2 tablespoons of the olive oil and 1-2 tablespoons of butter in a large cast-iron or non-stick skillet over medium-high heat. (Make sure you use butter as that will counteract the high smoking point). Working in batches, add chicken to skillet and cook until browned (about 4 minutes per side, adding more butter as needed). Transfer chicken breasts to a platter, and drain the oil by placing a paper towel underneath (change the paper towel as needed.)
  5. Spread 1 cup of tomato sauce in the bottom of a large roasting dish (I used a 9 x 13). Arrange 1 layer of browned chicken breasts over the sauce.  Spoon 2 cups of sauce over that layer, or you may do what I do which is do about 1/3 cup of sauce per chicken cutlet. Sprinkle half of the mozzarella, Parmesan & Pecorino over.  Repeat with remaining chicken, sauce, mozzarella, Parmesan & Pecorino.
  6. Bake until cheeses melt and chicken is cooked through, about 30 minutes. If you are making pasta, now would be the time to boil water and make spaghetti (once the water boils, it takes about 10 minutes.) Make sure you stir your pasta and make salty, salty water for the pasta!) Drain and add a few ladles of your sauce.
  7. Serve the spaghetti with sauce on a plate. Throw some grated cheese on top. Next, put the chicken parmigiana cutlet on top. Add more grated cheese (you get the idea). Eat immediately and enjoy!


Spinach Ricotta Lasagna Cupcakes

spinachcupcakes

Happy Monday!

Did you make my tortellini filling last week and find yourself in a similar conundrum to me? You know, you made so much that you could start an assembly line akin to the Model T? If you made the tortellinis and also had leftover Won Ton Wrappers, then this is the recipe for you! Even if you have no idea what recipe I am talking about, make these cupcakes; they are two-three bite lasagnas that are too cute and tasty to pass up.

Leftovers are often boring; instead, you should look to repurpose your ingredients. Create last night’s extra ingredients into something else you would not expect. Surprise yourself, or if you’re too nervous, troll through Pinterest and hope you find something worth while.

Speaking of inspiration, you may want to consider this for the Hallmark holiday that is embarking. As Valentine’s Day is around the corner, I really think this would be a great recipe to make for your loved one. Nothing says love like lasagna. The problem is that lasagna isn’t really an intimate dish; when you make lasagna, it’s usually to feed a family…and then some.

This recipe can be made as fast or as slowly as you want; if you have a tomato sauce on hand and a filling created, you can assemble your cupcakes in about five minutes, and you only need to bake them for about 10-12 minutes; dinner could be ready in less than a half an hour. If you’re feeling ambitious and want to make an elaborate sauce/filling, go for it. I promise you that it will still be easier than traditional lasagna. This is a great weeknight recipe for its speed, and it’s a great special occasion recipe (I think particularly for an appetizer) because of its elegant presentation (that takes no creativity at all!)

This recipe makes intimate, individual lasagna cupcakes for you and your honey bun. Now, I will not sell this recipe as equivalent to its homely counterpart. It is certainly not as hearty and hefty in its layers.  The recipe I am providing is meatless for you vegetarians out there unlike a typical lasagna that has crumbled sausage and/or ground beef. Feel free, however, to change the filling so it can resemble Garfield’s guilty pleasure. 🙂 And if you’re still dieting from the holidays, you’ll be happy to know that these bad-boys are fairly good calorically; these lasagna cupcakes fare at about 180 calories a piece. These are practically guiltless so you eat all the chocolate you want!

One day, when I am looking for that Sunday project, I will post a recipe for my family’s tried and true family-style lasagna.

Stay tuned–P.S: I will be going Italian the rest of the week: Chicken Parmigiana with Homemade Plum Tomato Basil Sauce and Kahlua and Bacardi Tiramisu (my absolute favorite recipe of Tiramisu; I almost don’t want to tell you about it 🙂 )

Spinach Ricotta Filling

  • 12 ounces Whole Milk Ricotta
  • 1-1/2 cup Freshly Grated Parmigiana (I always add more!)
  • 1/2-3/4 cup of Finely Shredded Mozzarella
  • 1 whole Egg
  • Salt and Pepper to your taste
  • Pinch of nutmeg (optional, but recommended)
  • 3-4 cups of arugula or spinach (your choice! you can do it without leafy greens)
  • 3-4 cloves of garlic** (only if you are sautéing spinach or arugula; I prefer spinach of the two for the filling)
  • 3 tablespoons of parsley and/or basil (mixed is fabulous: and fresh is best!)

Spinach Ricotta Filling Instructions…

  1. In a pan, heat up 1-2 tablespoons of Extra Virgin Olive Oil.
  2. Mince some garlic (3-4 cloves) and put in the pan that has olive oil.
  3. Throw in spinach (handfuls at a time) until it wilts. Repeat until all spinach is incorporated. Be sure to be stirring often so garlic doesn’t burn.
  4. Put spinach aside and give it about 5-10 minutes for cooling.
  5. Next, get a large mixing bowl. Take ricotta out of the container and add the cheeses. Stir.
  6. Next, throw in the sautéed spinach and mix. Next, beat one egg and throw into mixture.
  7. Mix well. Taste a small bit and add salt and pepper to taste. Throw in nutmeg, if desired.

Quick Meat Filling

  • 1 tablespoon olive oil
  • 2 Italian sausage links, casing removed
  • 1 cup marinara sauce, homemade, or store-bought
  • 1 1/2 cups ricotta cheese
  • Kosher salt and freshly ground black pepper, to taste
  • 2 tablespoons chopped fresh parsley leaves

Quick Meat Filling Instructions…

  • Heat olive oil in a large stockpot or Dutch oven over medium heat. Add Italian sausage and cook until browned, about 3-5 minutes, making sure to crumble the sausage as it cooks; drain excess fat and stir in marinara sauce.
  • Season ricotta cheese with salt, pepper, and parsley to taste.  I would also add grated parmigiana cheese (about 1/2 cup.) Nutmeg works nicely here as well (very sparingly.)

Speed Demons (use in both recipes)

  • 24 2-inch won ton wrappers (I use the round Gyoza wrappers)
  • 1 1/2 cups shredded mozzarella cheese
  • 1/2 cup of grated parmigiana cheese
  • Optional: Fresh/frozen basil and/or flat-leaf Italian parsley (approximately a teaspoon per cupcake)

All Together Now

  • Preheat oven to 375 degrees. Lightly oil a 12-cup standard muffin tin or coat with nonstick spray like Pam.
  • Create your choice of filling (see above.) Keep this aside.
  • Fit wonton wrappers into each of the 12 muffin tins, pressing carefully to make sure there is an opening in the center. Fill each cup with 1 tablespoon ricotta cheese. Top with 1 tablespoon marinara mixture and 1 tablespoon mozzarella cheese; repeat with one more layer.
  • Place into oven and bake for 10-12 minutes, or until the cheese has melted and the wonton wrappers are golden brown.
  • If available, place chiffonade basil on top while the cupcakes are cooling. This will add last minute flavor. Alternatively, if you have frozen basil, you could add a small amount to each cupcake. Additionally, sprinkle with some grated parmigiana to cover the top layer.
  • Serve immediately, garnished with some parsley, if desired (or just basil is fine–you need something green.)

Note: Do not reheat these; the won-ton wrapper gets soggy, so this must be eaten immediately and not wait the next day! If you want something sturdier, you can alternatively purchase a no-bake lasagna noodle and invert one noodle vertically around the inside of the cupcake for support of the filling.


Yellow Curry Shrimp with Garam Masala Spiced Coconut Milk

YELLOWCURRY.jpg

Happy Saturday!

Zach told me I had to make something Indian last night. I haven’t been feeling well and didn’t necessarily want to be a slave at the stove last night. How did I meet in the middle? I made my yellow curry in a hurry!

What make this so simple is that I am cooking shrimp as my protein; feel free to substitute chicken or another light fish, but shrimp complements this dish well and cooks in approximately 3 minutes.

This dish does not require anything absurdly obscure to make delicious. Yes, I used good ol’ fashioned McCormick curry powder; nothing “authentic” or specific to make you feel discouraged from making this. The optional ingredients here you may have handy, or you may not, but don’t feel the need to go out of your way. To make the sauce, you essential need curry powder, sautéed onion and garlic, honey, hot sauce, and coconut milk. These are all what you may already have or very accessible. The prep time is minimal, and the taste is fabulous. From start to finish, you could have dinner done in 20 minutes. Because my post is all about speed, I will stop writing about how wonderful it is and let you get to it! 🙂

In a Flash

  • 2 tablespoons butter or olive oil
  • 1 1/2 pound peeled and deveined shrimp (shoot for larger shrimp for maximum flavor)** (also they could be frozen)
  • 1 whole medium yellow onion diced finely
  • 4 cloves of garlic, minced
  • 1-2 tablespoons of minced/finely grated ginger root
  • 1 tablespoon or more of curry powder (to taste)
  • 1-2 teaspoons of Garam Masala (optional, but I love it!)
  • 1 can of coconut milk (make sure it’s full fat and from a can–you need the thick consistency)
  • 2 tablespoons of honey (but probably if you like sweeter curries)
  • 1/4 teaspoon Kosher salt (or more)
  • 1/4 teaspoon of freshly cracked pepper (or more)
  • 1 -2 teaspoon(s) of red pepper flakes (to taste)
  • 1 bag of frozen broccoli florets** (you can use any green vegetable you like such as peas, but I like the florets with the sauce)
  • 1 lime juiced (optional, but I like it!)
  • 1 tablespoon or so of Sriracha or any other hot sauce
  • 12 whole basil leaves chiffonade (sliced thinly into ribbons)
  • 2 cups Basmati rice (any rice is fine, but basmati screams Indian!)

The Need for Speed

  1. First, get a cold bowl of water and put frozen shrimp in the bowl. If desired, add some salt to water. This is a great way to thaw the shrimp will retaining tenderness through a light brine. In the meantime, measure out two cups of Basmati rice and cook to directions (usually a 1:2 ratio) with salt and butter (or olive oil).
  2. Meanwhile, do your prep: diced your onion finely and mince garlic and ginger.
  3. Heat up a pan with olive oil or butter on medium high heat. Cook the shrimp about 2 minutes or so until they turn pink and are no longer translucent. Make sure you don’t overcook the shrimp! Put the shrimp aside on a plate while you prepare the sauce in the same pan.
  4. Next, add the diced onions and sauté for a few minutes. Add about a tablespoon or so of water to the pan to make the onions extra soft. Repeat as necessary (but do not add too much water!) Next, add the ginger and stir around for a minute. Lastly, add the garlic (do not burn the garlic.)
  5. Once all of the aromatics are in the pan, throw curry powder on them and stir. Cook for a minute, and then open up a can of coconut milk. Stir around to incorporate everything. Turn the heat up on the stove to medium high to let the sauce bubble up. Once the sauce is heated through, put on a lower setting. While the sauce is cooling slightly, heat up frozen microwave to directions (I did about 3 minutes). Throw shrimp and broccoli into the sauce.
  6. Stir into your sauce chiffonaded basil, honey, squeeze lime, Sriracha sauce, salt, pepper, and red pepper flakes. Stir around and adjust seasonings to taste. Right before serving, add optional Garam Masala (if you add it too early, it will lose all flavor so make sure you do it at the end.)
  7. Add rice to the bottom of a bowl and pour on top the sauce and shrimp. devour immediately.

Hoisin Sesame Beef Lettuce Wraps with White Rice and Sriracha Cream

hoisin

Happy Monday!

Often times, people ask me how I manage to cook after teaching all day. Like anything else, it’s all about priorities. How do people make it to the gym in the morning? (I’ll never know.) Cooking and blogging are my hobbies and I am dedicated, but even I get tired and unmotivated…

Today is a good post for three reasons:

1.) It’s low-carb for my dieting audience; it’s practically guilt-free.

2.) Dinner in a flash: it is truly a 15 minute meal.

3.) It’s cheaper and tastier than take-out (so long as you have Asian staples in your pantry!)

For some reason, I have been craving lettuce wraps. I know it sounds ridiculous; it’s not fried or fat-laden. Maybe I am secretly feeling guilty about all my pasta creations. I seriously ate tortellini almost every day last week, and believe it or not, I am actually tired of it. Lettuce wraps are very light without feeling boring or tasteless. Now I hate to be a pain, but you really can’t just use any lettuce you have laying around. You need a sturdy lettuce in the butter lettuce family: Bibb, Butter, or Boston lettuce works just fine. If you use any other lettuce, it may not be able to withhold the filling.

Many different regions of Asia offer a slightly different take of the lettuce wrap. In particular, different proteins are incorporated. I’ve had chicken, duck, shrimp, beef, and pork in my lettuce wraps. In Korea, bulgogi-marinated chicken is trendy, and probably some brine-filled kimchi on top. They’re also not called “lettuce wraps” but rather are called Ssam or Bossam (popular varieties). Ssam looks like a typo to us Anglo-speaking Americans, eh? 🙂 There is usually some sort of combination of textures to compliment the meat, such as a purple shredded cabbage, shredded carrots, nuts, green onions, etc.

Depending which region of Asia I want to channel will determine what I put in my wrap; for example, if I want Thai, I’ll add some sweet chiles, shrimp, and peanut sauce. Today, I was craving Korean and Chinese, and the answer to my craving is this: use Hoisin sauce. Hoisin is technically Chinese, but to me, it’s perfect for a base of a Korean BBQ Style sauce.

If you don’t already have Hoisin sauce, go get it. It is great sweet and sour Asian BBQ. There are so many intense flavors that a very little bit goes a long way. I like to use Hoisin for my favorite Sticky Garlic Chicken…delicious.

The Sriracha Cream sauce is optional, but I think it really compliments the Hoisin sweet and sour profile well. These wraps are addicting as there is a balance of spice from the Sriracha and red pepper flake, sweetness from the honey and Hoisin, and coolness from the lettuce and the sour cream.

Dieters, time-crunchers, and take-out lovers rejoice for this deliciously easy 15 minute dinner. Feel free to make substitutions and additions; make this wrap yours. Enjoy!

Gym Rats

  • 1 pound ground beef (I prefer 80:20 or 85:15 fat ratio, otherwise, you’ll need a bit of oil)
  • 2 -inch piece ginger, peeled and finely grated
  • 2 scallions/green onions, chopped** (I ran out today, so this is optional)
  • 2 cloves garlic, minced
  • 2 tablespoons soy sauce
  • 1 tablespoon of sesame oil
  • 1 tablespoon of honey
  • 1 teaspoon red pepper flakes
  • 1/4 cup hoisin sauce
  • 1/4 cup of sesame seeds (toasted, if available)
  • Salt and freshly ground black pepper
  • 1 head Boston, Bibb, or Butter lettuce; leaves separated, cleaned and dried
  • 1/4 cup of Sriracha sauce (you could make more or less depending on your needs; make sure it’s equal to the amount of sour cream/mayo for heat)
  • 1/4 cup of Sour Cream (you may use mayonnaise if you want, but I never have it around. I hate it!)
  • 1 cup of white rice

The Circuit 

  1. Start the beef: In a skillet over medium-high heat, sauté beef until brown.
  2. Prep: While your beef is cooking, prep your ginger, scallions, and garlic. Also, make your sauce (if desired). Mix equal parts of Sriracha and sour cream (or mayo–you need a creamy consistency.) If you rather there be less heat, add more cream and less Sriracha. If you rather there be more spice, add more Sriracha and less sour cream.
  3. Make the rice: In a separate pot, portion out one cup of rice to two cups of water on high heat. Once the water is boiling, cover the pot and do not open for 10-15 minutes. Be sure to drop the heat to low once you put the lid on (that makes my rice perfect every time.)
  4. Back to the beef: Stir in ginger, scallions, garlic, soy sauce, red pepper flakes, and hoisin and cook for 1 minute. Remove from the heat and stir in the sesame seeds. Season with salt and pepper (taste first: Hoisin and soy sauce are salty!).
  5. All together: Once meat and rice are cooked, pull a lettuce leaf for each serving. Put rice on the leaf first, then top it with the beef. Feel free to add the green onions/scallions and other toppings of your choice (shredded purple cabbage, shredded carrots, peanuts, etc.) Wrap it tightly like a mini-burrito and enjoy! 🙂