Hi everyone! It’s been a while. Life happens, but cookies always seem to make it better.
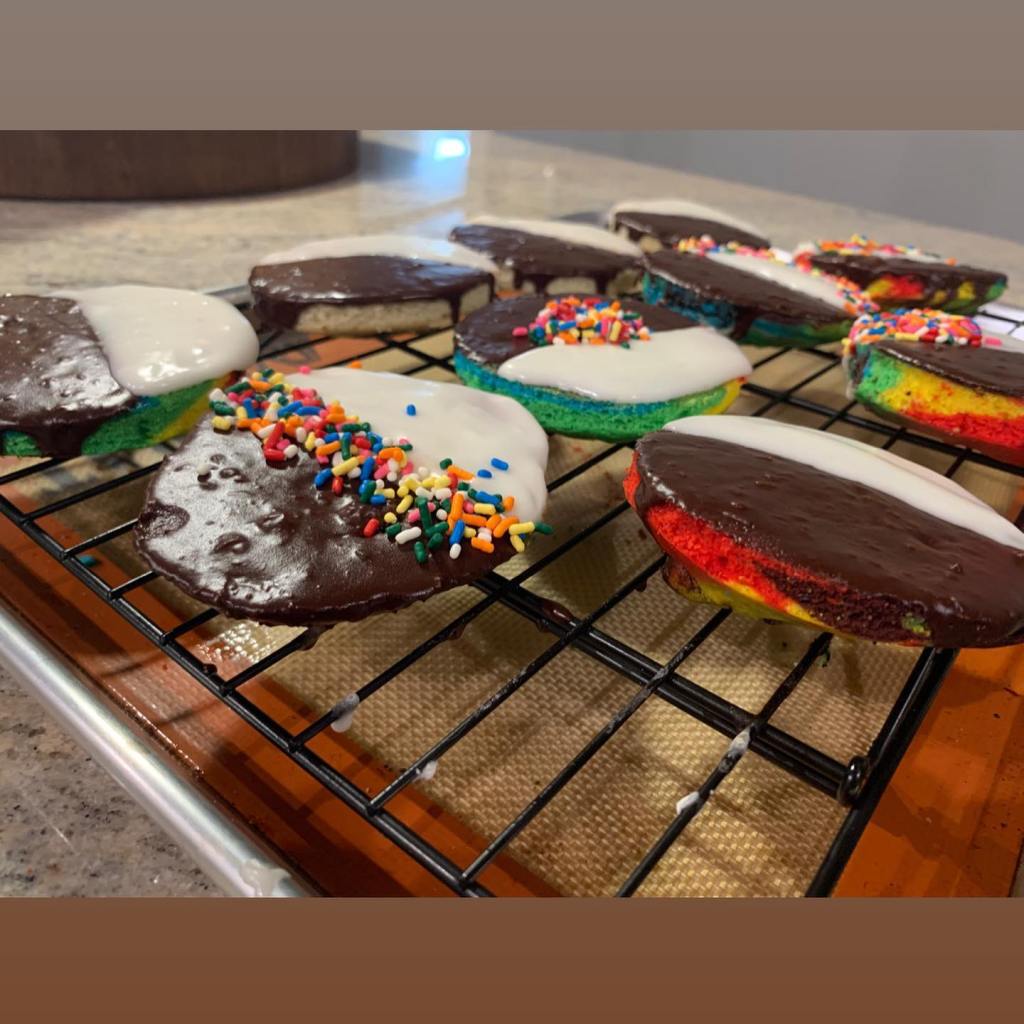
So I am taking this Monthly class with Christina Tosi from Milk Bar. It’s her Creative Baking Class, and it’s been such a fun experience. For my “Cookie Unit,” I had to create my own rendition of a cookie. It’s hard to make something new, so I decided to channel my two favorite cookies together: The Black and White Cookie and the Italian/Seven Layer/Venetian Cookie. They’re both cake-like, so I thought it would be the perfect hybrid. I literally shoved a pre-made Italian cookie inside the black and white, and I made the Black and White Batter more “almondy” like a Seven Layer Cookie, but I am proud of this unique, never before created hybrid cookie. If you don’t want to be bothered with dyeing the cookie different layers, no worries, but it makes it more fun to eat and reinforces the contrast between “Black and White” and COLOR. Enjoy this Brooklyn bakery fusion!
Rainbow Black and White Cookies
Makes about 15 cookies
INGREDIENTS
For cookies:
2 1/2 cups of cake flour (I like Softsilk best!)
1 teaspoon baking soda
1 teaspoon salt
2/3 cup well-shaken buttermilk (I used 2/3 cup of whole milk with two teaspoons of fresh lemon juice)
1 teaspoon vanilla
2/3 cup (10 2/3 tablespoons) unsalted European butter, softened (like Kerrygold)
1/2 cup granulated sugar
8 oz almond paste (I used Solo)
2 large eggs
15 Italian/Rainbow cookies already made (Cake Bites brand is excellent, and three come in a package, so for that brand, grab 5 packs!)
1 jar of apricot preserves (you will NOT use the whole jar–I had some leftover in my fridge, so it was cost-effective for me…)**optional, but recommended highly!
gel food coloring (your choice of four colors: I used red, yellow, green, and blue)
for the glazes:
4 tablespoons (½ stick) unsalted butter
5 ounces good semisweet chocolate, such as Lindt, roughly chopped (I used Ghirardelli chocolate chips)
2 cups sifted confectioners’ sugar
2 tablespoons light corn syrup
½ teaspoon pure vanilla extract (use clear vanilla extract to make sure the color stays as white as possible)
2 to 3 tablespoons heavy cream
1 teaspoon of lemon juice (optional–if you like that lemon taste in your black and white cookie frosting)
Alternative for icings (but would only recommend for the chocolate portion–the vanilla portion is too transparent)
1 1/2 cups confectioners sugar
1 tablespoon light corn syrup
2 teaspoons fresh lemon juice
1/4 teaspoon vanilla
1 to 2 tablespoons water
1/4 cup unsweetened Dutch-process cocoa powder
BAKING THE COOKIES
1.) Preheat oven to 350°F.
2.) Whisk together flour, baking soda, and salt in a bowl.
3.) Stir together buttermilk and vanilla in a cup.
4.) Next, break up almond paste with your mixer before you add other ingredients. Drop the almond paste in the bowl and let it crumble finely on medium speed.
5.) Once the almond paste is broken up nicely, beat together butter and sugar in a large bowl with an electric mixer until pale and fluffy, about 3 minutes, then add egg, beating until combined well.
6.) Mix in flour mixture and buttermilk mixture alternately in batches at low speed (scraping down side of bowl occasionally), beginning and ending with flour mixture. Mix until smooth.
8.) If you would like to dye the layers, use a small cookie scoop and portion out the batter into separate small ramekins to dye. Add a small amount of gel food color in each and stir until evenly distributed.
7) Spoon 1/4 cups of batter about 2 inches apart onto a buttered large baking sheet (I used a Silpat with a light bit of butter). Also, I used a large cookie scoop and used a spoon to gently layer each color on top.
8.) Once multiple colors are layered alongside one another, slice your pre-made rainbow cookie into three thin slices (leaving all three layers intact. With one layer, cut into half to have an even distribution of the rainbow cookie in the scooper. See photos.
9.) Bake in the middle of the oven until the tops are puffed and pale golden, and cookies spring back when touched, 15 to 17 minutes. While cookies are hot, lightly brush apricot preserves onto the baked cookie. Also, if you want a perfect shape, feel free to use a cookie cutter (sugar cookie size) to make them look perfectly circular.
10.) Transfer with a spatula to a rack and chill (to cool quickly), about 5 minutes. Do not ice cookies until they’re cooled down enough!
ICING THE COOKIES
1.) For the chocolate glaze, place the butter, and chocolate in a heatproof bowl and microwave on high for 30 seconds. Stir the mixture and continue to microwave in 30-second increments until the chocolate is almost melted, allowing the residual heat to finish melting the chocolate completely. Stir the mixture vigorously, until smooth. Turn the cookies so the flat side is up. Hold the cookie in your hand and, with a spoon, carefully pour the chocolate glaze on half of the cookie, forming a straight line down the middle. Allow the glaze to set for 30 minutes. Tip: Point the tip of the spoon in a straight line for a clean line.
2.) For the vanilla glaze, whisk together the confectioners’ sugar, corn syrup, vanilla, lemon juice (if using), and 2 tablespoons of the cream, adding drops of cream until the glaze is smooth, thick, and barely pourable. Holding the cookie in your hand, with a spoon, pour the white glaze over the unglazed half of each cookie right up to the chocolate glaze. You can smooth it out with an offset spatula if you need to. Allow to set for 30 minutes. Serve at room temperature.
If using the alternative icing:
Stir together confectioners sugar, corn syrup, lemon juice, vanilla, and 1 tablespoon water in a small bowl until smooth. Transfer half of the icing to another bowl and stir in cocoa, adding more water, 1/2 teaspoon at a time, to thin to the same consistency as white icing. Turn cookies flat sides up, then spread white icing over half of each and chocolate over other half.
