Italian Seven Layer Cookies (Regular and Half Sheet Pan Size!)

Every year around the holidays, I get requests to make Italian Seven Layer Cookies, Venetian, Rainbows–whatever you may call them. They’re a staple in an Italian-American/Tri-State Area of New York. I live in the Poconos, so these are hard to come by–we don’t have lavish bakeries, so it’s often requested of me to bake these, and I do it lovingly. They’re my favorite cookie. However, they are time-consuming to make, so this year, I experimented with making even LARGER batches of these so it’s worth the effort. Nowhere on the internet other than here shows you this, so with a little trial and error, I would like to share with you this recipe that is near and dear to my heart. I am also going to share some tips along the way. These cookies are not for beginner bakers, so beware!

The recipe and tips I’ve used over the years are from Smitten Kitchen. The recipe is the same generally everywhere you look. What I like about this recipe is that the egg whites are whipped up separately (some don’t), which I think lightens the batter and makes it easier to spread and airier in the end. I think these have the authentic almond flavor without tasting artificial, which I appreciate. I’ve included my tips as well as other tips that I learned researching these cookies, so please actually read them! They’re a fussy cookie, so do it right!

If you have a kitchen scale, I highly recommend using it for not only this but all baking. Measuring in grams gives you immense accuracy! I think it’s especially helpful to weigh all your ingredients, particularly the jam.

Below I am including the conventional recipe, which uses a 9″ by 13″ jelly roll pan. I also have my version which makes a larger, bakery-style size batch!

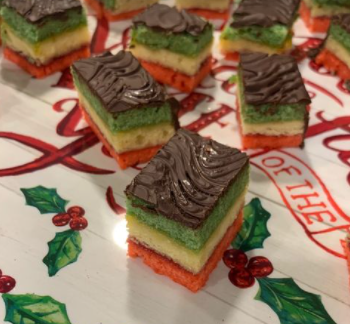
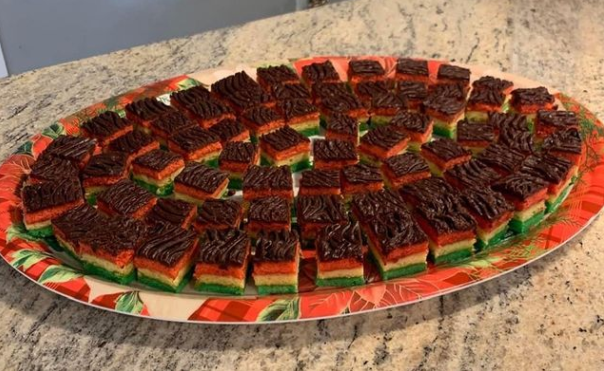
Italian Seven Layer/Rainbow Cookies

Servings: Makes about 5 dozen cookies (or more, if you cut them as small as I did); the double batch makes about 10 dozen!

Time: These take at least 11 hours from beginning to end, most of it inactive, but make sure you have a good 2 to 3-hour window. I recommend making these at nighttime so you can wake up to cookies!

Regular Recipe, designed for a conventional 9″ by 13″ jelly roll pan

4 large eggs, separated
1 cup (200 grams) granulated sugar
1 (8-ounce or 225-gram) can almond paste
1 1/4 cups (10 ounces, 285 grams, or 2 1/2 sticks) unsalted butter, softened
1 teaspoon (5 ml) almond extract
2 cups (260 grams) all-purpose flour
1/2 teaspoon kosher salt
25 drops red food coloring
25 drops green food coloring
1 (12-ounce or 340-gram) jar apricot preserves, heated and strained (or you can do 6 ounces of raspberry preserves and 6 ounces of apricot if you want the combination like I use)
7 ounces (200 grams) semi-sweet chocolate chips or pistoles

Ingredients for Half Sheet Pan Size (Be sure to use a half sheet pan, which is 18″ by 13″)

8 large eggs, separated

2 cups (400 grams) granulated sugar
2 (16-ounce or 450-gram) almond paste
2 1/2 cups (20 ounces, 570 grams, or 5 sticks) unsalted butter, softened
2 teaspoon (10 ml) almond extract
4 cups (260 grams) all-purpose flour
1 teaspoon kosher salt
50 drops red food coloring
50 drops green food coloring
1 (12-ounce or 340-gram) jar apricot preserves, heated and strained

1 (12 ounce or 340 gram) raspberry preserves, heated and strained (seedless if possible!)
14 ounces (400 grams) semi-sweet chocolate chips or pistoles

Put oven rack in middle position and preheat oven to 350°F. Butter a 13- by 9-inch baking pan (or half sheet pan, if you’re going large and in charge) and line bottom with wax paper, leaving a 2-inch overhang on 2 ends, then butter paper.

Beat whites in a mixer fitted with whisk attachment at medium-high speed until they just hold stiff peaks. Add 1/4 cup sugar a little at a time, beating at high speed until whites hold stiff, slightly glossy peaks. Transfer to another bowl. Note: If you’re making the larger batch, you’ll need double, so you’ll need to add 1/2 cup of sugar a little at a time.

Switch to the paddle attachment, then beat together almond paste and remaining 3/4 cup sugar (1 1/2 cups of sugar, if going large) until well blended, about 3 minutes. Add butter and beat until pale and fluffy, about 3 minutes. Add yolks and almond extract and beat until combined well about 2 minutes. Reduce speed to low, then add flour and salt and mix until just combined.

Fold half of egg white mixture into almond mixture to lighten, then fold in remaining whites gently but thoroughly.

Divide batter among 3 bowls. Stir red food coloring into one and green food coloring into another, leaving the third batch plain. Set white batter aside. Chill green batter, covered. Pour red batter into prepared pan and spread evenly with offset spatula (layer will be about 1/4 inch thick). Note: I don’t chill my batter–I don’t find it makes a difference, but I am including it here anyway.

Pro Tip About Spreading: Spreading the batter evenly is very difficult with these cookies because it doesn’t pour smoothly like a cake. It’s very thick from the almond paste. So first off, use an offset spatula to spread. Take long, deliberate strokes. Crouch down from time to time to see if it’s level. Also, I find running my offset spatula under hot water (and then wiping it–no water on the cake) helps make spreading smoother if it’s being stubborn.

Bake red layer 8 to 10 minutes, until just set. (It is important to undercook. They’ll look like they’re not done, but a tester does come out clean.) If you are using the larger pan, the time that works best for me is 13 minutes!

Using paper overhang, transfer layer to a rack to cool, about 15 minutes. Clean pan, then line with parchment or wax paper and butter paper in the same manner as above. Bake white layer in prepared pan until just set. As the white layer bakes, bring green batter to room temperature. Transfer white layer to a rack. Prepare pan as above, then bake green layer in the same manner as before. Transfer to a rack to cool.

Another note before you read about the jams.–you can use just apricot or raspberry preserves. I personally like the combination, and I personally do less raspberry and more apricot as I find the raspberry can overpower the cake. I generally put a raspberry on the red layer and apricot on the white layer.

A helpful tip from Smitten Kitchen about the jams/preserves:

Be careful dividing your jam: I mindlessly divided the jam wrong/unevenly and ended up with too much between one layer and too little between another. Too little was no biggie, but where there was too much it oozed out and was particularly difficult to keep stacked when sawing through with a serrated knife. So, if you’re using a scale to make two six-ounce divisions of jam, remember that you’ve probably strained out a good ounce or so of jam solids, or in other words DUH. Your divided amounts will be less than six ounces each. From Lei Mangia: Less jam is the better way to go, if you ask me.

When all layers are cool, invert green onto a parchment or wax-paper-lined large baking sheet. Discard paper from the layer and spread with half of the preserves. Invert white on top of the green layer, discarding paper. Spread with remaining preserves. Invert the red layer on top of the white layer and discard wax or parchment paper.

Cover the cake with plastic wrap and top with one of the empty pans; place several heavy cans on top to weigh down the layers. Chill for at least 8 hours, which is why I suggest making these at night so you can wake up to cookies!

Remove weight and plastic wrap. Bring layers to room temperature. Melt chocolate in a double boiler or a metal bowl set over a saucepan of barely simmering water, stirring until smooth. Remove from heat. Keep chocolate over water. (Alternately, you can do what I did: melt the chocolate 3.5 ounces at a time just to make sure it doesn’t seize up between steps, though that shouldn’t be a problem if you only let it set for 15.)

Trim edges of assembled layers with a long serrated knife. Eat those as your snack. Quickly spread half of the chocolate in a thin layer on top of the cake.  Dip an offset spatula in the hot water and smooth the top and sides. Let set slightly. Scrape wavy lines into the chocolate with a fork; let cool a few more minutes until the chocolate is mostly set but still slightly tacky. Chill, uncovered until chocolate is firm, about 15 minutes. Cover with another sheet of wax paper and place another baking sheet on top, then invert cake onto sheet and remove the paper. Note: I personally don’t do chocolate on the bottom. I spread it on the top and then put chocolate on the sides, so I just put it in the fridge to set for 30 minutes.

Cut lengthwise into 4-6 strips (I cut them into more, because I wanted them 1 to 1 1/2 inches wide, as I remember them). Cut strips crosswise into 3/4-inch-wide cookies. Pro Tip: For clean edges, dip the knife in warm water and wipe it with a cloth between cuts, preferably with a long serrated knife.

Do ahead: Cookies keep, layered between sheets of wax paper or parchment, in an airtight container at room temperature for 2 weeks. They’ll keep even longer in the freezer.

Pecan Pie Baklava

Pecan Pie Baklava. This is my own personal creation for the “pie” unit for Christina Tosi’s Creative Baking Class. Tosi is brilliant in that her pies are not traditional. Her classic “Milk Bar Pie” has a crust of a crushed up, homemade oatmeal cookie that’s delicious and addictive. For her class, we need to create our own version of pie–not the traditional pie crust and filling. Rethinking what a “crust” and even what a “pie” is is inspiring in itself, so I decided for my second project to make Pecan Pie Filling as a layer of a whole baklava pie–the crust is the baklava and it’s the filling (between the layers, I retain the nature of baklava by still putting nuts in between each layer). When I usually make baklava, it’s pistachios, but because I am channeling the South, I decided to use pecans all the way through. Sorry, Dad!

As a former North Carolina resident, I learned to love Pecan Pie (as well as the classic Banana Cream Pie, but that will come, I think, for the cake upcoming). While living down there, I also liked to channel my Lebanese background and would make all sorts of appetizers and desserts with Phyllo dough. So while this pie isn’t Tosi-esque because I didn’t crumble a cookie, use cereal, or add something cloyingly sweet but unusual, it’s definitely me. When I think of pie, I think of a flakey, buttery crust, and I think the best form of a pie is either with Phyllo or Puff Pastry, hence my choice of crust.

I used a 6-inch springform pan and layered in Phyllo dough and buttered alternate sheets. I tossed chopped pecans, sugar, cinnamon, and fresh orange zest in between 3 layers. When I was halfway done, I put traditional pecan pie filling in the middle so it’s a true hybrid. The last few layers of Phyllo are circles to make a smooth top, and cutting this diamond pattern was very tedious. If it wasn’t for my best friend, I don’t think I could have done it. We worked on the design as a team!

The key to good baklava is to make sure the syrup is cooled and then it is slowly spooned on top of the hot baklava so that it seeps deeply and evenly.

Be warned: This is a bit tedious between the layering and the cutting, but it’s worth it if you have the patience. Enjoy!

Here’s my recipe!

INGREDIENTS FOR PECAN PIE FILLING
1 egg
7 tablespoons of light corn syrup
7 tablespoons of light brown sugar
2 tablespoons of butter melted (salted)
1 cup of pecans
1/2 teaspoon of cinnamon
a little orange zest

INGREDIENTS FOR BAKLAVA CRUST LAYERS
1/3 cup honey
1 (3″) cinnamon stick
3/4 cups sugar, divided
1.5 tablespoons bourbon
2 cups raw pecans
1/4 teaspoon ground cinnamon
1 teaspoon finely grated orange zest, plus 1 teaspoon orange curls
20 (17×12″) sheets fresh phyllo pastry or frozen, thawed (you will likely not use the whole box, but it’s better to have more than less)
1 cup (2 stick) unsalted butter, melted (European, like Kerrygold, is preferred)

Special Equipment
A 6-inch springform pan

1.) First, make your pecan pie filling. In a bowl, mix together egg, corn syrup, brown sugar, butter, pecans, cinnamon, and orange zest. Set aside.

2.) Preheat oven to 350°F.

3.) Next, make your baklava syrup. Bring honey, cinnamon sticks, 1/2 cup of sugar, and 1/2 cup water to a boil in a medium heavy saucepan over medium-high heat, stirring until sugar dissolves. Reduce heat to medium and continue to boil until syrup is reduced. Transfer to a medium bowl, stir in bourbon and let cool.

4.) Meanwhile, spread pecans on a rimmed baking sheet and toast until golden brown, 13–15 minutes. Let cool. Transfer nuts to a food processor. Add ground cinnamon, 1 tsp. orange zest, and remaining sugar (about 3 tablespoons) and pulse until coarsely chopped.

5.) Place a stack of phyllo sheets on a work surface. Keep any phyllo you’re not currently working with covered under a layer of plastic wrap topped with a slightly damp kitchen towel. Using a base of the springform pan as a guide, and starting at edge of phyllo, carefully cut out 20 (9″) circles, leaving as much phyllo remaining as possible. Cover phyllo circles. Using base of pan as a guide, cut remaining phyllo into 20 (4 1/2″) half-circles.

6.) Insert base into pan and secure the latch. Brush base with butter. Place 1 phyllo circle in pan and brush generously with butter. To save dough, cut dough into rectangular strips, cut into two square, and then cut each square into a diagonal triangle and to layer your pan. Each time you double up on a layer, brush with butter, and try to use your pastry brush to smooth and fit the sheets to be rounded off into the pan.

7.) Once you are a quarter of the way up, layer with seasoned pecans and shake the pan back and forth to make sure there’s an even distribution. Continue to layer and butter as you see fit.

8.) Repeat the previous steps for when you’re halfway through. Once halfway, add pecan pie filling. Put extra layers of phyllo to support the weight of the filling.

9.) I used triangles layered on top of one another and then the “springform traced circles for the top as that layer is very delicate and needs to be cut through. Be sure to save your circles for the top and fill your springform pan about 75% of the way.

10.) Repeat the previous steps and fill the other layers with the seasoned nut filling as you did before. You should have nuts on the first quarter, third quarter, and almost at the very top.

11.) OPTIONAL (if you want the pattern I did): Using a sharp knife, score the top layer (do not cut through to the bottom of the pan) to divide into 4 quadrants. Working with 1 quadrant at a time, make 1 straight cut to divide the quadrant into 2 even wedges. Make 4 more straight cuts (2 each on either side of, and parallel to the quadrant division line), spacing evenly apart. Now working within each wedge, make 2 evenly-spaced cuts parallel to the outside edge of the quadrant, connecting at points with the previous cuts to form a diamond pattern. Repeat with the remaining quadrants to create a starburst pattern.

ALTERNATIVE CUTTING METHOD: In the past, I’ve made diamond cuts by carefully slice the baklava into 4 long even strips lengthwise, then slice diagonally to create diamond-shaped baklava.

12.) Transfer pan to a rimmed baking sheet and bake until phyllo is golden brown, about 45 minutes.
Spoon cooled syrup over hot baklava in 4 additions. Place orange curls on top. Let cool completely in pan. Remove springform ring and cut baklava along the scored lines.

Rainbow Black and White Cookies🌈

Hi everyone! It’s been a while. Life happens, but cookies always seem to make it better.

So I am taking this Monthly class with Christina Tosi from Milk Bar. It’s her Creative Baking Class, and it’s been such a fun experience. For my “Cookie Unit,” I had to create my own rendition of a cookie. It’s hard to make something new, so I decided to channel my two favorite cookies together: The Black and White Cookie and the Italian/Seven Layer/Venetian Cookie. They’re both cake-like, so I thought it would be the perfect hybrid. I literally shoved a pre-made Italian cookie inside the black and white, and I made the Black and White Batter more “almondy” like a Seven Layer Cookie, but I am proud of this unique, never before created hybrid cookie. If you don’t want to be bothered with dyeing the cookie different layers, no worries, but it makes it more fun to eat and reinforces the contrast between “Black and White” and COLOR. Enjoy this Brooklyn bakery fusion!

Rainbow Black and White Cookies

Makes about 15 cookies

INGREDIENTS

For cookies:
2 1/2 cups of cake flour (I like Softsilk best!)
1 teaspoon baking soda
1 teaspoon salt
2/3 cup well-shaken buttermilk (I used 2/3 cup of whole milk with two teaspoons of fresh lemon juice)
1 teaspoon vanilla
2/3 cup (10 2/3 tablespoons) unsalted European butter, softened (like Kerrygold)
1/2 cup granulated sugar
8 oz almond paste (I used Solo)
2 large eggs
15 Italian/Rainbow cookies already made (Cake Bites brand is excellent, and three come in a package, so for that brand, grab 5 packs!)
1 jar of apricot preserves (you will NOT use the whole jar–I had some leftover in my fridge, so it was cost-effective for me…)**optional, but recommended highly!
gel food coloring (your choice of four colors: I used red, yellow, green, and blue)

for the glazes:

4 tablespoons (½ stick) unsalted butter
5 ounces good semisweet chocolate, such as Lindt, roughly chopped (I used Ghirardelli chocolate chips)
2 cups sifted confectioners’ sugar
2 tablespoons light corn syrup
½ teaspoon pure vanilla extract (use clear vanilla extract to make sure the color stays as white as possible)
2 to 3 tablespoons heavy cream
1 teaspoon of lemon juice (optional–if you like that lemon taste in your black and white cookie frosting)

Alternative for icings (but would only recommend for the chocolate portion–the vanilla portion is too transparent)

1 1/2 cups confectioners sugar
1 tablespoon light corn syrup
2 teaspoons fresh lemon juice
1/4 teaspoon vanilla
1 to 2 tablespoons water
1/4 cup unsweetened Dutch-process cocoa powder

BAKING THE COOKIES

1.) Preheat oven to 350°F.

2.) Whisk together flour, baking soda, and salt in a bowl.

3.) Stir together buttermilk and vanilla in a cup.

4.) Next, break up almond paste with your mixer before you add other ingredients. Drop the almond paste in the bowl and let it crumble finely on medium speed.

5.) Once the almond paste is broken up nicely, beat together butter and sugar in a large bowl with an electric mixer until pale and fluffy, about 3 minutes, then add egg, beating until combined well.

6.) Mix in flour mixture and buttermilk mixture alternately in batches at low speed (scraping down side of bowl occasionally), beginning and ending with flour mixture. Mix until smooth.

8.) If you would like to dye the layers, use a small cookie scoop and portion out the batter into separate small ramekins to dye. Add a small amount of gel food color in each and stir until evenly distributed.

7) Spoon 1/4 cups of batter about 2 inches apart onto a buttered large baking sheet (I used a Silpat with a light bit of butter). Also, I used a large cookie scoop and used a spoon to gently layer each color on top.

8.) Once multiple colors are layered alongside one another, slice your pre-made rainbow cookie into three thin slices (leaving all three layers intact. With one layer, cut into half to have an even distribution of the rainbow cookie in the scooper. See photos.

9.) Bake in the middle of the oven until the tops are puffed and pale golden, and cookies spring back when touched, 15 to 17 minutes. While cookies are hot, lightly brush apricot preserves onto the baked cookie. Also, if you want a perfect shape, feel free to use a cookie cutter (sugar cookie size) to make them look perfectly circular.

10.) Transfer with a spatula to a rack and chill (to cool quickly), about 5 minutes. Do not ice cookies until they’re cooled down enough!

ICING THE COOKIES

1.) For the chocolate glaze, place the butter, and chocolate in a heatproof bowl and microwave on high for 30 seconds. Stir the mixture and continue to microwave in 30-second increments until the chocolate is almost melted, allowing the residual heat to finish melting the chocolate completely. Stir the mixture vigorously, until smooth. Turn the cookies so the flat side is up. Hold the cookie in your hand and, with a spoon, carefully pour the chocolate glaze on half of the cookie, forming a straight line down the middle. Allow the glaze to set for 30 minutes. Tip: Point the tip of the spoon in a straight line for a clean line.

2.) For the vanilla glaze, whisk together the confectioners’ sugar, corn syrup, vanilla, lemon juice (if using), and 2 tablespoons of the cream, adding drops of cream until the glaze is smooth, thick, and barely pourable. Holding the cookie in your hand, with a spoon, pour the white glaze over the unglazed half of each cookie right up to the chocolate glaze. You can smooth it out with an offset spatula if you need to. Allow to set for 30 minutes. Serve at room temperature.

If using the alternative icing:

Stir together confectioners sugar, corn syrup, lemon juice, vanilla, and 1 tablespoon water in a small bowl until smooth. Transfer half of the icing to another bowl and stir in cocoa, adding more water, 1/2 teaspoon at a time, to thin to the same consistency as white icing. Turn cookies flat sides up, then spread white icing over half of each and chocolate over other half.

Tiramisu & He’ll Love You!

tiramisu

I never thought that I only made Tiramisu for Valentine’s Day, but I just recently thought about all the times I ever made it, and I suddenly realized–yes, this is my traditional, go-to-and-impress-him dessert. If it’s not Valentine’s Day, it somehow has been responsible for making people fall in love. True story: Two friends of mine married their spouses shortly after making this dessert. I don’t believe it’s a coincidence. There’s something about its layered espresso goodness that makes everyone smile and swoon. Tiramisu, which literally means “pick me up,” has plenty of coffee, espresso, liqueur, and rum to keep you going!

What’s the best thing about making Tiramisu? It’s fancy and tasty without the need for an oven. I love making this dessert in the summertime for that reason. There is technically no baking involved, but you will need a good stand mixer (or regular electric mixer) because you will need to make sure you get the consistency of the mascarpone and whipped cream mixture right. Other than that, this is the perfect dessert to make for your sweetheart. You can make it in about forty minutes of prep work, leave it overnight, and wake up to a decadent treat.

The most expensive and probably difficult ingredients to find if you do not live in an Italian neighborhood are mascarpone and ladyfingers. When I asked for the mascarpone cheese in my neighborhood grocery store, the attendant asked me if it was similar to parmigiana cheese. Uh, no! This is a sweet, Italian cream cheese! Although he could not help me, I eventually found what I was looking for by the chocolate covered strawberries. Maybe other people see that this, too, is the best Valentine’s Day treat? The secret must be out…

Can you use regular Philadelphia cream cheese instead? No. If you need to order it from Amazon.com because you live in Minnesota, then so be it. It’s worth the wait. I will say that if you are feeling extra creative, you can make your own savoiardi (ladyfingers), but the ones that come from Italian bakeries are more than excellent.

Okay, as with any baking where you are whipping a cream, you need to make sure your bowls that you are mixing with are chilled. If you really are short on time, throw them in a freezer and start to prepare everything else in the meantime. Cold bowls will help get the nice, fluffy peak you need out of your mixture.

To begin, you need the following:

A stand-mixer (or electric mixer–DO NOT MIX BY HAND WITH A WHISK)

Two mixing bowls (chilled)

A 13 x 9 inch pan (you can do any similar size if needed, but you may have more or less mixture needed)

A rubber spatula

Cast of Characters (Ingredients):

2 cups strong brewed coffee, room temperature
1½ tablespoons instant espresso powder
6½ tablespoons Kahlua, divided, 2½ tablespoons Bacardi Rum (you can also substitute vanilla and coffee extract if you need it without alcohol, but I highly recommend using the coffee liqueur and rum!)
6 egg yolks
⅔ cup sugar
¼ teaspoon salt
¾ cup cold heavy cream, divided
24 ounces mascarpone cheese
14 ounces dried ladyfingers (savoiardi) <–Typically, two boxes worth.
3½ tablespoons Dutch-processed cocoa powder <–Go for unsweetened! I used Hershey’s Cocoa Unsweetened. If available, go for the dark cocoa powder–that’s my favorite!

Directions

1. Prepare the ladyfinger coffee mixture. Brew two cups of strong coffee (and if you have, you can also brew one shot of espresso) and pour into a large bowl. Measure 2 1/2 tablespoons of Kahlua, 2½ tablespoons Bacardi Rum, and  1½ tablespoons of Instant Espresso Powder. Stir all ingredients into the espresso powder has dissolved. If you don’t have Instant Espresso Powder, feel free to substitute Instant Coffee Powder, but DO NOT use actual coffee or espresso grinds as these will not dissolve.

2. Crack eggs and separate whites from yolks. In a stand mixer fitted with whisk attachment, beat yolks at low speed until just combined. Gradually add sugar and salt and beat at medium-high speed until pale yellow, 1½ to 2 minutes, scraping down bowl with rubber spatula once or twice. Add ⅓ cup of the heavy cream to yolks and beat at medium speed until just combined, 20 to 30 seconds, and then scrape bowl. Do not over beat!

***If you have pasteurized eggs and want to eat Tiramisu traditionally, proceed. For those of you who are bothered by the concept of a raw egg, you can do this optional step to cook the eggs lightly.***

OPTIONAL: Set the bowl with yolks over a medium saucepan containing 1 inch of gently simmering water; cook, constantly scraping along bottom and sides of bowl with heatproof rubber spatula, until mixture coats back of spoon and registers 160 degrees on instant-read thermometer, 4 to 7 minutes. Remove from heat and stir vigorously to cool slightly, then set aside to cool to room temperature, about 15 minutes.

3. Whisk in remaining 4 tablespoons Kahlua until combined. Transfer bowl to standing mixer fitted with whisk attachment, add mascarpone, and beat at medium speed until no lumps remain, 30 to 45 seconds. Transfer mixture to large bowl and set aside. DO NOT OVERBEAT! IF IT IS LIQUEFIED, YOU CANNOT FIX IT.

4. In a now-empty mixer bowl, beat the remaining heavy cream (about 6.5-7 tablespoons) at medium speed until frothy, 1 to 1½ minutes. Increase speed to high and continue to beat until the cream holds stiff peaks, 1 to 1½ minutes longer. Using a rubber spatula, fold one-third of the whipped cream into mascarpone mixture to lighten, then gently fold in remaining whipped cream until no white streaks remain. Set mascarpone mixture aside.

5. Assemble your lady fingers by soaking them first, one-by-one, into a 13 x 9 pan. Grab one ladyfinger, drop and roll in the coffee/rum mixture for about two seconds. Do not let it get soggy! Because it will be sit overnight, it will continue to get very moist. In fact, by the third day of leftovers, it may be almost “too wet.” It’s just an excuse to eat it all right away.

6. For each ladyfinger you soak, you must put the cookie on the bottom of the Pyrex. You are making one layer with just soaked ladyfingers first. You may have to break some in half to fit perfectly for your individual pan.

7. Apply the first half of mascarpone mixture over ladyfingers; use rubber spatula to spread mixture to sides and into corners of dish and smooth surface. Place 2 tablespoons cocoa in fine-mesh strainer and dust cocoa over mascarpone or simply sprinkle it on. You can also sprinkle a little espresso powder for more oomph!

8. Repeat dipping and arrangement process of ladyfingers by placing the newly soaked ladyfingers on top of mascarpone mixture; spread remaining mascarpone mixture over ladyfingers and dust with remaining 1½ tablespoons cocoa. If you have any leftover crumbs from the ladyfingers, feel free to sprinkle these on top as well. Cover with plastic wrap and refrigerate overnight or at least 6-8 hours. Cut into pieces and serve chilled. Leftovers can be stored, tightly wrapped, in the refrigerator for up to 3 days.

Pan-Seared Salmon with Lemon Dill Cream Sauce

salmon

Happy Saturday, everyone!

This is one of those recipes that is elegant enough for entertaining, but easy enough for a weeknight. It’s my famous Pan Seared Salmon with Lemon Dill Cream Sauce. My mother, who is an excellent cook, begs me to make this for her when I see her. One of my friends said something I found rather humorous. She said, “you know your recipe is good when your mom asks YOU for the recipe.” It’s true–most of the time, it’s the other way around. We always want our family members to pass down their secrets for which we cannot trade.

This salmon is so good that I’ve made it twice in a row this week! Many of my Instagram followers have been asking for the recipe. I did a demonstration on my story, so now I figured it would be best to write it down so you can enjoy it as often as I do!

P.S: If you’re following the low-carb or Keto diet, this will fit in well with your macros.

Ingredients (two servings)

  • 2 Norwegian, skin-on salmon filets (or any salmon you can find), ideally 10 ounces (5 ounces per serving–you can make the recipe if they’re smaller, but this is the best amount!)
  • 1 bunch of fresh dill (2-3 tablespoons should be minced!)
  • 1 lemon (half for slicing, half for juicing)
  • Heavy Cream (1/4 cup to 1/2 cup)
  • Butter (1 tablespoon)
  • Extra Virgin Olive Oil (1 teaspoon)
  • Salt and Pepper, to taste

Cooking Instructions

  1. Paper towel dry excess moisture from salmon on both sides. Blot generously until very dry!
  2. Season skin side up with freshly cracked salt and pepper.
  3. Preheat a saute pan on medium-low heat for 2-3 minutes.
  4. Next, drizzle a little olive oil (maybe a teaspoon), and grab a paper towel to evenly coat the pan for a good sear.
  5. Once the oil is heated, place salmon skin side down and sear 3-5 minutes.
  6. While the skin is cooking, put salt and pepper on the flesh side. Use your fingers/fork to gently press down to create contact with the pan. This will ensure you have a crispy sear on both sides!
  7. Once the time is up, look carefully underneath to look at the skin to ensure it’s golden brown and crispy!
  8. Once the skin is cooked as described above, flip over and cook the flesh side for 3-5 minutes. Like before, use your fingers or fork to press the salmon down to create a good sear! You know you’re ready to flip when you have a golden brown sear fully across.
  9. Remove salmon from pan and place on cutting board.
  10. Let the pan cool down. Once cooled, wipe out the excess oil with a paper towel. You will be using the same pan to make your sauce.
  11. In the same pan, melt a tablespoon of butter and whisk about 1/4 cup of cream (add up to 1/2 cup, depending on your preference).
  12. Increase the heat slightly and whisk constantly to thicken.
  13. Once the sauce thickens, lower the heat to low and add the juice of half a lemon, 1-2 tablespoons of freshly minced dill, and salt and pepper to taste. Continue to whisk sauce occasionally.
  14. Put salmon back into the pan with sauce and squeeze more lemon on top of fish (use the other half of the lemon that was cut from before).
  15. Garnish with lemon slices and fresh dill on top and enjoy!

Butter Chicken with Basmati Rice and “Non” Naan (Garlic/Za’tar)


butter1

Hello everyone!

You should watch my Youtube Video Tutorial to see all the steps in action!

I am obsessed with Butter Chicken–it’s one of my Indian go-to orders (but I also love, in no particular order, Navratan Korma, Chicken Korma, and Saag Paneer). This recipe I have today was an exclusive one from Cook’s Illustrated. I made a few tweaks to their version of Indian Butter Chicken (Murgh Makhani), but they deserve all the credit and praise for this one. I have tried many home cook renditions of this, and it just never has that authentic taste. This one absolutely does!

The spices absolutely matter–do not substitute them. Also, don’t use standard “yellow” curry powder–for this recipe, with a few simple spices you can find, you can make your own, and it’ll be that much better. In fact, I hand ground my spices (I had coriander and cumin seeds) with my mortar and pestle, and I think freshly grinding the spices took it to the next level, for sure.

And although I am team “make your own everything,” Garam Masala is a difficult spice blend to master. This, I would suggest, buying already prepared.

Garam Masala gives the Butter Chicken its sweetness (Garam Masala tends to be some sort of variation of cinnamon, cardamom, etc.). It’s absolutely divine.

In addition, this recipe is smart because it uses yogurt to tenderize the chicken, and there’s use of tomato paste (instead of sauce) for better concentration of tomato flavor. In addition, I made this recipe so that both low and high carb eaters can enjoy (yes, even the “non” naan).

Most of my readers know how much I love my cooking gadgets, and today, I would like to feature my Blackstone Griddle. For those of you who don’t know what that is, essentially it’s a flat top grill, and it is one of the most versatile tools I have. The reason I use my Blackstone for this recipe is because a.) my fire alarm goes off easily, so when I use my broiler, I will have an incessant headache, b.) the Blackstone has so much “real estate”–32 inches of room to evenly sear all my chicken and not smoke my house, and c.) I can multi-task–I was able to make my sauce by putting my cast iron pot right on the griddle top and still have room to sear the chicken.

If you don’t have a Blackstone griddle, no fret. Just broil as specified below (the Cook’s Illustrated way). Any sort of grill would work here! Cooking outdoors is just something I love so much.

Ingredients for Butter Chicken (4 Servings)

  • 4 tablespoons unsalted butter, cut into 2 pieces and chilled, divided
  • 1 onion, chopped finely
  • 6 garlic cloves, minced
  • 4 teaspoons grated fresh ginger
  • 4 teaspoons minced serrano chile
  • 3 teaspoons garam masala
  • 1 teaspoon ground coriander
  • 1/2 teaspoon of ground cumin
  • 1/2 teaspoon of pepper
  • 1 1/2 cups of water
  • 1⁄2 cup tomato paste
  • 3 teaspoons sugar (or if you’re low carb, use a sugar substitute of your choice like Lakanto/Swerve–but use the powdered kind so it blends well)
  • 2 teaspoon table salt, divided
  • 1 cup heavy cream
  • 2 pounds boneless, skinless chicken thighs, trimmed
  • 1⁄2 cup plain Greek yogurt (if you’re low carb, I use the plain “Two Good” brand as it has the least amount of carbs)
  • 3 tablespoons chopped fresh cilantro, divided

Cooking Steps for Butter Chicken Sauce

  1. Melt 2 tablespoons of butter in medium saucepan over medium heat. Add onion, garlic, ginger, and serrano and cook, stirring frequently, until mixture is softened and onion begins to brown, 6 to 8 minutes.
  2. Add garam masala, coriander, cumin, and pepper and cook, stirring frequently, until very fragrant, about 3 minutes. Add water and tomato paste and whisk until no lumps of tomato paste remain. Add sugar and 1 teaspoon salt and bring to boil.
  3. Remove from heat, stir in cream. Using immersion blender or blender, process until smooth, 30 to 60 seconds. Return sauce to simmer over medium heat and whisk in remaining 2 tablespoons of butter. Remove saucepan from heat and cover to keep warm. (Sauce can be refrigerated for up to 4 days; gently reheat sauce before adding hot chicken.)

Lei Mangia’s Method for Preparing Chicken (using a grill, preferably Blackstone Griddle)

  1. Dice chicken into small, bite sized pieces. Combine chicken, yogurt, and remaining 1 teaspoon salt in bowl and toss well to coat. If you have time, leave chicken marinating for at least an hour in the refrigerator.
  2. Preheat your grill on high (you’re looking for 450 or higher!) for a few minutes.
  3. Throw chicken with marinade on hot griddle/grill top and cook until caramelized and cooked thoroughly. Use tongs/Heavy Duty Griddle Spatula to keep chicken moving every minute or so.
  4. Put chicken aside to put into sauce later.
  5. Tip: The yogurt from the chicken will be left on the griddle. Scrape off your grill while it’s hot to make cleaning the easiest!

Cook’s Illustrated Method for Preparing Chicken (using an oven broiler)

  1. Adjust oven rack 6 inches from broiler element and heat broiler. Combine chicken, yogurt, and remaining 1⁄2 teaspoon salt in bowl and toss well to coat. Using tongs, transfer chicken to wire rack set in aluminum foil— lined rimmed baking sheet. Broil until chicken is evenly charred on both sides and registers 175 degrees, 16 to 20 minutes, flipping chicken halfway through broiling.

Finishing Steps for Butter Chicken

  1. Let chicken rest for 5 minutes. While chicken rests, warm sauce over medium-low heat. Cut chicken into 3⁄4-inch chunks and stir into sauce, if you did Cook’s Illustrated method. If you did Lei Mangia’s, the chicken is cut into chunks already.
  2. Stir in 2 tablespoons of cilantro and season with salt to taste.
  3. Transfer to serving dish, sprinkle with remaining 3 teaspoons cilantro, and serve.

Bonus Side Dish Recipes:

Basmati Rice

Ingredients

  • 1 cup Indian basmati rice (or use jasmine rice, if difficult to find–good substitute)
  • 1-3/4 cups water
  • 1-1/2 tablespoons unsalted butter
  • 1/2 teaspoon salt

Cooking Steps for Basmati Rice

**Please don’t skip rinsing the rice–it makes a difference!**

  1. Place the rice in medium bowl and add enough water to cover by 2 inches. Using your hands, gently swish the grains to release any excess starch. Carefully pour off the water, leaving the rice in the bowl. Repeat four times, or until the water runs almost clear. Using a fine mesh strainer, drain the rice.
  2. In a medium pot, bring the water, butter, salt, and rice to a boil. Cover the pot with a tight fitting lid, then turn the heat down to a simmer and cook for 15 to 20 minutes, until all of the water is absorbed and the rice is tender. If the rice is still too firm, add a few more tablespoons of water and continue cooking for a few minutes more.
  3. Remove the pan from the heat and allow it to sit covered for 5 minutes. Fluff the rice with a fork and serve.

Non “Naan” (Garlic/Za’tar)

**Or use actual Naan, if you have it/are making it!**

Ingredients

  • 2 pita bread/Naan bread (Pro Tip: if you are low-carb, you can use this. It works not just as a Pita, but also as a Naan substitute!)
  • 2 teaspoons of olive oil
  • 1 1/2 teaspoons of garlic powder (or use two cloves of fresh garlic!)
  • 1 1/2 teaspoons of za’tar
  • 1/2 teaspoon of cilantro (optional)

Cooking Steps for “Non” Naan

  1. Preheat a pan/griddle to medium heat for two minutes.
  2. Put a light coating of olive oil down and brush oil on both sides of bread.  (About half a teaspoon to 3/4 teaspoon)
  3. Cook each side for at least 30-40 seconds to soften.
  4. Drizzle remaining olive oil on top and put seasonings on top. Take off heat.
  5. Cut into eighths to make triangles (think of a small pizza).
  6. Enjoy!

Instant Pot Glazed Pork Belly Ramen (Carbs and Fewer Carbs)

ramen

Happy Sunday!

I am embarrassed by how long it has been since I’ve last posted. I think in addition to being caught up with life, I have been somewhat apprehensive to post what I make as I have been doing the Keto/Low-Carb lifestyle since the end of July. Not everyone is on the bandwagon, nor should anyone feel forced/pressured to do so by my posts. Sometimes, I do miss cooking my regular meals, but for now, this is the lifestyle that I am pursuing, and I am happy to report that it is one where I feel great. I’ve lost 37 pounds (with a goal to lose 10 more), but most importantly, I have a lot more energy. I’m not as sluggish. My knee pain I had from hiking has never returned.

I know a lot of people on the Keto/Low-Carb lifestyle tend to sound like a MLM (Multi-Level Marketing) campaign, but truthfully, it has worked for me. I don’t like condoning or promoting it, but somehow, my results have inspired tons of people around me to try the lifestyle as well. I have been called the “Unofficial Keto Coach,”and I am okay with it. I’ve been trying to inspire people more so to feel confident that they can make food that tastes worthwhile that meets their dietary preferences. All it takes is patience and a willingness to research.

My last post was my Keto Italian Meatballs.  They are delicious and remind me of what I ate growing up. Since I’ve started this blog, I refuse to a post a recipe until I am 100% satisfied. And for anyone who knows me, I am entirely too much of a perfectionist, and thus, my posts have slowed. But I am starting to realize that I have inspired a lot of people to try this diet, and while the trend is there, I figured–why not continue post what I make each night?

Since I’ve started my journey, I have been challenging myself to try to make foods that not only suit my nutritional needs and dietary preferences, but also dishes that my husband, and other members of my family, can equally enjoy. I love to entertain, so I try to make dishes that not only meet my “macros,” but also are delicious and satisfying for someone who isn’t necessarily eating this way.

I am not going to sit here and tell you that it is easy to make everything Low-Carb/Keto friendly. It isn’t–I’ve had enough failures and disappointments to know. Keto baking is especially a tough challenge, but I have learned to love making my Keto Blondies! I will post those soon and attach a link when I do.

When it comes to Keto/Low-Carb Cooking, I’ve learned that when I want to re-create something I’ve made before, I have to be able to use almost all of the same ingredients for it to be the most successful. If you make too many substitutions, it resembles nothing of the original recipe. For example, one of my first recipes I made for Keto was a Chocolate Cheesecake. All the ingredients that naturally are in cheesecake (cream, eggs, cream cheese, butter, etc.) are already Keto–I just needed to replace the sugar and the graham cracker crust. And now that I’ve done this type of eating for about six months, I’ve come to love the sugar substitutes like Monkfruit and Erythritol (Lakanto and Swerve are my favorite brands). The only thing I don’t love is the price tag for all of these products…but hey, hopefully with more demand over time, the prices will go down!

Okay, enough about the Keto/Low Carb Lifestyle. Let’s get to the Ramen!

So as I said, when I cook, it has to meet the needs/tastes of not only me, but also my husband. While I appreciate his support, the truth is, the man doesn’t want cauliflower rice every night. He wants and needs carbohydrates (his activity level is insane). And noodles, my friends, have plenty. But I wanted Ramen…and I thought about all my cooking adventures thus far. Bone broth is a Keto staple and is super healthy (collagen, anyone?) All the ingredients other than the noodles themselves are Keto, so I thought about what I’ve been using as my pasta replacement lately: Tofu Shirataki noodles. I am not going to lie–they are NOT pasta, but when used in a broth, they fit the Ramen bill, for sure. P.S: My favorite pasta replacement so far is Palmini Noodles (Hearts of Palm). That’s been the closest.

For this recipe, I wanted to utilize the one-pot-wonder–the Instant Pot. They’ve become so popularized and cost-effective lately, which makes me happy! I don’t use it all the time, but for this Ramen, the pressure cooker makes an excellent stock. In addition, I love the sweet and salty flavors of Asian cuisine, but I knew I couldn’t use regular sugar/brown sugar. So I’ve called in Brown Sugar Swerve for my glaze. Also, soy sauce is arguably somewhat low-carb (there’s debate on that–I don’t want to get into it). Most Keto/Low Carb bloggers will tell you to either purchase Coconut Aminos instead of Tamari (Gluten Free Soy Sauce). I have the latter, and I think it’s super flavorful and more accessible.

If you are looking for a recipe that you can make that is Keto/Low Carb that you can also share with someone who isn’t, this is the one! Just make the noodles separately and you’re good to go. Enjoy!

INGREDIENTS (Serves 4)

2 pound pork belly

2 tsp salt

1 cup yellow onion, chopped (about one large onion)

4 cloves garlic, crushed

2 tbsp fresh ginger, minced (or 1 teaspoon of dry ginger powder)

2 ounces of package dried shiitake mushrooms

8 cups beef broth, low sodium

4 tbsp soy sauce (I used Tamari–you can also use Coconut Aminos if you’re into that!)

4 tbsp Swerve brown sugar (if you’re not trying to make it Low Carb, use regular brown sugar)

2 package Ramen Noodles, flavor packet discarded (This is for the person eating regular noodles)

1 package of Tofu Shirataki Noodles, drained (Low Carb/Keto people only!)

1/2 cup green onions, chopped (optional)

A few shakes of Trader Joe’s Umami Seasoning (optional–two shakes per individual bowl, stir in the broth before serving)

Japanese marinated soft boiled eggs (optional) <–Note: these ingredients are not Keto/Low Carb, so you could just make a regular soft boiled egg. However, these are the flavors for the traditional soft boiled egg you get in a good Japanese place.

INSTRUCTIONS

  1. Pat pork belly dry with a paper towel and sprinkle generously with salt.
  2. Put about a tablespoon of olive oil in the Instant Pot and put it on “saute” mode.
  3. Add pork belly to Instant Pot once it’s preheated, brown on 1 side for 3-4 minutes. Cook it with the fat cap down.
  4. Lift the pork belly up, and add onions. Stir around for a minute not to burn.
  5. Flip pork belly, brown on the other side 2-3 minutes and place on top of onions.
  6. Add garlic and ginger, cook 2 more minutes–stir occasionally.
  7. Hit “cancel” and then “pressure cook – high” and set for 25 minutes.
  8. Before closing the lid, add dried shiitake mushrooms and beef broth.
  9. Lock lid and switch pressure release button to “sealing”.
  10. While the Instant Pot is working its magic, take out the Tofu Shirataki noodles out of the package and drain/rinse well in a colander. (If you aren’t making anything Keto/Low-Carb, skip this step).
  11. Also during this time, you can make your soft boiled eggs (if you haven’t done so already–the fancy Japanese ones are linked to the ingredients above). Simply boil about 2 quarts of quarter and once it’s boiling, drop the eggs gently with a spider strainer and cook with the shell on for 6 1/2 minutes.
  12. While eggs are cooking, prepare an ice bath. Get a bowl and fill it with ice and extra cold water. You will put the eggs in the “ice bath” when they’re done cooking to stop them from overcooking!
  13. Once the eggs are cooked, put them immediately in the ice bath. You may peel them in about 5-10 minutes. You will slice them in half vertically for the best presentation.
  14. Pro Tip: Use the same boiling water for the regular Ramen. When you’re about ready to serve the Ramen, use the same water by cooking the Ramen for 3 minutes in the water, stirring occasionally. Drain.
  15. When the Instant Pot beeps, you may either quick release or slow release the pressure. I did a “quick release.”
  16. Once the pressure is released and you can open the lid, remove the pork belly and set aside on a cutting board.
  17. Slice pork belly into 1/2 inch slices.
  18. Add pork belly slices to a frying pan with soy sauce and brown sugar. Stir and make sure all pieces are coated.
  19. Work with a wooden spoon, being careful not to break up the pork belly and not to burn the sugar, slowly turn the pork belly so all pieces become evenly coated in the sugar mixture, this will take 3-4 minutes. It’ll turn like a reddish hue.
  20. Remove glazed pork belly slices, set aside.
  21. Drop Tofu Shirataki noodles into bowls for people who are Keto/Low Carb. Drop regular Ramen noodles for everyone else.
  22. Split broth into 4 large bowls for serving.
  23. Add a quarter of the pork belly slices to each bowl.
  24. Garnish with green onions and a soft-boiled egg sliced in half. (optional)

Italian American Style Meatballs (Keto/Low Carb)

ketomeatballs

I grew up in an Italian-American neighborhood and every Sunday, we all ate as a family and had meatballs and pasta. It was a given, it was never questioned, and it was delicious. My grandmother made the best meatballs, and although I am sure all of us show favoritism towards our family members when we say “this is the best,” my bias stands–hers were the best and always will be.

My mother, my aunt, and I have tried to keep our memory of her alive through her recipes, and her meatballs are no exception. But as of two weeks ago, I started the diet that is the antithesis of all that is Italian–the Keto diet.

For those of you who are not familiar, the Keto diet is one of the strictest forms of a low-carb diet. For my body type, I am only allowed 18 net carbohydrates. The FDA suggests (assuming a non-specialized diet) a significant amount more: “The FDA recommends that 50 percent to 60 percent of your total food intake comes from carbohydrates. The percent daily value for carbohydrates, as shown on food labels, is calculated for the average adult consuming about 2,000 calories per day. Percentage daily values for carbohydrates assume you consume about 300 grams of carbohydrates per day.”

So you may think, if the FDA is suggesting 300 total carbohydrates, how can you possibly survive on 18? Well, the Ketogenic diet (a.k.a Keto diet) changes your body’s fuel source so that your food intake percentages are largely dependent on fat. In fact, the Ketogenic diet has people eating 70% of their daily calories from it! It’s a totally new way of eating.

The foods on the Keto diet are delicious–steak with butter, eggs and bacon, cheese (need I say more?); however, the limitations are challenging, especially when you are traveling, you’ll have to do some hardcore research beforehand. In fact, I just came back from a trip to Tennesee, and every time we went to a restaurant, I had to make modifications, Google the ingredients and nutritional facts. Sugar and carbohydrates are in so many things we eat that it’s tough to navigate at times. Honestly, if you are on the Keto diet or considering it, make sure you mainly cook at home, meal prep if you have to.

I thought the second I went on a low carb diet (especially the restrictive Keto diet) that Italian food would be out of the question. It took me a bit of time, but I recreated my grandma’s meatballs and used her techniques. All I had to do was substitute the bread crumbs and bread. Every other ingredient is Keto approved–ground meats have no carbs, eggs are welcome, herbs, pecorino romano cheese, etc.

When you go on a diet like Keto, there are recipes you’ll find abound, especially on Pinterest. However, as someone who loves to cook and develop recipes, I made it my mission to combine what my grandmother would do with what I would have to do in order to these meatballs okay for me to consume. I did not want to sacrifice flavor nor texture.

I made my own Italian seasoned “bread crumbs” by freshly grinding pork rinds, Pecorino Romano, and Italian seasonings. I used 647 Italian bread (lowest carb, but most certainly resembles regular bread), soaked it in heavy cream instead of milk (believe it or not, milk has carbohydrates and sugar!). I made my mixture as grandma would, with a soft touch to make the texture airy and light. I also had to make a lower-carb tomato sauce as many tomato sauces are not allowed (jarred already made sauces are the worst–but even crushed tomatoes have natural sugars).

I aimed to be able to replicate, not merely substitute my grandmother’s meatballs, and I believe I was successful. This is evident as even my carb fiend of a husband highly approved. (He had spaghetti with the meatballs and sauce, the lucky devil). It honestly tastes just the same!  After carefully calculating, my math works out that my meatballs are a welcome addition to a low-carb diet. I calculated 2 carbs for three meatballs, 4 for 6 meatballs. Pasta sauce is 5 carbs for 1/2 cup serving, and I only needed a 1/4 cup (maybe even less!)

Note: Before you make your meatballs, you must make your own Italian “bread’ crumb mixture. All your spices you should have already in your pantry, especially if you’re a lover of Italian food. Nothing crazy fancy here. Pork rinds are your friend…tasty and 0 carbs! The “bread” crumb mixture will make a bit more than you need, so feel free to make a lower-carb Chicken or Eggplant Parmigiana with it! 🙂

Enjoy!

Ingredients for Italian Seasoned “Bread” Crumbs

  • 1 cup of Pork Rinds, ground **Please see note!
  • 1 1/4 cup of Pecorino Romano, grated (feel free to substitute grated Parmesan as well, but I like Pecorino Romano the best!)
  • 1 teaspoon of Garlic Powder
  • 1 teaspoon of Onion Powder
  • 1/4 teaspoon of Salt
  • 1/8 teaspoons of Black Pepper
  • 1 1/2 teaspoons of Dried Parsley
  • 1/2 teaspoon of Dried Basil
  • 1/2 Dried Oregano

**Note: I used my dry container on my Vitamix to grind the pork rinds, but any food processor or blender will do. You’ll need about half a bag of Pork Rinds. You can get these at the dollar store. Seriously. The brand I used is Brim’s Snack Foods. The bag is .3 oz (85.g), and I only needed half the bag to get the 1 cup of ground pork rinds).

Directions for Italian Seasoned “Bread” Crumbs

  1. Gather all your spice ingredients, grated cheese, and a bag of pork rinds.
  2. Grind up about half a bag of pork rinds to the texture of traditional bread crumbs. You will need exactly one cup, so measure it out!
  3. In a bowl, combine pork rinds, grated cheese of choice, and spices. Use a form to combine evenly.
  4. You will use 1 1/2 cup of this mixture for the recipe, leaving with a cup for you to spare. Feel free to store in a jar and stick the “bread” crumb mixture in the refrigerator for later use.

Nutritional Information for Italian-American Meatballs (Keto/Low Carb)

Total  Size: 30+ Medium-Sized Meatballs (Serves 4-6)

Nutritional Macros (Three Meatballs): 2 net carbs, 3 total carbs, 1 gram of fiber, 18 grams of fat, 19 grams of protein, 255 net calories

Nutritional Macros (Six Meatballs): 4 net carbs, 7 total carbs, 3 grams of fiber, 36 grams of fat, 37 grams of protein, 509 net calories

Nutritional Macros for Rao’s Sauce with Lei Mangia’s Modifications (1/4 cup): 2 net carbs, 2 total carbs, 0 grams of fiber, 6 grams of fat, 1 gram of protein, 67 net calories

Nutritional Macros for Rao’s Sauce with Lei Mangia’s Modifications (1/2 cup): 5 net carbs, 5 total carbs, 0 grams of fiber, 13 grams of fat, 1 gram protein, 134 net calories

Ingredients for Italian-American Meatballs (Keto/Low Carb)

  • 1 1/2 pounds of Ground Beef, Pork, and Veal (it’s usually labeled meatloaf/meatball mixture in a grocery store).
  • 3 Medium Eggs
  • 1 cup of homemade “Italian Seasoned “Bread” Crumbs”** (Recipe above for the breadcrumbs–please don’t actually use bread crumbs and kick yourself out of Ketosis! I am saying you need to use the Pork Rind version, duh.)
  • 1 teaspoon of Italian Seasoning
  • 1/2 cup of Grated Pecorino Romano Cheese (or Parmesan Cheese0
  • 2 slices of 647 Bread, diced (Please, no substitutions. If you do, you are under your own risk. This is the only bread I can find that is low enough in “net” carbohydrates to make this recipe possible!)
  • 1/2 cup of Heavy Whipping Cream
  • 3-4 cloves of Garlic, minced fresh
  • 1/2 cup of freshly chopped Parsley
  • 1 28 ounce jar/can of Tomato Sauce of your choice***

***Note about tomato sauce: Be mindful of carbohydrates and sugars in whatever sauce/crushed tomato mixture you use. I use Rao’s as that only has 4 carbs per serving (1/2 cup). I add garlic and olive oil and fresh herbs to the sauce, and believe it or not, the garlic cloves count as carbohydrates. I used to add sugar to my sauce or grate a carrot, but that is off-limits here. If you simmer the sauce a while, it should taste great! Read your nutritional labels, people! Again, you will have 1/2 the carbs if you only use 1/4 cup of sauce.

Directions for Italian-American Meatballs (Keto/Low Carb)

  1. Heat up your choice of tomato sauce (I use Rao’s). I sauteed 6 cloves of minced garlic in two tablespoons of olive oil, and once garlic was fragrant, added the jarred sauce. Before serving, I minced up fresh parsley and basil to taste. Be sure to stir the sauce from time to time.
  2. While your sauce is heating through/cooking, prepare your meatball mixture.
  3. Mince up at least 1/2 cup of parsley. Grab the bunch, cut off the stems (use only the leaves). Roll up the bunch in a tight bundle and chop parsley relatively finely.
  4. Next, peel and press/mince garlic.
  5. After prepping your ingredients, get a liquid measuring cup or bowl and fill with heavy cream.
  6. Next, take out your two slices of 647 bread. Dice into small cubes. Put cubes in cup or bowl with heavy cream to soak for a few minutes.
  7. In a large bowl, combine beef, pork, and veal mixture. Crack three eggs. Take your cloves of garlic (or use a garlic press) and put in the same bowl.
  8. Next, add Italian seasoning, grated cheese, fresh parsley, and liquid bread mixture. Yes, include all the cream as well as the soaked bread.
  9. With a light hand, combine ingredients, making sure to evenly distribute all ingredients. Do not overmix!
  10. When everything is evenly mixed, use a medium cookie scoop and press meat mixture into the scoop and squeeze out. Roll the mixture into your hands into a ball. Make sure all meatballs are evenly sized! You should have at least 30 (my recipe made 33).

Methods of Cooking Meatballs

  1. Use a baking sheet with a rack (if you don’t use a rack, you will have a fatty, congealed mess) and bake for 20-25 minutes at 400 degrees.
  2. Pan-sear the meatballs in a skillet with olive oil (cast-iron preferred).
  3. Put the meatballs in your sauce to slowly cook.

**I personally baked the meatballs to get them started, and then I seared them after. There’s nothing like the crispy edge of a meatball. I used my Blackstone Grill to sear all the meatballs at once as it is quite messy and time consuming the fry the meatballs. But man–is it a tasty step. You decide! 🙂

To serve meatballs, dollop your tomato sauce on top (but please measure, if you’re counting carbs) with more fresh parsley. Garnish with basil, if desired. If you would like, add a side of fresh ricotta cheese–it’s a fabulous combination! 🙂

Grilled Shrimp Scampi with Angel Hair and Garlic Bread Baguette


shrimpscampi.jpg

Happy Monday! I will be doing two posts today to make up for my long absence from the blog!

Shrimp Scampi is the classic lemony, garlicy Italian delight. I hardly make shrimp, let alone Shrimp Scampi, despite my undying love for it sauteed, fried, grilled, as a dumpling filling. My husband just isn’t into shrimp; hey, to each their own.

But tonight, I  just really wanted shrimp. I put my needs before my husband’s (for the first time ever…ha), and it turns out that even the non-lover of shrimp enjoyed this one! We were both in absolute awe. I haven’t made this in years, but it suddenly came back to me, just like most Italian dishes I grew up making and enjoying.

This was one of those meals where every bite was just perfect. I did a lot of this by feel, so I am doing my very best with my approximation of how much I used of each ingredient. I will be sure to make it again and get the exact measurements for those of you who need a recipe to feel reassured! 🙂

I hope you enjoy. We most certainly did! 🙂

Shrimp Scampi with Angel Hair

1 pound angel hair pasta (or different pasta if you desire–angel hair cooks the fastest, though!)

6 tablespoons olive oil, divided (2 for shrimp, 4 for pan sauce)

1.5-2 pounds of uncooked, extra large shrimp, peeled and deveined (leave the tails on for presentation–also, keep shells if you want to make small shrimp stock)

1 tablespoon of sea salt (NOT for cooking–only for brining the shrimp!)

5 cloves garlic, minced

1/2 teaspoon red pepper flakes (if you’re not into spicy, you can do 1/4 teaspoon)

2 teaspoons of garlic salt (I used the grinder from Trader Joe’s), divided (1 for shrimp, 1 for pasta)

1 teaspoon of Tastefully Simple Garlic Bread Seasoning, divided (1/2 teaspoon for shrimp, 1/2 teaspoon for pasta)

**(This seasoning is optional, but I love it! If you can’t find it, use a similar seasoning that has some or all of the following: garlic, onion, parsley, red bell pepper, chives).

1 lemon, juiced, plus 1/2 lemon, zested (make sure there’s no white, bitter pith)

1/2 cup dry white wine (I used a Chardonnay–be sure to drink the rest with dinner)

5 tablespoons salted butter (plus, I added more butter from the garlic bread butter spread–figure you’ll need a stick and a half for both)

1/4 cup freshly chopped parsley leaves

Garlic Bread Baguette

1 French, store-bought baguette

1 stick of unsalted butter, softened

1 tablespoon of Tastefully Simple Garlic Bread Seasoning  (If you can’t find it, use a similar seasoning that has some or all of the following: garlic, onion, parsley, red bell pepper, chives).

Directions for Garlic Bread Baguette

  1. Make sure your stick of butter is softened. If it’s not, use your microwave setting to do so (do not melt it!)
  2. Using a spatula, mix the Garlic Bread Seasoning with the butter. Let sit for 30 minutes for the flavors to meld.
  3. Cut your baguette in half and then slice the middle to make two even pieces.
  4. Once the Garlic Bread Butter flavors have melded, spread your butter evenly on the baguette. **
  5. **Note: Don’t be shy. You do not, however, need to use ALL the butter. Some of the leftover butter will be used for the shrimp scampi to finish!**
  6. Pre-heat your oven to 400 degrees.
  7. When your sauce is almost done reducing, put your bread in the oven on a baking tray. It should take no more than 5-6 minutes. Check for doneness periodically. Be sure to toast to a golden brown, but not over bake!

Directions for Shrimp Scampi

  1. First, peel and devein your shrimp (leave tails on for presentation). **Optional, but recommended: keep your shells and make a quick shrimp stock by boiling hot water and pouring it over the shells that are wrapped in cheesecloth). Steep for at least 15 minutes.
  2. Next, add deveined and peeled shrimp to a bowl of cold water (about 3-4 cups) and add a tablespoon of sea salt (note: do not use hot or even warm water as that will literally COOK the shrimp). Swirl the shrimp around in the salt water and brine for at least 20 minutes–may do so for up to an hour.
  3. While the shrimp are in the brine and you are finishing prepping, get a large pot of water to boil for pasta.
  4. Mince up your garlic (or use a garlic press, like I do), roughly chop your parsley, and zest your lemon. Once you’re done zesting the lemon, cut in half to use the juice. Roll the lemon with the palm of your hand to get the most juice out of it.
  5. Add the pasta to a large pot of boiling salted water, over medium heat, and cook until al dente. Angel hair pasta should take no more than five minutes! Feel free to substitute a different pasta, like spaghetti or linguine, if desired, and cook to specified direction on the pasta box.  Leave the pasta in the colander and drizzle a little olive oil to prevent sticking.
  6. Once at least 20 minutes have passed, drain the shrimp and blot with a paper towel. It’s okay if there is a little bit of water left (but not too much).
  7. Add two tablespoons of olive oil, garlic salt (1 teaspoon), and Garlic Bread Seasoning (1/2 teaspoon) to shrimp. Toss to coat. If grilling, add to ungreased grill pan once your sauce is almost done reducing.**
  8. For your sauce, heat a large 12-inch skillet over medium-high heat. Add the olive oil.
  9. ***Note: I did not cook the shrimp in the pan like most people do (I wanted the grilled taste), so what is listed below is what most people will do if they do not have an indoor grill pan. If you do want to do what I did, preheat your grill pan to medium-high heat for 4-5 minutes and grill your shrimp (as mentioned later) when your sauce is almost done reducing.**shrimpgrill
  10. Once shimmering and hot, add the shrimp and saute until just cooked through, about 2 to 3 minutes. Remove to a plate and reserve. (Only for those without a grill pan.)
  11. Add the garlic and red pepper flakes to the skillet, then saute for until the garlic is fragrant, about 1 minute. Add the lemon juice and white wine and raise the heat to high. Let the liquid reduce for 2 to 3 minutes. Whisk in the butter, add a ladleful of the pasta cooking water (if you made shrimp stock, add a little bit of that as well) and return the shrimp. Remove from the heat.
  12. Drain the pasta in a colander, and add it to the skillet along with the chopped parsley and toss. Add the lemon zest and adjust the seasonings with salt and pepper, to taste.
  13. Add remaining Garlic Bread Butter (that was not used on the baguette) onto hot pasta to finish–about 1/4 cup worth.
  14. Transfer to a serving platter and serve immediately.


Homemade Lamb and Beef Gyros (Sous Vide and Rotisserie)

46797617_10212997602387965_2037370788293640192_o

Click here to watch the Youtube video demonstration of this recipe!

Happy Tuesday!

Are you over turkey and leftovers? I am! I love Thanksgiving, but I get bored and want to go for something international immediately after. My husband and I love Greek food, so it came to me that I wanted to make my stuffed grape leaves. But that’s not all. I wanted a gyro in the worst way, too.

Recently, I acquired a Ronco Rotisserie. Do you remember the commercial from the 1990s-2000s? “Set It and Forget It!” Best slogan ever. My problem? I have an obsession with watching it go round and round! One of my best friends told me that I ironically “stalk my food.” I can’t help it–it’s truly mesmerizing. I made rotisserie chicken two weeks ago, and I contemplated even doing my turkey in it for oven space purposes. So you can say I have a bit of an infatuation.

For all of you who know me personally, you know I am also a huge Sous Vide fan. It’s the best for proteins, and the low and slow water bath makes the meat extra juicy. So I had to use my Anova as I do for all my meat cooking.

I decided to grind my meat, blend in a food processor into a paste (it sounds gross, but trust me, it needs to bind!), sous vided for two hours, and then I seared it for about 30 minutes in my rotisserie. Last final step? I carved the meat into thin slices into a sizzling hot cast iron pan for a little extra crispy edge. Absolute perfection.

The homemade Tzakiki sauce came together in a snap too. It’s creamy and indulgent and totally makes this classic Greek dish complete.

My husband said this is a “Top 5” meal–10/10. He isn’t wrong. It is perfect. Enjoy! 🙂

Ingredients for the Lamb and Beef Gyro Meat

  • 1.3-1.5 pounds of Ground Beef
  • 1 pound of Ground Lamb
  • 1 1/2 Tablespoons of Garlic Powder
  • 1 1/2 Tablespoons of Salt
  • 1 1/2 Tablespoons of Dried Oregano
  • 1 1/2 Tablespoons of Black Pepper
  • 1 small White/Yellow Onion (I used yellow)
  • 1 fresh garlic clove

Ingredients for the Tzatziki Sauce

  • 2 cups of plain Greek yogurt
  • 1 large cucumber
  • 2-3 tablespoons of garlic powder (to taste)
  • 1/2 small lemon, squeezed
  • 3 teaspoons of dried dill
  • Salt and pepper, to taste

Other Ingredients

White Pita Rounds (4-6)

Vegetable Toppings (Lettuce, Tomato, Red/White Onion–your choice!)

  • **Feel free to make the pita rounds too, but the store bought ones, if heated up properly, taste great!) This recipe serves 4-6, so you would need at least 4-6 pita rounds.
  • ***You may also add in any vegetable you want. Some people like sliced onions, most people like tomato. I sliced up only a few small grape tomatoes for mine as lettuce has a bad reputation as of late (thanks Romaine outbreak!)

Special Equipment

  • 8-10 cup Food Processor (I have a Cuisinart 8 Cup)
  • Sous Vide (Immersion Circulator)–I have an Anova; Joule works well, too!
  • Rotisserie Machine (**optional, but it’s what I used. You can also simply broil the outside and rotate in the oven if need be.) <–P.S: I bought my rotisserie for $20 on Facebook Marketplace, so fear not!
  • Cast Iron Pan (Somewhat optional–this is for the extra searing at the end. I guess you could use another pan, but cast iron is highly recommended!)

Directions to the Pantheon of Street Food (How To Make the Gyro Meat)

  1. First, take out your food processor. Pulse until finely diced your onion and garlic clove.
  2. Next, add the ground meats (lamb and beef), salt, pepper, garlic powder, and oregano.
  3. Grind the meat mixture into its a paste (it looks gross, but trust me, it’s divine). If you find it’s not all evenly getting mixed, stop the machine and use a spatula to push down the meat to make sure everything is ground evenly.
  4. Once it’s a “meat paste,” dump onto a piece of parchment paper.
  5. Next, transfer it to a large piece of plastic wrap. If you need another piece of plastic wrap, that’s fine! You are using the plastic wrap to mold the meat into a round log.
  6. Once you have rolled the meat into a log, portion out a large enough bag with your vacuum sealer. I have a Food Saver. **Make sure you remove the plastic wrap when the “log” is inside the vacuum-sealable plastic bag.**
  7. Once you have the meat sealed, you are ready to heat up your water!
  8. Get a large pot/sous vide container of water big enough to cover your meat. Fill the water between the minimum and maximum water lines that are listed on your circulator.
  9. Preheat your Sous Vide (Anova, Joule) machine to 150 degrees F. Once your water is heated up to temperature, put the meat log (is there a nice way of saying this?) into the water, and set a timer for two hours.
  10. As your Sous Vide is heating up/cooking your meat, go make your sauce!

Note: If you don’t have a Sous Vide, you can try putting the meat into a loaf shape on a sheet pan and put it in the oven at 325-350 like you would a meatloaf, but I have never tried it this way. Plus, if you don’t have a Sous Vide, I am not sure what you are waiting for. It’s the best! It’s worth the $100 investment!

Making your Tzatziki Sauce

  1. Scoop out two cups of plain Greek yogurt into a medium-sized mixing bowl.
  2. Peel your cucumber and then Microplane/grate your cucumber (not too finely nor too thick) into the yogurt.
  3. Next, slice open half a lemon. Squeeze the lemon into your yogurt mixture (make sure there are no seeds!)
  4. Add salt, pepper, garlic powder, and dried dill to your yogurt mixture.
  5. Stir all ingredients and taste. Add more salt and pepper as needed.
  6. When you’re satisfied, leave the mixture out to homogenize. The flavors will improve as it sits.

Putting It All Together

  1. Once your meat has finished cooking in the Sous Vide, it’s time to get it nice and browned on the outside.
  2. If you have a rotisserie, put the meat onto the prongs and put it into the machine and set for 30 minutes. If you don’t have, you can try carefully broiling the meat, rotating to ensure even browning on all sides. Alternatively, you can sear the meat whole in a cast iron pan/dutch oven. Again, I used a rotisserie as most gyros you order out are “gyrated” (if you go to a Greek place, you’ll likely see the vertical Doner Kebab machines).
  3. Once the meat is browned evenly on all sides, let the meat rest.
  4. Heat up your cast iron (preferably) skillet to medium-high heat. Put about a tablespoon of olive oil on the pan, spinning the pita round in the pan to help coat the oil.
  5. You will first heat up your pitas on both sides. You want the pita to be a little browned, but soft and pliable. About 1-2 minutes per pita (30 seconds to a minute per side).
  6. Once the pitas are warmed, you should slice the meat very thinly and cook in the same pan. You want a golden brown texture. Flip the meat often not to overcook.
  7. Assembling the pita: On the warmed pita, apply about a tablespoon of Tzatziki sauce and spread all over the pita. Then add your “salad” toppings of choice. Add the hot, seared meat on top.
  8. Fold and eat. Enjoy. Devour. Your life just may change today. 🙂