Restaurant Review: Sanducci’s Trattoria

bee51b0f-be31-4a1f-8925-317c6976a28a.jpg

Happy Thursday!

I apologize for not posting in a while; I haven’t had a minute to spare!

This week has been dedicated to wedding planning, and it is probably one of the most time consuming endeavors I have ever encountered. In addition, I have dividing my time seeing friends and family. I have been in New Jersey, New York, and Pennsylvania all this week (and sometimes, all three states in one day.) Even though I have been driving around like crazy, I am happy to be here to get my Italian/New York fixes.

Living in North Carolina for the past few months, I have missed out on a lot of great pasta, pizza, bagels (you know–the holy trinity of carbohydrates). While I am back “home,” I have to take advantage and eat them all–practically every day.

When I was visiting my friend Cassandra, author of Bottlesoup, she told me we should have lunch at her favorite local Italian restaurant called Sanducci’s Trattoria.

For me to review an Italian restaurant, it has to exceed my high expectations. As a native New Yorker, I did not need to go out often for Italian food growing up. It’s what my grandmother made, it’s what my mother made, and it’s obviously what I can do as well. I find myself disappointed often when I go out to eat for Italian–(except pizza: without the brick oven at home, the results can never be as good). There are a few gems, however, that are absolutely what I need from an Italian place: I need an upperscale interpretation of classic comfort Italian dishes with heightened complexity. This place can make what we all know and love but take it to the next level (all without totally breaking the bank: it’s a little bit more than going to your local pizzeria but less than going to a fine dining establishment.)  While I recommend this place, I will be honest about what I felt foot the bill, and what I could do without again…

Appetizer: Ginger Sesame Fried Calamari

This is definitely my favorite item here. I know what you’re thinking. Sesame and ginger are not Italian. But the way they fry the calamari is–it’s light and delicate, not rubbery or chewy. P.S: I am totally inspired to re-create this…

12932932_10206092381761765_6753725958021960775_n

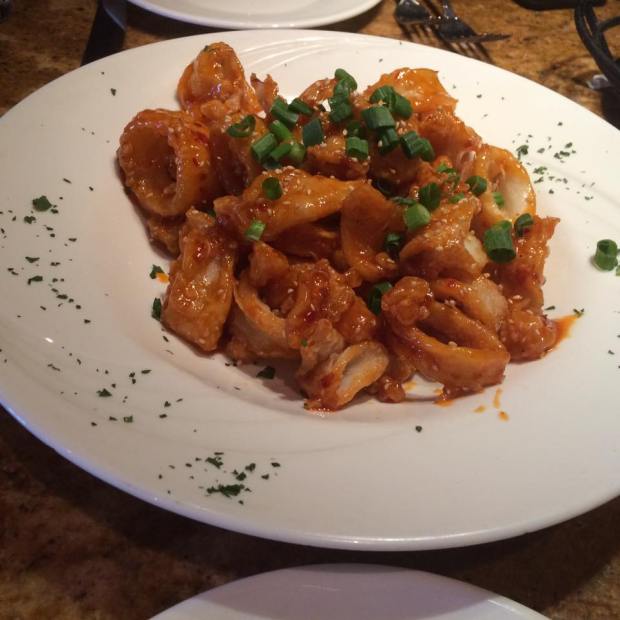
Calamari must start with a flour based dredge; if you ever eat calamari with a heavy breading (breadcrumbs versus the latter mention of flour), move away. It is too light and delicate of a fish for all that! Also, calamari should always be lightly fried because if it is in oil too long, it will become greasy and tough to chew. This calamari clearly has perfect flour coating to get the crispiness necessary.

The sauce, like I said, un-Italian but rather Asian in its style, is absolutely delicious. It is a sweet chili base with hints of honey and red pepper flake (maybe some orange–that’s something I was sensing), and the sesame seeds really coordinate well with the crunch of the properly prepared calamari. The aroma is very floral and sweet from the glaze. The green onions also bring fresh, brightness to the dish by distributing just the lightest flavor of onion to the fish. By the way, if you want to sound like you’re an Italian New Yorker, say GAL-A-MAAAHD–the slang will give you some respect, or at least, will give you a laugh for a minute.

Rating: 10 out of 10

Soup: Pasta Fagioli

My favorite peasant food from Italy is Pasta Fagioli. I am obsessed with white beans (cannellini beans), and this soup is one of my favorite dishes my grandmother makes. But it’s not quite like my Nonna’s!

942547_10206092381561760_6317465968215179088_n

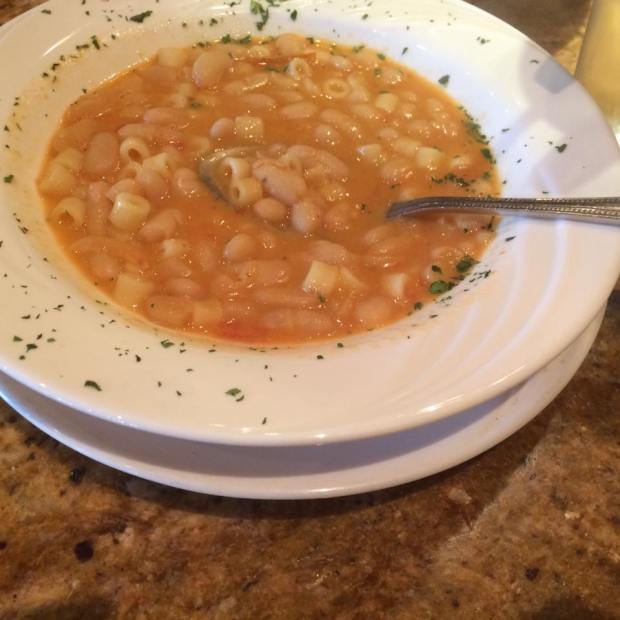
Pasta fagioli is a white bean soup; however, my grandmother always made it thick so it was more like a sauce for pasta. The way she makes it looks like vodka sauce versus liquid-y soup like this. So of course, there is a bias there, but I will happily give it a go.

I tasted the garlic notes and the broth had the right amount of seasoning herb wise, but I believe it fell short on the parmesan. I needed to add the cheese to take it to a new height, or at the very least, what I expect pasta fagioli to do for me. The onion notes in the soup were present, and it was good–but again–it needed the cheese! If you order this, make sure you put copious amount of cheese because the parmesan base is missing here.

Rating: 7.5 out of 10

Entree: Penne alla Vodka

The way to test an Italian restaurant is to eat a popular dish and see how it is prepared. The sauce was cheesy and creamy as expected; however, the meat (prosciutto) was a bit too large for the delicate pasta. This was very flavorful with a minor execution error.

12933153_10206092381441757_1353599105885798210_n

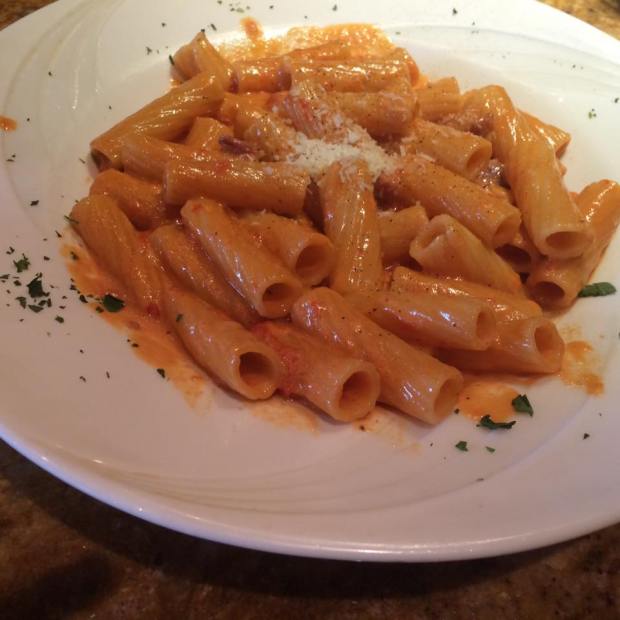
The tomato-y, creamy-base was very flavorful with the ham profile in the sauce. There was a balance of spice that was countered with the coolness from the area, without overwhelming the sauce. My only complaint of this dish is that the prosciutto was chunked almost like a piece of sausage. Prosciutto, dried, cured Italian ham, is an excellent complement to vodka sauce, but should be used sparingly. Thinly sliced prosciutto is better suited here. I also think more green would have made this great; I like vodka sauce with green peas!

Rating: 8.5 out of 10

Entree: Homemade Black Linguini with Chunks of Brazilian Lobster Tails in Pink Cognac Sauce

The last test of a good Italian restaurant is to see what they do beyond the expected–again, heightened complexity. This is Cassandra’s “go-to” that she orders often. As opposed to a typical “vodka sauce,” this blush rosa sauce is made with cognac which adds a touch of class and refinement. 

10390893_10206092381081748_8087021238209292961_n

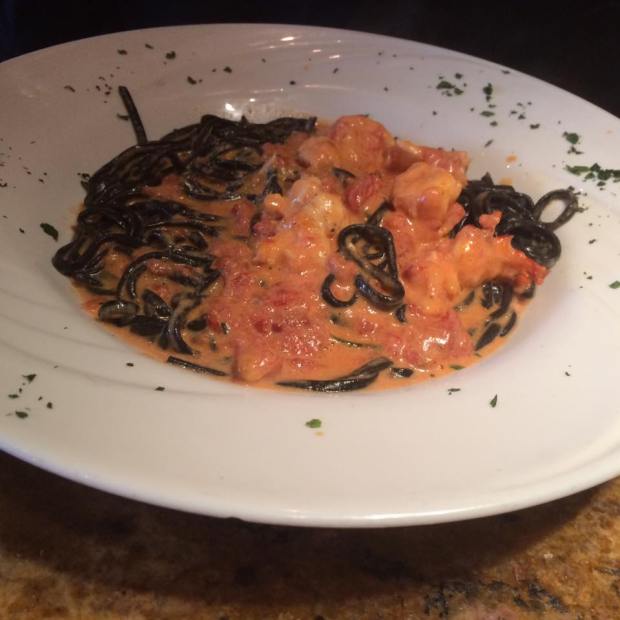
This is one of those dishes you see on a menu and say, “Ooh–that sounds interesting!” One of the privileges that people should take advantage of when they go out to eat is to try something they could not readily make at home. Although making pasta isn’t necessarily difficult, fresh pasta should always be commended as it makes a world of difference for taste.

This pasta in particular is black in color; if this is off-putting to you, be comforted with the reason as to why: it is made this color from squid ink. Oh, you don’t like squid? If you like calamari, you like squid! The pasta has a very modern appearance when black–it does not look nor taste conventional. Although not overpowering, there is a slight seafood flavor that comes from the squid’s ink that is perfectly appropriate in this dish.

The sauce, because it has a cognac base, has a slight sweetness that pairs well with the tomato cream sauce. If you like vodka sauce, but want to kick it up a notch, this is the sauce for you to try. Cognac and lobster are the two ingredients that make this pasta become eligible as First Class. Brazilian lobster, when prepared properly, is excellent and succulent (I personally love Maine Lobster better as it is sweeter).

Cassandra mentioned that this dish usually has better lobster (she felt it was slightly overcooked the day we tried it); however, I could see how this dish is a favorite of hers, and how I will definitely look to order it again when I am back in Bergen county! This is Italian elegance with modern flair–a perfect, romantic meal.

Rating: 9 out of 10

Pusser’s Painkillers: Barbados Delight

Pusser's Painkiller

Happy Sunday! Let your Sunday be a “fun” day.

When I used to work in a restaurant, I worked every weekend as that was when I would make the most money. Our clientele mainly consisted of the average 9-5 people who couldn’t wait for Friday and Saturday nights out. Surely, we could meet up with “everyone else” after work, but we mostly missed out on these moments for several reasons: There would only be about an hour or two left before the bars would close, our feet were too sore, and our shirts reeked of oil. So attractive.

The crazy nights out for the restaurant people were on Sundays; many of us were off Mondays, and better than the 9-5 people, we didn’t have to wake up early the next day! Most of us did not have work again until 4-5 p.m. Sunday Funday became a tradition in my restaurant because it was the one day of the weekend that we could participate in fully.

Speaking of fun, these Pusser’s Painkillers are the perfect accompaniment for your Sunday Funday. They go down smoothly, pack a punch, and cure all the typical Sunday woes of the 9-5 worker. I love waking up Sunday mornings, but I hate Sunday evenings; I bemoan the thought of having to get up early for work the next day. I just want time to stop on Sundays.

And although I don’t quite have a time machine, I believe these painkillers, as the name so cleverly implies, will soothe you of your troubles and woes.  I served these for my future mother-in-law and her best friend, and they were a big hit–there’s even a claim that they took away physical joint pain. 🙂

The drink is relatively simple to make, but I will be a stickler about ingredients. I refuse to use any rum other than Pusser’s. No, they did not sponsor this post, but I have tried to make them with similar dark rums and it didn’t quite taste right. You also need to use cream of coconut–do not try to use coconut milk or sweetened condensed milk. This is the original recipe that is served in Barbados, so use it and drink up! This drink tastes very authentic in its pineapple endeavor.

P.S: If you’re like me and accidentally threw out your cocktail shaker (do not judge me), you can use a travel coffee cup and cover the hole with your index finger to shake, not stir, this lovely cocktail. 🙂

The Medicine Cabinet

This makes one strong drink, but I usually double, triple, quadruple the recipe to make a bunch of servings at once!

2 oz Pusser’s Rum
4 oz pineapple juice
1 oz orange juice
1 oz cream of coconut (or more–depends on how sweet you like drinks)
Fresh grated nutmeg (I use McCormick’s Gourmet Ground Nutmeg)

If you’re making for two drinks for four people (8 total) for a small party, then the ratio would be this:

16 oz Pusser’s Rum
32 oz pineapple juice
8 oz orange juice
8 oz cream of coconut (or more–depends on how sweet you like drinks)
Fresh grated nutmeg (I use McCormick’s Gourmet Ground Nutmeg)

Doctor’s Orders

  1. Add liquid ingredients to a cocktail shaker and shake vigorously.
  2. Alternatively, pour all ingredients into a travel coffee mug and cover the hole with your index finger to shake.
  3. Once shaken, put into the freezer (if you want to drink it quickly) or refrigerate in a pitcher. I
  4. If you’re freezing your mixture, try to leave it in for at least 5-10 minutes.
  5. Once properly chilled, pour into a big glass or goblet filled with ice. Grate fresh nutmeg on top and enjoy! Garnish with an optional Maraschino cherry.
  6. If you’re feeling bold, make a “rum float” on top. This means you can pour more rum on top if you like an even stronger drink. 🙂


Mongolian Beef Noodles

Mongolian Beef Noodles.jpg

Happy Sunday!

I go on kicks each and every time I eat something amazing. I’ll eat sushi, and I will want it for a week straight. I have lasagna one day, and I’ll want ricotta for years. I become obsessive, and I’ll fall in love so deeply in that moment.

It kind of reminds me of teenaged infatuation; I have my “flavor of the week,” but eventually get over it and find something better. 🙂

Today, I had absolutely no inspiration whatsoever. I also knew I had to blog this weekend–eep. I decided that I needed to, after spending an hour in the grocery store roaming, just make something quick and delicious–and bam–I thought about making Mongolian Beef Noodles.

Stir frying is my go-to weeknight strategy because everything cooks so quickly. It’s also great for when I have a temptation to call for some take-out Chinese. I think that many people feel that they cannot make Chinese food themselves, and I am really not sure why. Chinese food isn’t difficult to make at all! Make a bucket list of your favorites from your local joint, and then go figure it out. One of my personal favorites is what I am making today.

Mongolian Beef Noodles has a perfect balance of sweet and salty. I like to add mini sweet bell peppers to get some natural sweetness in my vegetables, and it gives the dish a nice bright flair. I also add honey, mandarin oranges, and brown sugar to enhance the sweet flavor. The salty, savory factor comes from the green onions, garlic, and ginger. In terms of vegetables, you can use whatever you want. I like to throw in broccoli as beef and broccoli are an amazing pairing in the Chinese realm. I have seen people make it with coleslaw mix (note: NOT mayonnaise-laden prepared coleslaw, but rather, the vegetables). You could add whatever vegetables you like! Seriously! If you’re not too creative, think about what vegetables you actually enjoy eating when you dig through that white take-out container.

In terms of the beef, use flank steak, and make sure the meat is sliced thinly. To expedite the cooking process, the meat needs to be cooked not only thinly, but in smaller pieces (go for bite size.) I am also a big fan of marinating your meat whenever possible. Flank is not particularly tender, so I think it needs to sit for a little bit. More time is best, but if you don’t have all the time in the world, look to marinate your meat in the soy sauce/corn starch slurry immediately while you prep your vegetables–the half an hour bath will do just fine. The soy sauce, rice vinegar, and sesame oil will tenderize the meat.

There are two reasons why you want to add cornstarch to your meat: 1.) it thickens the sauce to make a succulent brown sauce, and 2.) it prevents the meat from overcooking and becoming tough. If you don’t have cornstarch, you can use flour, but I think cornstarch is the best way to get the traditional Chinese results.

Alright, enough talking–let’s get to dinner.

Marry the Meat

  • 1 pound flank steak, cut across the grain into 1/8″ thin slices, then cut into 2” length pieces (think bite size)
  • 1 tablespoon soy sauce
  • 1 tablespoon of rice wine vinegar (if you don’t have it, skip it–but I like it!)
  • 1 tablespoon of sesame oil* (Again, you could skip, but it’s another step closer to authentic Chinese)
  • 1 Mandarian orange (Cuties, Halos, whatever brand), juice squeezed** (optional, but I   like the acidity and sweetness; alternatively, pour in 2 tablespoons of orange juice!)
  • 1/4 cup cornstarch

Fry on the Fly

  • 2 tablespoons of canola oil
  • 3 cups broccoli florets (I just microwaved a bag of frozen florets)
  • 6 mini bell peppers, sliced thinly (no seeds, please!)–you could also used 1 whole bell pepper so long as its sweet!
  • 6 green onions, chopped (2 green onions reserved for garnish, the rest is for the stir fry itself)
  • 6 garlic cloves, minced
  • 1 tablespoon freshly grated ginger (If you don’t have any, you can leave it out, but ginger is another authentic Asian aromatic!)
  • 1 box of Rice Noodles (cook to directions)–if you’re really in a bind, you can use pasta (shhh!) or white rice

The Slurry in a Hurry

  • 1 Mandarian orange, juice squeezed** (optional, but I like the acidity and sweetness; alternatively, pour in 2 tablespoons of orange juice!)
  • 1/2 cup low sodium soy sauce
  • 1/2 cup water
  • 1/3 cup brown sugar, packed (add more if you like sweeter sauces)
  • 1/4 cup Asian sweet chili sauce (optional–I just used Sriracha because I ran out of Sambal Oelek)
  • 2 tablespoons mirin/sweet Japanese rice wine or rice wine vinegar
  • 1 tablespoon hoisin sauce
  • 1 teaspoon salt
  • 1/4 teaspoon pepper
  • 2 teaspoons cornstarch
  • 1-2 teaspoons Sriracha
  • 2 tablespoons of honey
Directions
  1. Make your rice noodles to the package’s directions. You can cook them by boiling water (like pasta) in ten minutes, or you can soak them in cold water (takes longer, but is a traditional method) for about 45 minutes.
  2. Next, slice your beef on a diagonal to the size specifications above. Add the meat to a large freezer bag along with 1 tablespoon soy sauce,. Toss to evenly coat. Add 1/4 cup cornstarch and toss to evenly coat. Let sit at room temperature 30-60 minutes at the very minimum.
  3. Slice your peppers thinly, and slice the green onions. Take out garlic cloves and  1 inch piece of ginger; press both through a garlic press. Alternatively, mince garlic and ginger finely with a chef’s knife.
  4. Once your ingredients are prepped, then begin your sauce. Whisk the sauce ingredients together in a small bowl. Set aside.
  5. Heat 1 tablespoon canola oil a large nonstick skillet or a wok (I prefer using a wok) over high heat until very hot and sizzling. Add beef to the skillet and break up any clumps; cook without stirring for 1 minute, then stir and cook until beef is browned and almost cooked through, about 1-2 minutes (it will cook more in the sauce). Don’t overcook or it won’t be as tender! Transfer beef to a large plate and cover it up so it doesn’t get cold.
  6. Add 1 tablespoon oil to the pan and saute the peppers. Throw the meat back in and add the garlic (use a garlic press, if you have one.) Stir frequently with tongs. Throw in almost all of the green onions (reserve some for garnish.)
  7. Microwave the broccoli to the directions on the package (about 5 minutes), and once it is cooked, add it to the pan. Once the noodles are cooked and drained, add to the wok/skillet, too.
  8. Return the beef to the skillet and toss to combine. Whisk the sauce to recombine then add to the skillet. Cook, stirring constantly with tongs, until the sauce is thickened, the beef is cooked and vegetables are crisp tender, about 1-2 minutes. Taste and add additional sriracha, sweet chili sauce, if you would like. Add the rest green onions as a garnish. If you have sesame seeds, you could add these also! Tip: If the sauce isn’t thickening, turn the heat up to a simmer, and then drop it low. Also, you may need to add more cornstarch. 
  9. Eat immediately. Try to use chopsticks without making a mess. 🙂 Slurp away!

Pulled Pork and Smoked Gouda Cheddar Mac and Cheese with a Panko Parmesan Topping

pulledpork

Happy Monday!

Zach always wants macaroni and cheese. This past weekend in particular, he told me to make some. I haven’t made this Gouda Cheddar Macaroni and Cheese in over year; apparently, the last time I made it was around Valentine’s day. I say that’s too long for this decadent goodness. Who doesn’t love this childhood cult favorite? You know, the southern side dish that immediately increases waistlines upon impact?

I will tell you this–this macaroni and cheese recipe is a lot more work than its blue box counterpart, but this recipe makes plenty and is so rich. It’s worth it–otherwise, I wouldn’t post it! You’ll get at least ten heaping servings, and I made this only for Zach and me. You guessed it–I’ll be eating macaroni and cheese for the rest of the week. I am certain this is illegal. This is made with butter, heavy cream, milk, and four cheeses (cream cheese, cheddar, smoked gouda, and parmesan.) To me, the smoked gouda comes out the most flavor wise, the cream cheese helps smooth the sauce over, and the cheddar helps round out the gouda. This was made very diet conscious indeed…

This would be great to make for a potluck or for a holiday  I am sure between Lent and New Year’s that everyone will be craving something fattening!) I love the topping; the crunchy Panko and the salty Parmesan truly work wonders with the melted butter. I am not always a fan of macaroni and cheese with a topping, but this one does the trick. The flavors here are also more complex through the use of sautéed onions and (optional) bacon. If you don’t use bacon, that’s fine–just make sure you make pulled pork. There’s something about barbecued foods that make this mac and cheese really shine. If you don’t feel like making pulled pork, feel free to go to a reputable barbecue joint by you; Zach and I love Mission BBQ for a chain.  Again, if you want to just make the macaroni and cheese by itself, that’s fine too, but the hint of BBQ sauce that seeps through does pull this dish together.

Get Jiggy With It
The ‘Roni
  • 1 box of Rotini macaroni, cooked and drained (or any other pasta you want to use, like elbow)
  • 4 tablespoons of butter
  • 1 medium onion, diced
  • ½ cup flour
  • 1 cup chicken broth
  • 1½ cup milk
  • 1¼ cup heavy cream
  • 2 teaspoons kosher salt
  • 1 teaspoon ground black pepper
  • 1 teaspoon dry mustard powder
  • 2 teaspoons Worcestershire
  • ½ lb smoked gouda cheese, shredded
  • ½ lb sharp cheddar cheese, shredded
  • 8 oz cream cheese, cubed
The Topping
  • 2 cups Panko bread crumbs
  • 4 Tbsp butter, melted
  • 4-6 slices bacon crumbled *** (optional!)
  • ½ cup Parmesan cheese
  • ½ cup bacon crumbled** (optional!)

Jazzercise For Your Thighs!

  1. Prepare your macaroni according to package directions. Set aside in a large pan (9X13 or larger would work!)
  2. Do your prep work! Shred all your cheeses (except parmesan and cream cheese). Dice your onion.
  3. In a large pan, melt butter over medium high heat. Saute chopped onions until translucent and just starting to caramelize.
  4. Reduce heat to medium and sprinkle in flour. Next, whisk until mixed with butter and onion. Cook on medium heat for one minute. You need to form a roux.
  5. Combine milk, cream and broth in a large measuring cup and add all at one time to mixture in pan. Whisk over medium heat for 1-2 minutes. Mixture will thicken considerably. If it doesn’t thicken, raise the heat a bit until it does so, and then lower it once it bubbles up.
  6. Add salt, pepper, mustard and Worcestershire sauce. Then you should reduce the heat to low and continue to cook for 2-3 minutes.
  7. Add the cheeses to the pan and stir to thoroughly combine.
  8. Add cooked macaroni to cheese mixture and stir to combine; reduce heat and cook on low for 5 minutes for everything to meld together and get hot. Smooth top.
  9. Combine panko bread crumbs, melted butter, bacon and Parmesan cheese together and mix well. Sprinkle over the top of the noodle casserole and broil the dish until the top is just starting to brown. Mine broiled in less than five minutes–so make sure you keep your eye on it!
  10. Devour politely. 😉