Thyme and Rosemary T-Bone Steak with Potatoes and Broccoli

13000282_10206201178601618_8624191865594800461_n

Happy Saturday!

I don’t think there is a meal out there that is more satisfying than a steak. To be honest, I eat burgers more than I eat steaks, but when I do have a hunch for a steak, I just have to have it!

I have a fairly good amount of experience with steak and flavor combinations as I worked in a steakhouse as a waitress. I have had my share in making dry rubs, wet marinades, savory toppings like bleu cheese crumbles and caramelized onions. In addition, my father always had a keen sense for how steak should taste (he’s partial to Prime Rib).  Honestly, there isn’t much that is necessary for a delicious steak, but what will sure kill its flavor is overcooking it.

I apologize if I offend anyone, but you really should not be eating steak over medium rare. I love rare to medium rare (believe it or not–I range depending on the cut of steak!) I know that the blood for some people is too much, but really–eating carcinogenic charcoal is a lot more unnerving to me personally. To me, the flavor of the steak comes through when it’s prepared the proper way.

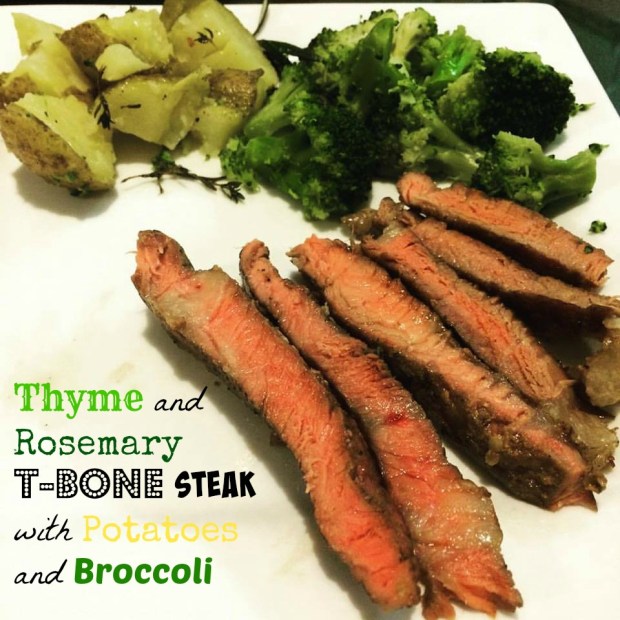
There are many cuts of steak I love to prepare, but I think one of the most romantic cuts (that is, a steak you can split for two), is a T-Bone steak. What I love about the T-Bone is that it’s two different steaks inside one. One half is a New York Strip and the other half is a Filet Mignon. The only problem with cooking a T-Bone steak is that the Filet Mignon, because it’s much smaller in proportion to the New York Strip, will naturally cook more quickly than its counterpart. This is only good is your significant other likes slightly more cooked meat and is partial to the Filet, but if you are sharing equally, you need to be thoughtful to how you prepare your steak with the challenges presented: two different meats, and a bone. Steak on the bone has definitely more flavor, but with the bone inside, the steak will be rarer near the bone and thus appear uneven.

I used to get really pissed off when customers would send a T-Bone back at my job; they would eat almost their entire steak, and then bam! They would cut near the bone and freak out when they saw a little blood. If only these patrons knew that the bone is blocking the distribution of heat hence the rarer inside. Ugh. At least now you know! Knowledge is power.

This meal is great if you are looking to cook a simple, romantic dinner for two.

I decided to make this mostly foolproof by using a few tricks…

1.) The steak is “reverse seared” which means it’s slow cooked in the oven for a short amount of time and THEN seared in a hot, cast iron skillet. Many times, people try to sear the outside first and then finish in the oven, but there is less consistency. If you want more control, this is the method for you.

2.) I used my microwave for my vegetables. Sue me. They taste wonderfully.

3.) Even though I use a few short cuts, I am ultimately using the freshest ingredients: the best meat I can find, fresh herbs versus dried (sorry!), and freshly cracked pepper and salt to form that wonderful crust.

Alright, enough talking. Let’s eat!

Ingredients

  • 1 1/2 pound T-Bone Steak (or any other steak of your choice)
  • 1 Steamable Potato Bag (go for petite potatoes or even red potatoes)
  • 1 Steamable Broccoli Bag
  • Four cloves of garlic
  • 2 tablespoons of olive oil
  • 1 tablespoon of Canola oil
  • 1 tablespoon of butter (salted or unsalted–your call)
  • Fresh thyme (at least 5 sprigs)
  • Fresh rosemary (at least two sprigs)
  • Freshly cracked salt and pepper (no table salt!)

Meat and Greet

  1. Take your steak out of the refrigerator so it comes to room temperature. Lay it out on a plate and add salt and pepper liberally. With a garlic press, smash four cloves of garlic and press them deeply into the steak.To infuse the steak with herby flavor, take off thyme leaves and rosemary leaves. You will remove these herbs before cooking.
  2. Preheat your oven to 250 degrees. Get a wire rack and baking sheet. Line the baking sheet with aluminum foil for easy clean up.
  3. While you’re waiting for the oven to pre-heat, make your potatoes. Get olive oil, thyme and rosemary leaves (about 1 sprig of each–more to taste) and rub them on all the potatoes before microwaving. Throw the potatoes in the microwave (it’s usually about 8 minutes) once they are all evenly coated. You may need to microwave them again to make them fork tender (about another 2-3 minutes.)
  4. Once the oven is pre-heated, put the seasoned steak on the rack (take off the herbs). Cook the steak in the oven (flipping mid way through) for about 30 minutes (could be more if the steak is really thick–look at it every 10-15 minutes to be careful!)
  5. Take the steak out and let it rest. In the meantime, heat up your cast iron skillet with 1 ounce of Canola oil (it has a high smoke point) on medium high heat.
  6. Once the skillet is hot enough, sear the steak on about 2-3 minutes per side until a crust forms (this will create a medium rare). Towards the end, melt 1 tablespoon of butter and throw in some whole thyme and rosemary sprigs for aromatics. Baste the steak in the melted butter. Remove the aromatics (the sprigs) after about two minutes.
  7. Let the steak rest. As the steak is resting on the rack, microwave your steamable broccoli. Once the broccoli is done (about 5 minutes), add salt and pepper.
  8. You may re-heat your potatoes in the microwave on a plate with leftover thyme/rosemary leaves, or you may crisp the potatoes up in the already hot cast iron skillet–your choice!
  9. Slice thinly to share, or you may split the Filet Migon from the New York Strip. Your choice! 🙂


Stuffed Porkchops with Jalapeño Popper Filling, Roasted Brussel Sprouts, and Petite Sweet Potatoes

12938287_10206132379921694_296138030822302642_n-2.jpg

Happy Tuesday!

I love jalapeño poppers…I don’t think I can ever get enough. It reminds me of a fiesta, football, and a fun time–each and every time.I actually don’t think I eat these enough. But when I do, I go crazy. I love the combination of moderate heat with the coolness of cream cheese. And to make matters better, they’re deep fried which almost guarantees perfection. I used to work at Texas Roadhouse as a waitress, and what I always loved most was when someone couldn’t handle the heat and sent back one of my favorite appetizers: “Snakebites.”

514.jpg

These were, contrary to popular belief, not made from actual snakes, and no–they have nothing to do with that awful liquor shot with Jack Daniels, Tequila, and Tabasco. These are the signature “jalapeño poppers” of Texas Roadhouse, and they are absolutely fabulous. They aren’t your typical whole jalapeño pepper stuffed with cheese; instead, snakebites are buttermilk dredged and fried cheese balls that are mixed with finely diced peppers (sweet bell peppers and jalapeño). I think the sweet peppers really complement the heat and flavor of the jalapeño without stealing the latter pepper’s limelight. They are absolutely perfect–be assured.

What we used to also do in the restaurant (please–if you go to Texas Roadhouse, do not ask them to do this for you because it is somewhat of a pain!) is order a custom early dine pork chop (hey–it was $8.99 between 4-6 and I got a 30% discount!). With this pork chop, I would want to “spice it up”, so I would butterfly the chop (if you are unfamiliar with the term simply means splitting it in half without fully cutting it) and add the snakebite filling inside. It is beyond delicious. I bet you it would be even better with a freshly fried “snakebite” on top too…ooh.

**Note: If you are not a pork chop fan, fear not! Some may think that pork too often dries out, but I assure you that if you prepare it well, you will change your mind. And if I am not going to convince you that pork chops can be made succulent and tasty, then at the very least make this filling for a stuffed grilled chicken breast, or maybe another protein of your choice. The options are endless, but I think chicken or pork would be best.

I haven’t had my custom pork chop in years, and I suddenly felt a need to re-create it again. I also knew that my freezer had a few lonely pork chops waiting to be defrosted. And when I want something, I will go to any length to have it. This recipe is cost efficient, tasty, and requires minimal effort. Go for the gold! Speaking of easy–my side dishes, the brussel sprouts and petite sweet potatoes, are cooked primarily in a microwave and you would never know the difference in taste–hey ho! For authentic caramelization on the brussel sprouts, however, I roasted them for ten minutes after cooking them in the microwave. Vegetables in those microwavable bags are your friends, people!

P.S: If you have extra filling, you may make your very own appetizer of “Snakebites” similar to Texas Roadhouse. Maybe I’ll post that later in the week…:) It’s always great to repurpose your ingredients! Let’s get started!

First–Yo’ Fiesta Filling for Yo’ Poppa’

Ingredients…

8 ounce package of cream cheese

1 cup of shredded Monterey Jack cheese

1 small, finely diced red bell pepper

1 small, finely diced yellow bell pepper

1 small, finely diced and deseeded jalapeño pepper

Directions: First, finely dice all the aforementioned peppers (really finely!) In a medium sized bowl, mix cream cheese, jack cheese, and peppers together. Make sure everything is well incorporated. Grab plastic wrap and form the cream cheese mixture into a log. Refrigerate immediately for later use.

Second–Get To The Choppa’

Ingredients…

1 package of pork chops (should be four in a package; I used boneless and centercut–preferably thick chops. You could alternatively get bone in chops–they are delicious too!)

1 bag of microwavable brussel sprouts** (Trader Joe’s makes an excellent product!)

1 bag of microwavable petite sweet potatoes**

4 tablespoons of olive oil, divided (some for pork, some for potatoes, some for brussel sprouts)

2 tablespoons of salt and pepper (more or less to taste) for pork and/or brussel sprouts

1 teaspoon of crushed red pepper (optional) for pork and/or brussel sprouts

**–only if you are making the side dishes

Start With Your Side Dishes: Brussel Sprouts and Petite Sweet Potatoes

  1. First, make your side dishes. Microwave your sweet potatoes first (they should take about eight minutes in the microwave.
  2. Before microwaving, coat the potatoes with olive oil in the microwavable –approximately two tablespoons. The sweet potatoes will not need any more preparation after being microwaved.
  3. Next, microwave the brussel sprouts (do not add any oil.) Let both items cool before handling.
  4. Pre-heat your oven (or toaster oven as brussel sprouts are small) so you can roast your brussel sprouts to enhance the caramelized flavor.
  5. On a small sheet pan, put a silicone liner or aluminum foil.
  6. Cut the ends of the brussel sprouts, and cut each sprout in half. Place halved brussel sprouts on the sheet pan.
  7. Drizzle olive oil, salt, pepper, and red pepper flake on brussel sprouts (about 1 tablespoon of olive oil–add more if you like, and about half a teaspoon of salt, pepper, and red pepper flake).
  8. Roast coated brussel sprouts in the oven for approximately 10-15 until caramelized and brown.

Finish Your Main Course: Jalapeño Popped Stuffed Pork Chop

  1. Start Your Base: Season your pork chop with remaining amounts of olive oil, salt, pepper, and red pepper flake (more or less to taste.)
  2. Begin to Butterfly: Place your left hand flat on the pork chop (if you’re right handed, vice versa for left handed) and using a sharp knife, butterfly the pork chop. Your opposite hand is essentially “sawing” the chop in half that it is split, but make sure you don’t cut all the way through and split the chop in two separate halves! If this is too difficult, you may grill the pork chops and put the filling on top, alternatively.
  3. Take the jalapeño mixture out of the refrigerator and portion about 1-2 ounces of the filling and stuff inside the pork chop.  DO NOT OVERFILL! IT WILL OOZE OUT. If you have cooking twine, you may tie the chop to keep the filling in, but this isn’t necessary.
  4. Heat up cast iron grill pan or outdoor grill. Make sure the grill is very hot!
  5. Once the grill is heated, please pork chop on grill. Make sure you get a nice brown sear and grill marks. You should cook each side about 5-6 minutes on each side (if appropriately thick, about 1 inch). Don’t forget to flip and make sure it has that great color!
  6. If you desire to use a food them orator, it should be done at 140 degrees Fahrenheit.)
  7. Reheat your side dishes lightly in the microwave and put on the plate with the pork chop. Devour immediately!