Southern Style Crab Cake Melt with Cheddar, Remoulade, and Roasted Asparagus

SouthernCrabCake.jpg

Happy Tuesday!

I apologize for not posting; I’ve been overwhelmed between preparing to move, ending my school year, and so on. But no more excuses–I am here to stay!

I prepared this recipe yesterday to help my neighbor Jennifer with her “Surf and Turf” themed Memorial Day party. She was dead set on us making a ceviche, but I know that I am not one that likes to experiment on a large group of people. The little experience I have with ceviche tells me that I should 1.) get the freshest seafood ever and 2.) I need enough acid/time to marinate the fish. And so, I encouraged her to let me go with one of my favorite things to eat instead…crab!

I love crab cakes, crab legs with drawn butter, soft-shell crab, she-crab soup, or a crab gnocchi bake; Zach and I could devour Snow Crab, in particular, for days. Crab has such a distinct sweetness and flavor that it is totally undeniable. Crab cakes are definitely a weakness of mine, but they’re often…mediocre. I’ve had them out and have been disappointed. They can be dry, loaded with fillers (and thus, very little crab), and quite frankly, unaffordable for the average person dining out.

It’s one of the more expensive items you can purchase in a restaurant, and it may be an item you are afraid to make yourself because..

1.) It’s costly–chicken, anyone?

2.) It’s seafood–frightening for some.

But trust me when I say it isn’t that scary at all! And while I agree it’s not the cheapest meal to make, it’s so worth it. For this recipe, I use good quality canned crab (Phillips’). Yes, you could use fresh crab. Sure, you can cook your own crab and pick them to pieces, but you’ll die of starvation by the time you’re finished. Good quality canned crab is appropriate for this dish!

You should make this if you’re a crab lover and/or you’re looking to impress. Even if you’re not entertaining a few guests, this recipe can be easily even made for a single person (yes, you read that right), so that you can make yourself a 15 minute meal that tastes divine.

Now I have a “holiday” crab cake recipe I make, and I also make a salmon cake that is similar to the recipe I am providing here. This crab cake melt, however, is less fuss. When you’re cooking for a crowd, you don’t want complicated. You want tasty and easy, and this is perfectly that.

From all my experiences making seafood cakes (I’ve made tons), the best base has…

1.) Creamy components (Mayo, Sour Cream, and/or Remoulade)

2.) Butter Crackers (Like Club or Ritz)

3.) Sautéed Diced Peppers and/or Onions

Sure, you can make a deep fried one with typical breading (Panko or Italian-Style), but I don’t think that does anything to actually accentuate the natural taste of the crab cake. I personally (and for this recipe) broil, not fry the crab cakes. The flavor is much more prominent, and I believe the crushed cracker breading approach creates the right texture.

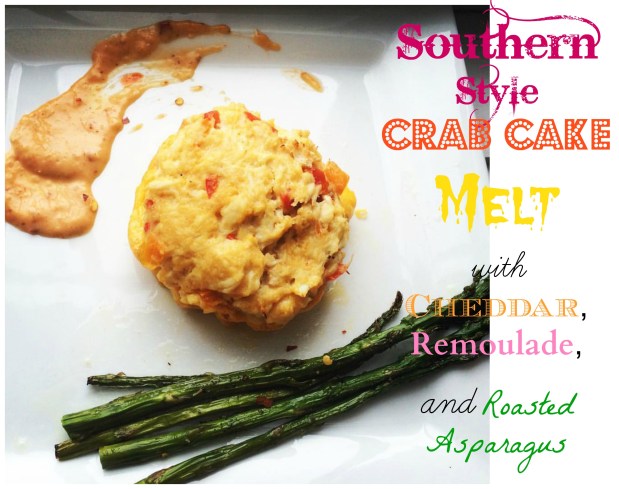
Now what heightens this dish (without taking away the excellent seafood flavor) is the cheddar that is melted. This crab cake melt, as the name implies, involves smothering the crab cake in gooey cheese on top of a split English muffin. It’s amazing! The first time I had a Crab Cake Melt was in Downtown Wilmington, NC. Not only was it fantastic, but it was only $9.99 at an awesome place called Paddy’s Hollow.

For the price of two crab cakes at the aforementioned restaurant, you can serve a hearty appetizer for 12, so let’s get started! Again, this recipe can easily be scaled down to a romantic meal for two, so don’t feel the need to invite company over…

Because I doubt you’ll want to share. 🙂

Ingredients for Side Dish: Roasted Asparagus

  • 1 bunch of fresh Asparagus
  • 1-2 tablespoons of Extra Virgin Olive Oil
  • Salt and Pepper

Ingredients for Remoulade (Make first to add to your crab cake mixture!)

    • 3 cups mayonnaise (or sour cream!)
    • ½ cup Dijon mustard
    • 1 tablespoon Worcestershire
    • 1 tablespoon hot sauce (I like Cholula!)
    • 1 teaspoon Cajun seasoning blend** (optional)
    • 1 teaspoon paprika
    • 1 tablespoon freshly squeezed lemon juice
    • 1 tablespoon prepared horseradish
    • 1 tablespoon ketchup, plus more if needed
    • 1 tablespoon finely minced garlic
    • 2 tablespoons chopped capers
    • 2 tablespoons sweet pickle relish
    • 2 tablespoons finely diced celery
    • 2 tablespoons finely chopped flat-leaf parsley
    • 1 tablespoon finely diced green onion tops
    • Kosher salt and freshly ground black pepper

Ingredients for Crab Cake for 2 (Multiply most ingredients by 6 to create 12!)

  • 2.5-3 ounces of lumped crab meat (canned)
  • 3 tablespoon of sour cream (or mayo)
  • 1 tablespoon Worcestershire
  • 1 tablespoon hot sauce (Cholula or Sriracha works for me!)
  • 1 tablespoon Dijon mustard
  • 1/6th of a sleeve of Club Crackers, crushed finely (if you’re making for 12, use a whole sleeve)
  • 1 beaten egg** (for 12 servings, I only needed 2-3 large eggs to bind!)
  • 3 sliced and diced jarred roasted sweet bell peppers OR 3 sliced and diced sweet MINI bell peppers (you must sauté beforehand) FINELY DICED
  • Salt and pepper, to taste
  • 1-2 tablespoons of homemade Remoulade (P.S: If you don’t have time, you can buy this, too–but fresh is best!)

For serving…

  • 1 split English muffin (or 1 package of English muffins for company; I recommend Thomas’ English muffins)
  • 2 slices of Cheddar cheese


Directions for Side Dish: Roasted Asparagus

  1. Slice off woody ends of fresh asparagus.
  2. On a sheet pan, evenly spread out asparagus. Coat with olive oil, salt, and pepper.
  3. Once oven is preheated to 400 degrees, cook for 10 minutes. Do not cook it any longer than that! If you’re serving this for company, cook the asparagus last.

Remoulade Directions

  1. In a large mixing bowl, add the mayonnaise or sour cream. Whisk in the mustard, Worcestershire, hot sauce, seasoning blend, paprika, lemon juice, and horseradish. Add the ketchup and whisk together. Add more ketchup as needed to get the pink coloring necessary.
  2. Once the color is achieved, add in the garlic, capers, relish, celery, parsley, and green onion. Stir to combine and add salt and pepper to taste. Cover and refrigerate for at least an hour.

Crab Cakes Directions

  1. First, slice and dice your sweet bell peppers very finely. If your peppers are not jarred (in other words, fresh peppers), sauté them in 1 tablespoon of extra virgin olive oil and 1 teaspoon of Worcestershire. Stir until soft and fragrant. Put aside to cool–do not add to mixture until cooled as you are adding them to eggs! You don’t want scrambled eggs, do you now? 🙂
  2. Once the peppers are cooled (or if they’re jarred, simply diced), add them to a bowl. Next, add the canned crab, hot sauce, Dijon mustard, mayo/sour cream, beaten egg(s), and remoulade. Over the sink, pulverize your cracker sleeve finely. You may use a food processor if you don’t feel like smashing the crackers yourself. Tip: Use your index finger and thumb to break up large pieces! Once the crackers are crushed, add them to the mixture. Stir lightly to combine; don’t overmix! Make sure your mixture looks nice and moist. If it doesn’t look super moist, add a little bit more remoulade, sour cream, and Dijon mustard.
  3. Next, split your English muffins in half. Toast your English muffins about halfway.
  4. Once the English muffins are toasted, place sliced cheddar on the bottom of each English muffin half.
  5. On top of the cheddar, scoop out a generous amount of crab cake mixture  that will eventually be distributed on each English muffin slice. You don’t have to shape it with your hands–simply plop on top.
  6. **Alternatively, you can place the cheddar on top of the crab cake depending on how particular you are about presentation! If the cheese slice is too large, you’re better off putting the cheese on the bottom.
  7. When ready to serve (and remember, these can be made ahead), broil for about 10 minutes until golden brown.
  8. Serve with remoulade on top!


Pan Seared Brown Butter Sea Scallops with Parmesan and Pea Risotto

Pan Seared Brown Butter Sea Scallops with Parmesan and Pea Risotto

Happy Tuesday!

I am exhausted. I admit it (I rarely do). I’ve been driving and flying all over the place lately. This weekend, I drove to Raleigh to fly back home to Pennsylvania to host and attend my best friend’s bridal shower. I am a tired soul. On my late flight home last night, I was thinking about what I wanted to make for dinner the next day (and the rest of the week–I’m a foodie, after all). All I could think about was my succulent sea scallops I had in my freezer. But would I have the energy to prepare this vision? You better believe it!

This meal that I (selfishly) made only for myself today sounds romantic and date night appropriate. Seafood screams “expensive” and “restaurant” as well as “risotto.” And while I wouldn’t be objected to making this for my significant other, I want to stress that to make this delicious meal doesn’t warrant a special occasion. I made this dinner in about 25 minutes from prep to plate. I know that this doesn’t sound weeknight friendly, but believe me, it is. This is quite the impressive feat.

Sea scallops, similar to crab, has a unique sweetness unlike other fish. Sea scallops are supreme to bay. Sea scallops are the larger of the two; to help you remember, think of the vastness of the sea. If a sea is huge, so is the sea scallop. Bays are just the “connection to the body of water”, so bay scallops aren’t as large as the latter. I believe that size matters when it comes to scallops. Bay scallops are okay for dishes where they are not quite the star of a dish, but for this dinner, you need to invest in the sea scallops. Are they pricier? Yes, but you’re worth it. Besides, you can get a great deal on frozen scallops (and when they thaw, they are virtually the same as if they were fresh off the dock) every now and again. I paid about $13.00 for 1 1/2 pounds! Not a bad deal, if you ask me. Once you see them on sale, snag them and put them in your freezer for whenever you’re feeling inspired!

Now for the next layer of luxury: Risotto. Risotto is not just rice; if you haven’t had risotto, you’re in for a treat. Risotto is an Italian preparation of arborio rice. Risotto, if done properly, is rich and creamy without a lick of cream (could you imagine that?) The starches as they are slowly released create a thickness to the rice. Risotto isn’t necessarily difficult to make, although it takes patience and careful attention. Please follow my directions carefully as I have seen risotto be destroyed by impatience by adding too little liquid, too much liquid, or not stirring enough. It’s about balance! I add grated parmesan at the end to add to the creaminess and nuttiness that is to complement the brown butter.

The scallops and risotto are paired beautifully naturally, but they are enhanced with the brown butter. If you’ve never had browned butter, you are in for a treat. The nuttiness and depth comes out in butter when the butter itself is cooked. All you need to do is melt butter in a frying pan and wait for it to change to a medium brown. Some people like deeper brown butters, but be careful not to burn it! You can stir occasionally to see what’s happening.

Enough talking–let’s cook!

All The Fish In The Sea

Risotto

  • 1 tablespoon butter
  • 1 tablespoon of extra virgin olive oil
  • 1 minced clove garlic
  • 1/2 diced yellow onion (very finely)
  • 1 cup arborio rice
  • ½ cup white wine (I used Pinot Grigio)
  • 3-4 cups of chicken broth  (I would grab a 32 ounce carton–it’s better to have more than less!)
  • ½ cup of frozen peas
  • ½ cup Parmesan cheese, or more to taste
  • salt and pepper to taste (preferably, freshly cracked)
Seared Scallops
  • 1 pound jumbo scallops (use leftover brown butter to sear scallops)**
  • salt and pepper to taste (preferably, freshly cracked)

**-If you are using frozen scallops, thaw them by placing them in a plastic bag and submerging them in cold water for a half an hour. You can do this as you’re making the risotto. The scallops only take 3 minutes to cook!

***-Whether your scallops are frozen or fresh, pat them dry with a paper towel (extra dry!) so there is no liquid. This is to ensure an excellent sear!

Brown Butter
  • 3-4 tablespoons butter

Directions for Risotto:

First, make your risotto. This takes the longest! Cut up your garlic and onion.   In a large non-stick skillet over medium heat, melt the butter and olive oil. Add the garlic and diced onion and saute for a minute or two until soft and fragrant. Add the arborio rice so it toasts a bit, but then stir to coat with butter and olive oil. Add the white wine. Add the chicken broth, ½ cup at a time, and simmer and stir after each addition until the rice is soft and creamy. You must stir very frequently, but let it simmer every 30 seconds or so in order to adequately cook the rice! Each time you add the 1/2 cup of broth, stir constantly so that the rice is absorbing the liquid. Once it seems like the liquid is almost all absorbed, add more (approximately 3 cups). Do not burn the rice! This process of ladling liquid into the risotto should take about 20 minutes. Taste the rice and make sure it’s soft and creamy. The starches should be released so that the mixture is thick without adding anything. Towards the end of cooking, add the frozen peas. Lastly, add the parmesan and stir until incorporated. Crack salt and pepper to taste.

Directions for Brown Butter:

Put a few tablespoons of butter in a clean skillet over medium heat and stir it while watching it closely – when it starts to look golden and foamy, remove from heat, and place a bowl aside.

Directions for Scallops: 

With the leftover butter that is in the pan for the brown butter you should be able to cook the scallops. You do not want too much oil because that will get in the way of the sear on the scallop. If you have too little oil, the scallop will stick to the pan. There should be butter on the pan with brown/black solids from before. Before cooking the scallops, pat the scallops dry with a paper towel. Next, sprinkle with the scallop with freshly cracked sea salt and pepper, and add to pan. They should sizzle. If you don’t hear a sizzle, pull it out and wait until it’s heated long enough. Shake gently to prevent sticking. After 2-3 minutes, flip each scallop over. They should have a pretty golden brown exterior and an opaque inside. Transfer to a paper towel lined plate to absorb excess oil.

All Together:

Scoop risotto into a bowl. Place approximately 4-6 scallops per person on top of the risotto. Drizzle the brown butter on top of the scallops as well as a little bit on the risotto. Enjoy!

Fried Chicken and Belgian Waffle Sliders with Arugula, Tomato, and Avocado and Maple Dijon Sauce

13165960_10206335818207524_8884107941874790437_n

Happy Sunday!

So I have this tradition I’ve had for quite some time since I’ve lived on my own…I make waffles on Sunday. Some people find solace in attendance of church services, others take long drives–me? I make waffles. It gives me a sense of inner peace, and it’s something I look forward to by the week’s final end. My fiancé bought me an awesome Waring professional Belgian waffle maker for my birthday last year, and I have used it religiously with utter delight. I am a lover of brunch with champagne, and I think that to be a proper brunch host, I just needed to have a solid waffle maker. Thanks, Zach!

I made my Belgian cuties as usual today for my love and me…except it’s just two of us, and I slipped by making extra batter. It was probably the best mistake I made today. The worst mistake I made was going to Michael’s (the crafts store) thinking that I could only buy one thing…ugh. My credit card is officially whacked for the month. 🙂

13177799_10206331925590211_5924864210540749297_n

I could eat these for the rest of the week, but that might get old. I decided to make them as sandwiches…genius! I recalled a Pinterest post and thought that today would be the day to give it a go. I didn’t follow the recipe for the waffle batter like they specified as I used my waffle recipe from this morning. The recipe in the Pinterest post is excellent for a savory waffle, so when you go make this yourself, feel free to use that one, but just know that you don’t necessarily need a savory waffle for this awesome sandwich. I believe the chicken, avocado, tomato, and arugula add enough savoriness, but to each their own!

If you are a southerner, or if you have a southern palate, you know how amazing fried chicken and waffles is. It’s a wonderful balance of sweet and savory, and it’s an excellent brunch item as it encompasses the best BUTTERMILK items. Ladies and gents–I do require you use buttermilk for your chicken, and preferably also for your waffles. Buttermilk does absolute wonders, and it is my secret weapon for today. Tip: If you don’t feel like running out and buying buttermilk, you can always add a little vinegar to regular milk and bam! The chemistry experiment will suffice as your vice.

This recipe is relatively simple, but if you have time on your side, go for the overnight yeast waffles versus my fast waffles (especially for breakfast). They are both good, but the yeast waffles are superb.

Same thing for the chicken–it’s best to let the chicken marinate in buttermilk overnight, and dredged so that the outside dries out and the inside remains moist (you know, the crispiest fried chicken ever.) Time is your friend, but if you’re short on time, you can always take short cuts. Heck, you can even buy fried chicken to not make a mess. I just won’t allow you to make Eggo waffles in lieu of a homemade batter. If you do want simple box mix, I like to use Aunt Jemina in a pinch. But please, let go of that EGGO. 🙂

This post is going to look really long, but that’s because I included three options for waffles. First, pick your waffle you want to make. I offer the savory version that has cheddar and scallions from Candid Appetite, my easy waffle, and my overnight waffle (which is great when time is on your side.) They’e all good–it just depends on your need.

After you make your waffles, then work on your chicken.

Lastly, ASSSSSSEEEEMMMMMBBBLLLEE!

STEP ONE: Waffle Batter Ingredients and Instructions (Pick One!)

Savory Version from Candid Appetite:

Ingredients

2 cups (250 grams) all-purpose flour

¼ cup (55 grams) light-brown sugar

1 teaspoon (8 grams) baking soda

1 ½ teaspoons (6 grams) baking powder

½ teaspoon (4 grams) salt

2 teaspoons (14 grams) freshly cracked black pepper

3 large eggs, room temperature

Instructions: 

  1. Preheat waffle iron.
  2. In a large bowl stir together the flour, brown sugar, baking soda, baking powder, salt and black pepper. Make a well in the center of the bowl and set aside.
  3. Crack the eggs into a small bowl and whisk together. Pour into the center of the dry ingredients. Add the melted butter and buttermilk. Using a wooden spoon, stir the waffle batter until just combined. It should be sightly lumpy. If the batter appears to be too thick, add a splash of buttermilk and stir until pouring consistency is reached. Fold in the cooked chopped bacon, shredded cheddar cheese, and sliced green onions.
  4. Lightly grease the waffle iron with cooking spray or melted butter. Pour in about ½ cup batter in each waffle cavity, more or less depending on size of waffle iron. Cook until the waffles are golden brown and crispy.

Easy Weekend Waffle from Lei Mangia :

2 cups  flour

4 teaspoons  baking powder

1⁄2 teaspoon  salt

1⁄4 cup  sugar

1 teaspoon pure vanilla extract 

2 eggs (you could separate yolks from whites, whip up whites until fluffy and add to batter if you have time, but again it’s the easy waffle!)

1⁄2 cup of Canola oil

2 cups milk (but buttermilk, preferably!)

Instructions: 

  1. Preheat waffle iron.
  2. Sift the dry ingredients together in a large bowl.
  3. Separate the eggs.
  4. In small bowl, beat egg whites until stiff.** (or to make it simple,  don’t separate the eggs–the whites will make your waffle fluffier, though.)
  5. Mix together the egg yolks, milk and oil and stir slightly.
  6. Add to dry ingredients and mix well.
  7. Fold in beaten egg whites.
  8. Put 2/3-1 cup of waffle mixture in the center of the waffle iron. Do not close your iron until all the mixture is properly distributed! Cook for about 5 minutes (depending on your waffle maker’s setting.)

Perfect Overnight Belgian Waffles (Based off of Barefoot Contessa and modified by Lei Mangia):

½ cup warm water (110 to 115 degrees) 
1 package (1/4 ounce) active dry yeast, at room temperature 
2 teaspoons sugar 
2 cups lukewarm whole milk (90 to 100 degrees) 
¼ pound (1 stick) unsalted butter, melted
plus extra for the waffle iron** (Or use cooking spray like Pam)
2 tablespoons honey  (I usually leave the honey out–it’s up to you!)
1 teaspoon pure vanilla extract 
1¼ teaspoons kosher salt 
2 cups all-purpose flour 
2 extra-large eggs 
¼ teaspoon baking soda 

Instructions: The night before, combine the water, yeast, and sugar in a very large bowl (the batter will expand enormously).

  1. Allow it to stand for about 5 minutes, until the yeast dissolves and the mixture has started to foam, which tells you the yeast is alive. Stir in the milk, butter, honey*, vanilla, and salt. Add the flour and whisk until the batter is smooth.
  2. Cover the bowl with plastic wrap and allow it to sit overnight at a cool room temperature.
  3. The next morning, preheat a Belgian waffle iron according to manufacturer’s instructions and brush the top and bottom with melted butter (or use cooking spray, which is easier).
  4. Beat the eggs together with the baking soda and whisk them into the batter until combined.
  5. Pour just enough of the batter onto the hot waffle iron to cover the grids (1/3 to ½ cup each, depending on your waffle maker), close, and cook for 5 to 6 minutes on medium heat, until the waffles are golden brown. Remember: It’s always best to go on a lighter setting and leave it in longer versus overcooking!

STEP TWO: Make Your Finger Lickin’ Chicken!

1 pound chicken breast cutlets, cut in half

1½ cups buttermilk

1 tablespoon of hot sauce, optional (but recommended, and I love Cholula!)

1½ cups all-purpose flour

1 teaspoon salt

1 teaspoon cayenne pepper

1 teaspoon garlic powder

1 teaspoon black pepper

canola oil for frying (fill a cast iron skillet!)

Instructions;
  1. Place the chicken in a large bowl. Cover with buttermilk and add the hot sauce, if using. Toss together until evenly mixed and all the chicken is submerged in the buttermilk. Cover with plastic wrap and place in the fridge for at least 30 minutes. If you don’t have the time, this step is not crucial but it will help make the chicken tender and juicy. You can leave it up to overnight, which if you’re doing this ahead, I totally recommend!
  2. In a shallow dish combine the flour, salt, cayenne pepper, garlic powder, and black pepper.
  3. To coat the chicken, grab a piece from the buttermilk bowl, slightly drain off, and throw into the flour.
  4. Pat the flour into the chicken, on both sides. Return to the buttermilk bowl (with the rest of the chicken) and coat both sides.
  5. Place the chicken back into the flour, once more, and coat both sides. We’re double dipping the chicken. Lay the coated chicken on a rack placed over a baking sheet. Repeat in this manner until all the chicken is coated.
  6. Allow the coated chicken to rest for at least 10 minutes, this will allow the fry to dry a bit and stick to the chicken.
  7. In the meantime, heat about 2 inches of oil in a heavy duty pan, such as a cast iron skillet.
  8. Once the oil is hot, fry the chicken in batches. Cook for about 5 minutes on the first side, turn over once golden brown and crispy, continue to cook for another 4 minutes on the other side.
  9. Drain the chicken and place on a separate rack set over a baking sheet. You can keep the cooked chicken warm in a 200°F oven until all the chicken is fried and you’re ready to serve.

Or, you can buy fried chicken and save yourself the fuss. 🙂

STEP THREE: Assembling Your Sandwich

Ingredients

1 cup of arugula

1 thinly sliced tomato (preferably off the vine)

1/2 slice of ripened avocado

1/4 cup of pure Maple syrup

3-4 tablespoons of Dijon Mustard

Prepared Waffle and Chicken

The Finale…

  1. Take your waffle and divide it into sections (mine has four sections per waffle which makes two sandwiches per waffle.)
  2. Slice avocado and tomato. Rinse arugula.
  3. Mix maple syrup and Dijon mustard together to create sauce.
  4. Put thin avocado slices on the bottom piece of the waffle.
  5. Place chicken on top of the avocado. Drizzle sauce.
  6. Put sliced tomato on top of avocado layer. Put a half a handful of arugula on top of the tomato. Slightly dress the arugula with more sauce.
  7. Place another waffle piece on top. You may use a toothpick to keep it together, if you like.
  8. Eat! You may need a knife and fork, but that’s only half the fun. 🙂


Charleston’s Cafes: Best Breakfast Joints in the Low Country

Happy Sunday,

Last weekend, I took an impromptu girl’s trip to Charleston, South Carolina. I am always enchanted by this city each time I go. There is always something to do, and there is always something good to eat! I could go on and on about where to eat dinner, but when I was searching some travel blogs, very few wrote about breakfast. I know that some hotels include your breakfast, but c’mon! You’re on vacation. Treat yourself like royalty!

The two places I am suggesting are not in historic downtown (sorry), but they are right over the Arthur Ravenel Jr. Bridge. They are very close to downtown, however! Interestingly, both of the places I love are in strip malls (looks are deceiving.) These joints have a blend of tourists and locals alike, and they clearly use the freshest, local ingredients. I go to both these places each time I go, and so should you!

Three Little Birds, 65 Windermere Blvd., Charleston, SC 29407

http://www.threelittlebirdscafe.com

IMG_7686

This place is where my friend Jen and I went first upon arriving to Charleston. Upon walking to this restaurant, you’ll see this unique ivy sprawled all around the front of the restaurant. The name, Three Little Birds, is likely an allusion to Bob Marley, and it has a very simple island vibe to it. This is the hipster/hippie’s paradise. They have mason jars (my weakness) and colorful coffee mugs with plates that are equally vibrant. Upon walking in, you’ll smell the freshly pressed juice (how rare is to find that these days?) and freshly ground coffee. Speaking of juice and coffee, please get both–the coffee is from a local vendor and is probably one of the least bitter coffees I have had (excessive cream and sugar not needed–it’s that good on its own), and the juice is refreshing and almost therapeutic.

Now let’s talk food! Last year, I had this “out of this world” Crab Cake Benedict; however, that was only a daily special for the time. I instead ordered the Sweet Potato Benedict which had Poached Eggs, Ham, and Hollandaise over Sweet Potato Biscuits with Cheese Grits. It only cost me $8.95, and boy did it satisfy. I will admit that I am partial to the special they had last year (that would be a 15/10), but as an aficionado of all foods with Hollandaise, I have to tip my hat off to Three Little birds again–it was spectacular. The eggs were perfectly poached and runny upon breaking their “love seal.” The ham was crisp but tender, and the homemade sweet potato biscuit was a great substitute for a tradition English muffin. The grits were good–the cheese were a bit thick of a shred for my taste, but once it melted in, it was great!

13138878_10206290822802667_4454136562039154453_n

Rating 9 out of 10

This is Jen’s breakfast, and she was very satisfied. Because she comes from California, I know that Jen is a good judge of fresh food. Jen is very used to eating local everything. Featured here is a daily special; it was a Scrambled Egg Burrito with Potatoes and Peppers with Fresh Salsa, Sour Cream, and fruit (strawberries and orange slices).

She was impressed with the whole dish, but she was especially impressed with the pressed seal of the burrito and the salsa. Sometimes, when you order any burrito out, it falls apart because it’s overstuffed and/or not wrapped properly. There was just the right amount of filling, and it was clearly pressed (similar to a panini) for the crisp texture of the tortilla on the outside as well as for maintaining all ingredients inside. She said this salsa she had (a regular item they have–don’t worry) was the best she has had since she has moved to the Carolinas. You know what that means–it competes with California! 🙂

13151778_10206290822762666_3873977049984390089_n

Rating 9 out of 10

**The next restaurant I am going to talk about I absolutely fell in love with last time; however, this time, there was definitely poor execution of our food (a few send backs on our behalf as well as others), but it does not mean I wouldn’t recommend this place. They had an off day, but once our food came back correctly, it was salvaged. Every place has its moments. I still recommend this place, but I am going to maintain integrity with my review. 🙂

Charleston’s Cafe, 1039 Johnnie Dodds Blvd., Mount Pleasant, SC 29464

www.charlestonscafe.com

cafe_edited_5-e1407771531297

It sounds really tourist-y to go to a place in Charleston with a name like “Charleston’s Cafe.” It almost sounds like a trap, but I promise you, this place has impressed the locals as well. When we arrived here on our way out of Charleston, it was relatively early on a Sunday (around 9 am), and we had to wait about 25 minutes. You know a place is good when there’s a wait for breakfast. And you also know its good as the outside of this place is brandished with awards locally as well as reputable companies like TripAdvisor and Zagat.

Upon walking in, you’ll feel like you’re walking into a mom and pop’s place; it has a very inviting family feel to it. There are always specials on the white board that are intriguing, but I know when I come here just what I want—A DEEP FRIED CINNAMON ROLL. And it comes at a reasonable price to clog your arteries with delight; it’s only 5 bucks! I told Jen (as I was salivating) how much I was looking forward to eating this Cinnamon Roll. It was one of the best things, if not the best things I ever ate dessert wise.

13103546_10206290822522660_700713694593935152_n

Everyone loves a cinnamon roll; it can only get exponentially better by its preparation method and its icing. It is deep fried, which is dangerous, but makes it crispy on the outside but extra warm and gooey on the inside. The melted butter/cream cheese icing maintains that authentic nostalgic taste of a cinnamon roll and distributes decadence to each and every bite.

I probably gave it too much hype; I know it was all I could talk about for the 15-20 minutes we had to wait for our food, but it had been an entire year without this delectable dessert, and I was needing it. Yes. Need. And so, I ordered breakfast but wanted to order one to go (I considered buying two), and Jen ordered one to eat for breakfast, and one to go home. Yes, it is worth it.

But unfortunately, this time we both had to send back our rolls because they were overfried the first time. As you can see in the picture, it is slightly overcooked; it should be a golden brown not–“oh crap! I left it in the fryer too long” brown. It definitely was still good, but we needed to send it back because I have absurdly high expectations for it. Once we had the new rolls, we were much happier.

I do require (yes–REQUIRE) you to order this if you are in the Charleston area. It will change your life…and maybe your pant size too, but it’s worth it!

On that note, before I stop talking about this cinnamon roll that I could never get tired of discussing–the cinnamon roll actually tastes better if you let it sit. Seriously! If you order it and eat it about an hour or two later, you’ll hit the money spot. The butter and cream cheese melts into the cinnamon roll and makes it so moist and flavorful. So if you grab it, try to wait. If you can’t wait (which I totally understand), have a bite or two freshly fried and then force yourself to put it away. Slap yourself out of it.

Rating (ordinarily) 10 out of 10. (Our experience initially would give it a 7 out of 10)

So to try to balance out my palate, I ordered the Amber’s Choice Benedict: It had crab cakes, shrimp, kiebasa, and delicious Hollandaise. I think I was on a Benedict kick this weekend! Anyway, I have to say that this was excellent. My favorite part of this was the kielbasa; it was perfectly crispy and was a great substitute for Canadian bacon. The Hollandaise was smooth and not too lemony, and the shrimp had a butter poached taste. The crab cakes were delicious; however, they were slightly salty. I noticed if I put the Hollandaise on the crab cake bite it would cut the saltiness, but it still needed a little bit of a cut back. Unfortunately, when I went to break my poached eggs, they were clearly soft boiled and had no runny yolk. I sent back my eggs (as so did a woman next to me), but once they brought me new eggs, this dish was a home run. Again, this place had poor execution today, but the flavors and quality are still totally there.

Rating 8.5 out of 10

13087409_10206290822442658_3273108224568967448_n

Go to Charleston today! And don’t be afraid of the strip malls; they have these great places that I am so glad that I found, and I am so glad I could share them with you!

🙂