Rainbow Black and White Cookies🌈

Hi everyone! It’s been a while. Life happens, but cookies always seem to make it better.

So I am taking this Monthly class with Christina Tosi from Milk Bar. It’s her Creative Baking Class, and it’s been such a fun experience. For my “Cookie Unit,” I had to create my own rendition of a cookie. It’s hard to make something new, so I decided to channel my two favorite cookies together: The Black and White Cookie and the Italian/Seven Layer/Venetian Cookie. They’re both cake-like, so I thought it would be the perfect hybrid. I literally shoved a pre-made Italian cookie inside the black and white, and I made the Black and White Batter more “almondy” like a Seven Layer Cookie, but I am proud of this unique, never before created hybrid cookie. If you don’t want to be bothered with dyeing the cookie different layers, no worries, but it makes it more fun to eat and reinforces the contrast between “Black and White” and COLOR. Enjoy this Brooklyn bakery fusion!

Rainbow Black and White Cookies

Makes about 15 cookies

INGREDIENTS

For cookies:
2 1/2 cups of cake flour (I like Softsilk best!)
1 teaspoon baking soda
1 teaspoon salt
2/3 cup well-shaken buttermilk (I used 2/3 cup of whole milk with two teaspoons of fresh lemon juice)
1 teaspoon vanilla
2/3 cup (10 2/3 tablespoons) unsalted European butter, softened (like Kerrygold)
1/2 cup granulated sugar
8 oz almond paste (I used Solo)
2 large eggs
15 Italian/Rainbow cookies already made (Cake Bites brand is excellent, and three come in a package, so for that brand, grab 5 packs!)
1 jar of apricot preserves (you will NOT use the whole jar–I had some leftover in my fridge, so it was cost-effective for me…)**optional, but recommended highly!
gel food coloring (your choice of four colors: I used red, yellow, green, and blue)

for the glazes:

4 tablespoons (½ stick) unsalted butter
5 ounces good semisweet chocolate, such as Lindt, roughly chopped (I used Ghirardelli chocolate chips)
2 cups sifted confectioners’ sugar
2 tablespoons light corn syrup
½ teaspoon pure vanilla extract (use clear vanilla extract to make sure the color stays as white as possible)
2 to 3 tablespoons heavy cream
1 teaspoon of lemon juice (optional–if you like that lemon taste in your black and white cookie frosting)

Alternative for icings (but would only recommend for the chocolate portion–the vanilla portion is too transparent)

1 1/2 cups confectioners sugar
1 tablespoon light corn syrup
2 teaspoons fresh lemon juice
1/4 teaspoon vanilla
1 to 2 tablespoons water
1/4 cup unsweetened Dutch-process cocoa powder

BAKING THE COOKIES

1.) Preheat oven to 350°F.

2.) Whisk together flour, baking soda, and salt in a bowl.

3.) Stir together buttermilk and vanilla in a cup.

4.) Next, break up almond paste with your mixer before you add other ingredients. Drop the almond paste in the bowl and let it crumble finely on medium speed.

5.) Once the almond paste is broken up nicely, beat together butter and sugar in a large bowl with an electric mixer until pale and fluffy, about 3 minutes, then add egg, beating until combined well.

6.) Mix in flour mixture and buttermilk mixture alternately in batches at low speed (scraping down side of bowl occasionally), beginning and ending with flour mixture. Mix until smooth.

8.) If you would like to dye the layers, use a small cookie scoop and portion out the batter into separate small ramekins to dye. Add a small amount of gel food color in each and stir until evenly distributed.

7) Spoon 1/4 cups of batter about 2 inches apart onto a buttered large baking sheet (I used a Silpat with a light bit of butter). Also, I used a large cookie scoop and used a spoon to gently layer each color on top.

8.) Once multiple colors are layered alongside one another, slice your pre-made rainbow cookie into three thin slices (leaving all three layers intact. With one layer, cut into half to have an even distribution of the rainbow cookie in the scooper. See photos.

9.) Bake in the middle of the oven until the tops are puffed and pale golden, and cookies spring back when touched, 15 to 17 minutes. While cookies are hot, lightly brush apricot preserves onto the baked cookie. Also, if you want a perfect shape, feel free to use a cookie cutter (sugar cookie size) to make them look perfectly circular.

10.) Transfer with a spatula to a rack and chill (to cool quickly), about 5 minutes. Do not ice cookies until they’re cooled down enough!

ICING THE COOKIES

1.) For the chocolate glaze, place the butter, and chocolate in a heatproof bowl and microwave on high for 30 seconds. Stir the mixture and continue to microwave in 30-second increments until the chocolate is almost melted, allowing the residual heat to finish melting the chocolate completely. Stir the mixture vigorously, until smooth. Turn the cookies so the flat side is up. Hold the cookie in your hand and, with a spoon, carefully pour the chocolate glaze on half of the cookie, forming a straight line down the middle. Allow the glaze to set for 30 minutes. Tip: Point the tip of the spoon in a straight line for a clean line.

2.) For the vanilla glaze, whisk together the confectioners’ sugar, corn syrup, vanilla, lemon juice (if using), and 2 tablespoons of the cream, adding drops of cream until the glaze is smooth, thick, and barely pourable. Holding the cookie in your hand, with a spoon, pour the white glaze over the unglazed half of each cookie right up to the chocolate glaze. You can smooth it out with an offset spatula if you need to. Allow to set for 30 minutes. Serve at room temperature.

If using the alternative icing:

Stir together confectioners sugar, corn syrup, lemon juice, vanilla, and 1 tablespoon water in a small bowl until smooth. Transfer half of the icing to another bowl and stir in cocoa, adding more water, 1/2 teaspoon at a time, to thin to the same consistency as white icing. Turn cookies flat sides up, then spread white icing over half of each and chocolate over other half.

Italian American Style Meatballs (Keto/Low Carb)

ketomeatballs

I grew up in an Italian-American neighborhood and every Sunday, we all ate as a family and had meatballs and pasta. It was a given, it was never questioned, and it was delicious. My grandmother made the best meatballs, and although I am sure all of us show favoritism towards our family members when we say “this is the best,” my bias stands–hers were the best and always will be.

My mother, my aunt, and I have tried to keep our memory of her alive through her recipes, and her meatballs are no exception. But as of two weeks ago, I started the diet that is the antithesis of all that is Italian–the Keto diet.

For those of you who are not familiar, the Keto diet is one of the strictest forms of a low-carb diet. For my body type, I am only allowed 18 net carbohydrates. The FDA suggests (assuming a non-specialized diet) a significant amount more: “The FDA recommends that 50 percent to 60 percent of your total food intake comes from carbohydrates. The percent daily value for carbohydrates, as shown on food labels, is calculated for the average adult consuming about 2,000 calories per day. Percentage daily values for carbohydrates assume you consume about 300 grams of carbohydrates per day.”

So you may think, if the FDA is suggesting 300 total carbohydrates, how can you possibly survive on 18? Well, the Ketogenic diet (a.k.a Keto diet) changes your body’s fuel source so that your food intake percentages are largely dependent on fat. In fact, the Ketogenic diet has people eating 70% of their daily calories from it! It’s a totally new way of eating.

The foods on the Keto diet are delicious–steak with butter, eggs and bacon, cheese (need I say more?); however, the limitations are challenging, especially when you are traveling, you’ll have to do some hardcore research beforehand. In fact, I just came back from a trip to Tennesee, and every time we went to a restaurant, I had to make modifications, Google the ingredients and nutritional facts. Sugar and carbohydrates are in so many things we eat that it’s tough to navigate at times. Honestly, if you are on the Keto diet or considering it, make sure you mainly cook at home, meal prep if you have to.

I thought the second I went on a low carb diet (especially the restrictive Keto diet) that Italian food would be out of the question. It took me a bit of time, but I recreated my grandma’s meatballs and used her techniques. All I had to do was substitute the bread crumbs and bread. Every other ingredient is Keto approved–ground meats have no carbs, eggs are welcome, herbs, pecorino romano cheese, etc.

When you go on a diet like Keto, there are recipes you’ll find abound, especially on Pinterest. However, as someone who loves to cook and develop recipes, I made it my mission to combine what my grandmother would do with what I would have to do in order to these meatballs okay for me to consume. I did not want to sacrifice flavor nor texture.

I made my own Italian seasoned “bread crumbs” by freshly grinding pork rinds, Pecorino Romano, and Italian seasonings. I used 647 Italian bread (lowest carb, but most certainly resembles regular bread), soaked it in heavy cream instead of milk (believe it or not, milk has carbohydrates and sugar!). I made my mixture as grandma would, with a soft touch to make the texture airy and light. I also had to make a lower-carb tomato sauce as many tomato sauces are not allowed (jarred already made sauces are the worst–but even crushed tomatoes have natural sugars).

I aimed to be able to replicate, not merely substitute my grandmother’s meatballs, and I believe I was successful. This is evident as even my carb fiend of a husband highly approved. (He had spaghetti with the meatballs and sauce, the lucky devil). It honestly tastes just the same!  After carefully calculating, my math works out that my meatballs are a welcome addition to a low-carb diet. I calculated 2 carbs for three meatballs, 4 for 6 meatballs. Pasta sauce is 5 carbs for 1/2 cup serving, and I only needed a 1/4 cup (maybe even less!)

Note: Before you make your meatballs, you must make your own Italian “bread’ crumb mixture. All your spices you should have already in your pantry, especially if you’re a lover of Italian food. Nothing crazy fancy here. Pork rinds are your friend…tasty and 0 carbs! The “bread” crumb mixture will make a bit more than you need, so feel free to make a lower-carb Chicken or Eggplant Parmigiana with it! 🙂

Enjoy!

Ingredients for Italian Seasoned “Bread” Crumbs

  • 1 cup of Pork Rinds, ground **Please see note!
  • 1 1/4 cup of Pecorino Romano, grated (feel free to substitute grated Parmesan as well, but I like Pecorino Romano the best!)
  • 1 teaspoon of Garlic Powder
  • 1 teaspoon of Onion Powder
  • 1/4 teaspoon of Salt
  • 1/8 teaspoons of Black Pepper
  • 1 1/2 teaspoons of Dried Parsley
  • 1/2 teaspoon of Dried Basil
  • 1/2 Dried Oregano

**Note: I used my dry container on my Vitamix to grind the pork rinds, but any food processor or blender will do. You’ll need about half a bag of Pork Rinds. You can get these at the dollar store. Seriously. The brand I used is Brim’s Snack Foods. The bag is .3 oz (85.g), and I only needed half the bag to get the 1 cup of ground pork rinds).

Directions for Italian Seasoned “Bread” Crumbs

  1. Gather all your spice ingredients, grated cheese, and a bag of pork rinds.
  2. Grind up about half a bag of pork rinds to the texture of traditional bread crumbs. You will need exactly one cup, so measure it out!
  3. In a bowl, combine pork rinds, grated cheese of choice, and spices. Use a form to combine evenly.
  4. You will use 1 1/2 cup of this mixture for the recipe, leaving with a cup for you to spare. Feel free to store in a jar and stick the “bread” crumb mixture in the refrigerator for later use.

Nutritional Information for Italian-American Meatballs (Keto/Low Carb)

Total  Size: 30+ Medium-Sized Meatballs (Serves 4-6)

Nutritional Macros (Three Meatballs): 2 net carbs, 3 total carbs, 1 gram of fiber, 18 grams of fat, 19 grams of protein, 255 net calories

Nutritional Macros (Six Meatballs): 4 net carbs, 7 total carbs, 3 grams of fiber, 36 grams of fat, 37 grams of protein, 509 net calories

Nutritional Macros for Rao’s Sauce with Lei Mangia’s Modifications (1/4 cup): 2 net carbs, 2 total carbs, 0 grams of fiber, 6 grams of fat, 1 gram of protein, 67 net calories

Nutritional Macros for Rao’s Sauce with Lei Mangia’s Modifications (1/2 cup): 5 net carbs, 5 total carbs, 0 grams of fiber, 13 grams of fat, 1 gram protein, 134 net calories

Ingredients for Italian-American Meatballs (Keto/Low Carb)

  • 1 1/2 pounds of Ground Beef, Pork, and Veal (it’s usually labeled meatloaf/meatball mixture in a grocery store).
  • 3 Medium Eggs
  • 1 cup of homemade “Italian Seasoned “Bread” Crumbs”** (Recipe above for the breadcrumbs–please don’t actually use bread crumbs and kick yourself out of Ketosis! I am saying you need to use the Pork Rind version, duh.)
  • 1 teaspoon of Italian Seasoning
  • 1/2 cup of Grated Pecorino Romano Cheese (or Parmesan Cheese0
  • 2 slices of 647 Bread, diced (Please, no substitutions. If you do, you are under your own risk. This is the only bread I can find that is low enough in “net” carbohydrates to make this recipe possible!)
  • 1/2 cup of Heavy Whipping Cream
  • 3-4 cloves of Garlic, minced fresh
  • 1/2 cup of freshly chopped Parsley
  • 1 28 ounce jar/can of Tomato Sauce of your choice***

***Note about tomato sauce: Be mindful of carbohydrates and sugars in whatever sauce/crushed tomato mixture you use. I use Rao’s as that only has 4 carbs per serving (1/2 cup). I add garlic and olive oil and fresh herbs to the sauce, and believe it or not, the garlic cloves count as carbohydrates. I used to add sugar to my sauce or grate a carrot, but that is off-limits here. If you simmer the sauce a while, it should taste great! Read your nutritional labels, people! Again, you will have 1/2 the carbs if you only use 1/4 cup of sauce.

Directions for Italian-American Meatballs (Keto/Low Carb)

  1. Heat up your choice of tomato sauce (I use Rao’s). I sauteed 6 cloves of minced garlic in two tablespoons of olive oil, and once garlic was fragrant, added the jarred sauce. Before serving, I minced up fresh parsley and basil to taste. Be sure to stir the sauce from time to time.
  2. While your sauce is heating through/cooking, prepare your meatball mixture.
  3. Mince up at least 1/2 cup of parsley. Grab the bunch, cut off the stems (use only the leaves). Roll up the bunch in a tight bundle and chop parsley relatively finely.
  4. Next, peel and press/mince garlic.
  5. After prepping your ingredients, get a liquid measuring cup or bowl and fill with heavy cream.
  6. Next, take out your two slices of 647 bread. Dice into small cubes. Put cubes in cup or bowl with heavy cream to soak for a few minutes.
  7. In a large bowl, combine beef, pork, and veal mixture. Crack three eggs. Take your cloves of garlic (or use a garlic press) and put in the same bowl.
  8. Next, add Italian seasoning, grated cheese, fresh parsley, and liquid bread mixture. Yes, include all the cream as well as the soaked bread.
  9. With a light hand, combine ingredients, making sure to evenly distribute all ingredients. Do not overmix!
  10. When everything is evenly mixed, use a medium cookie scoop and press meat mixture into the scoop and squeeze out. Roll the mixture into your hands into a ball. Make sure all meatballs are evenly sized! You should have at least 30 (my recipe made 33).

Methods of Cooking Meatballs

  1. Use a baking sheet with a rack (if you don’t use a rack, you will have a fatty, congealed mess) and bake for 20-25 minutes at 400 degrees.
  2. Pan-sear the meatballs in a skillet with olive oil (cast-iron preferred).
  3. Put the meatballs in your sauce to slowly cook.

**I personally baked the meatballs to get them started, and then I seared them after. There’s nothing like the crispy edge of a meatball. I used my Blackstone Grill to sear all the meatballs at once as it is quite messy and time consuming the fry the meatballs. But man–is it a tasty step. You decide! 🙂

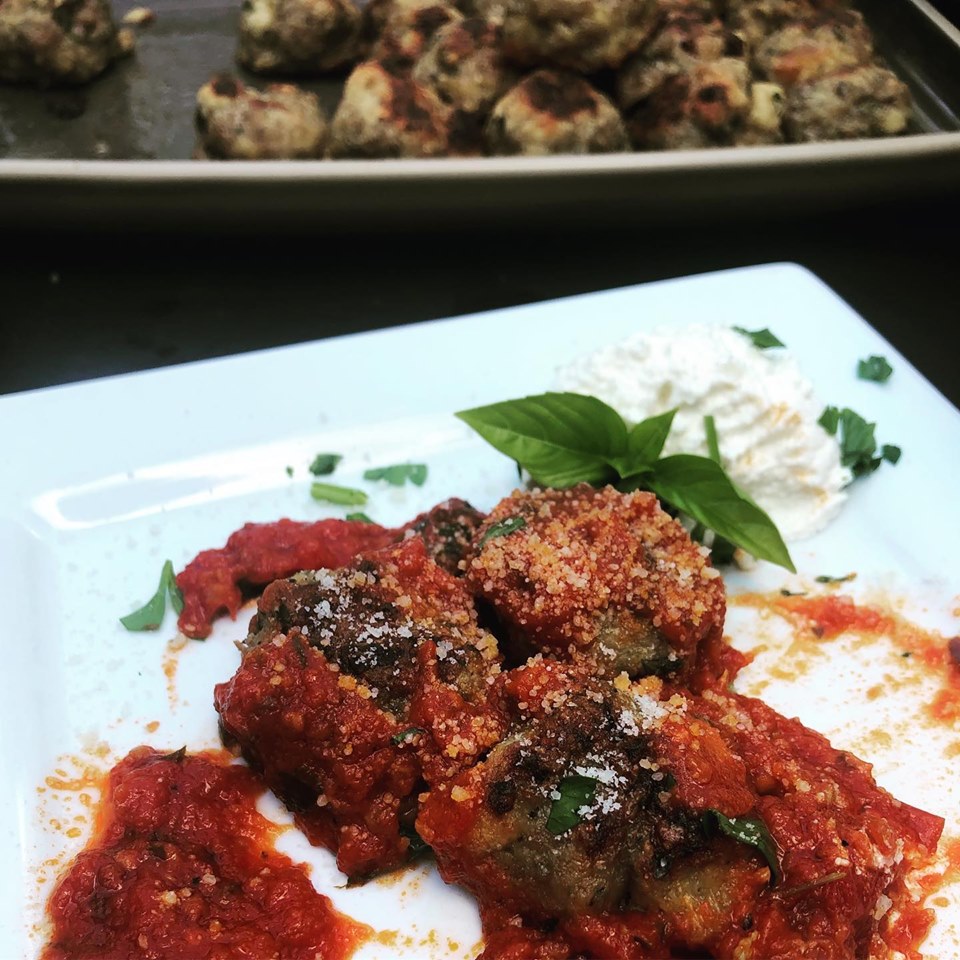
To serve meatballs, dollop your tomato sauce on top (but please measure, if you’re counting carbs) with more fresh parsley. Garnish with basil, if desired. If you would like, add a side of fresh ricotta cheese–it’s a fabulous combination! 🙂

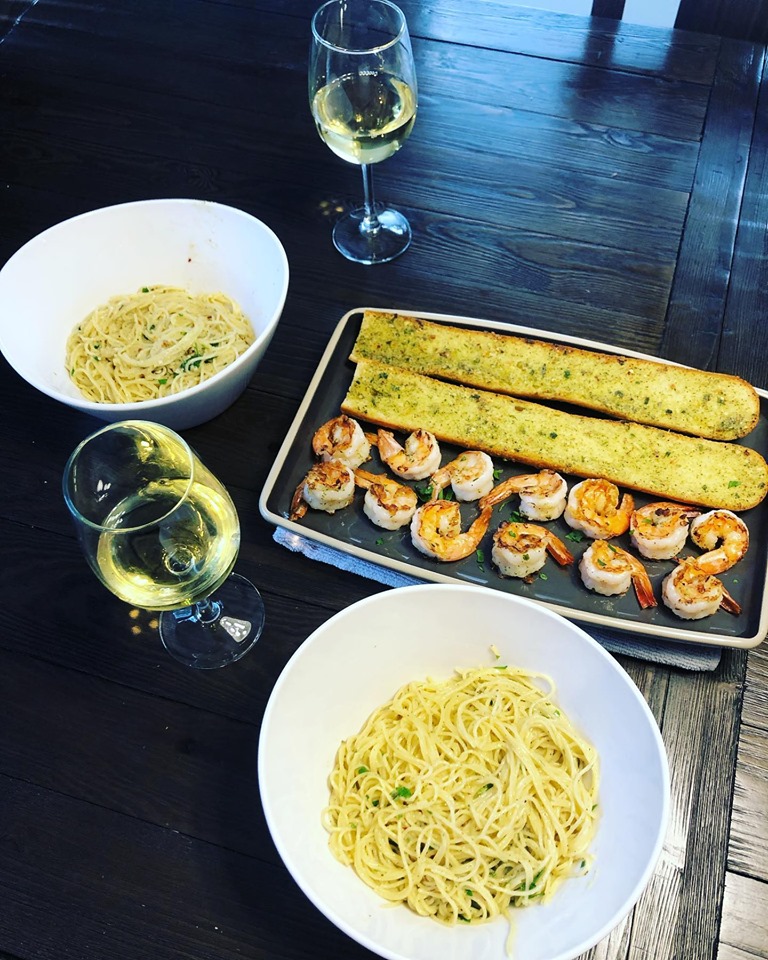
Grilled Shrimp Scampi with Angel Hair and Garlic Bread Baguette


shrimpscampi.jpg

Happy Monday! I will be doing two posts today to make up for my long absence from the blog!

Shrimp Scampi is the classic lemony, garlicy Italian delight. I hardly make shrimp, let alone Shrimp Scampi, despite my undying love for it sauteed, fried, grilled, as a dumpling filling. My husband just isn’t into shrimp; hey, to each their own.

But tonight, I  just really wanted shrimp. I put my needs before my husband’s (for the first time ever…ha), and it turns out that even the non-lover of shrimp enjoyed this one! We were both in absolute awe. I haven’t made this in years, but it suddenly came back to me, just like most Italian dishes I grew up making and enjoying.

This was one of those meals where every bite was just perfect. I did a lot of this by feel, so I am doing my very best with my approximation of how much I used of each ingredient. I will be sure to make it again and get the exact measurements for those of you who need a recipe to feel reassured! 🙂

I hope you enjoy. We most certainly did! 🙂

Shrimp Scampi with Angel Hair

1 pound angel hair pasta (or different pasta if you desire–angel hair cooks the fastest, though!)

6 tablespoons olive oil, divided (2 for shrimp, 4 for pan sauce)

1.5-2 pounds of uncooked, extra large shrimp, peeled and deveined (leave the tails on for presentation–also, keep shells if you want to make small shrimp stock)

1 tablespoon of sea salt (NOT for cooking–only for brining the shrimp!)

5 cloves garlic, minced

1/2 teaspoon red pepper flakes (if you’re not into spicy, you can do 1/4 teaspoon)

2 teaspoons of garlic salt (I used the grinder from Trader Joe’s), divided (1 for shrimp, 1 for pasta)

1 teaspoon of Tastefully Simple Garlic Bread Seasoning, divided (1/2 teaspoon for shrimp, 1/2 teaspoon for pasta)

**(This seasoning is optional, but I love it! If you can’t find it, use a similar seasoning that has some or all of the following: garlic, onion, parsley, red bell pepper, chives).

1 lemon, juiced, plus 1/2 lemon, zested (make sure there’s no white, bitter pith)

1/2 cup dry white wine (I used a Chardonnay–be sure to drink the rest with dinner)

5 tablespoons salted butter (plus, I added more butter from the garlic bread butter spread–figure you’ll need a stick and a half for both)

1/4 cup freshly chopped parsley leaves

Garlic Bread Baguette

1 French, store-bought baguette

1 stick of unsalted butter, softened

1 tablespoon of Tastefully Simple Garlic Bread Seasoning  (If you can’t find it, use a similar seasoning that has some or all of the following: garlic, onion, parsley, red bell pepper, chives).

Directions for Garlic Bread Baguette

  1. Make sure your stick of butter is softened. If it’s not, use your microwave setting to do so (do not melt it!)
  2. Using a spatula, mix the Garlic Bread Seasoning with the butter. Let sit for 30 minutes for the flavors to meld.
  3. Cut your baguette in half and then slice the middle to make two even pieces.
  4. Once the Garlic Bread Butter flavors have melded, spread your butter evenly on the baguette. **
  5. **Note: Don’t be shy. You do not, however, need to use ALL the butter. Some of the leftover butter will be used for the shrimp scampi to finish!**
  6. Pre-heat your oven to 400 degrees.
  7. When your sauce is almost done reducing, put your bread in the oven on a baking tray. It should take no more than 5-6 minutes. Check for doneness periodically. Be sure to toast to a golden brown, but not over bake!

Directions for Shrimp Scampi

  1. First, peel and devein your shrimp (leave tails on for presentation). **Optional, but recommended: keep your shells and make a quick shrimp stock by boiling hot water and pouring it over the shells that are wrapped in cheesecloth). Steep for at least 15 minutes.
  2. Next, add deveined and peeled shrimp to a bowl of cold water (about 3-4 cups) and add a tablespoon of sea salt (note: do not use hot or even warm water as that will literally COOK the shrimp). Swirl the shrimp around in the salt water and brine for at least 20 minutes–may do so for up to an hour.
  3. While the shrimp are in the brine and you are finishing prepping, get a large pot of water to boil for pasta.
  4. Mince up your garlic (or use a garlic press, like I do), roughly chop your parsley, and zest your lemon. Once you’re done zesting the lemon, cut in half to use the juice. Roll the lemon with the palm of your hand to get the most juice out of it.
  5. Add the pasta to a large pot of boiling salted water, over medium heat, and cook until al dente. Angel hair pasta should take no more than five minutes! Feel free to substitute a different pasta, like spaghetti or linguine, if desired, and cook to specified direction on the pasta box.  Leave the pasta in the colander and drizzle a little olive oil to prevent sticking.
  6. Once at least 20 minutes have passed, drain the shrimp and blot with a paper towel. It’s okay if there is a little bit of water left (but not too much).
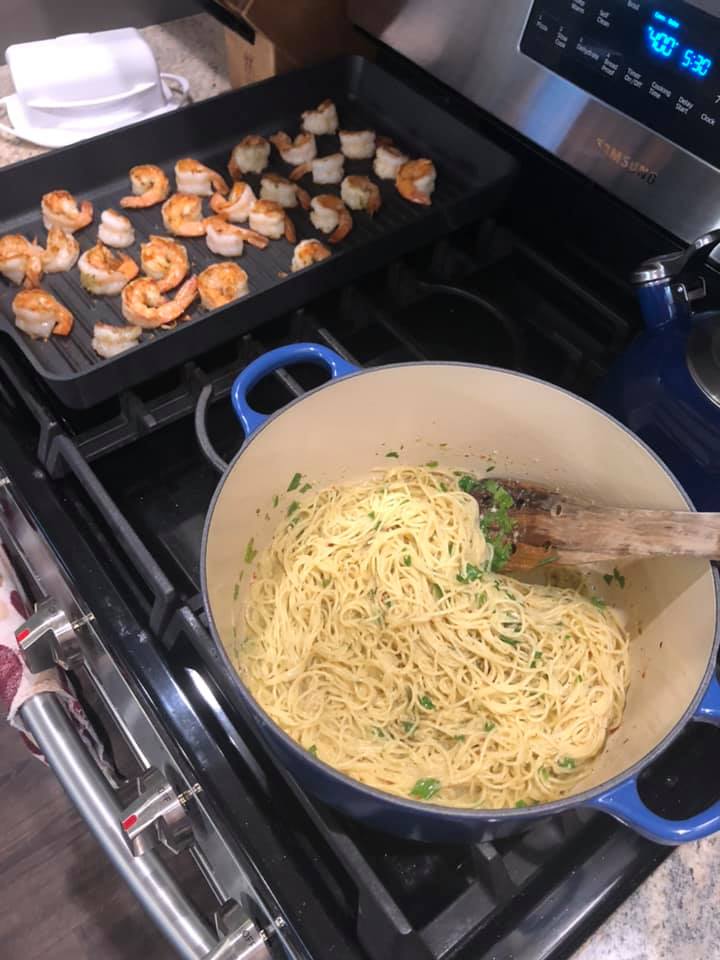
  7. Add two tablespoons of olive oil, garlic salt (1 teaspoon), and Garlic Bread Seasoning (1/2 teaspoon) to shrimp. Toss to coat. If grilling, add to ungreased grill pan once your sauce is almost done reducing.**
  8. For your sauce, heat a large 12-inch skillet over medium-high heat. Add the olive oil.
  9. ***Note: I did not cook the shrimp in the pan like most people do (I wanted the grilled taste), so what is listed below is what most people will do if they do not have an indoor grill pan. If you do want to do what I did, preheat your grill pan to medium-high heat for 4-5 minutes and grill your shrimp (as mentioned later) when your sauce is almost done reducing.**shrimpgrill
  10. Once shimmering and hot, add the shrimp and saute until just cooked through, about 2 to 3 minutes. Remove to a plate and reserve. (Only for those without a grill pan.)
  11. Add the garlic and red pepper flakes to the skillet, then saute for until the garlic is fragrant, about 1 minute. Add the lemon juice and white wine and raise the heat to high. Let the liquid reduce for 2 to 3 minutes. Whisk in the butter, add a ladleful of the pasta cooking water (if you made shrimp stock, add a little bit of that as well) and return the shrimp. Remove from the heat.
  12. Drain the pasta in a colander, and add it to the skillet along with the chopped parsley and toss. Add the lemon zest and adjust the seasonings with salt and pepper, to taste.
  13. Add remaining Garlic Bread Butter (that was not used on the baguette) onto hot pasta to finish–about 1/4 cup worth.
  14. Transfer to a serving platter and serve immediately.


Restaurant Review: Sanducci’s Trattoria

bee51b0f-be31-4a1f-8925-317c6976a28a.jpg

Happy Thursday!

I apologize for not posting in a while; I haven’t had a minute to spare!

This week has been dedicated to wedding planning, and it is probably one of the most time consuming endeavors I have ever encountered. In addition, I have dividing my time seeing friends and family. I have been in New Jersey, New York, and Pennsylvania all this week (and sometimes, all three states in one day.) Even though I have been driving around like crazy, I am happy to be here to get my Italian/New York fixes.

Living in North Carolina for the past few months, I have missed out on a lot of great pasta, pizza, bagels (you know–the holy trinity of carbohydrates). While I am back “home,” I have to take advantage and eat them all–practically every day.

When I was visiting my friend Cassandra, author of Bottlesoup, she told me we should have lunch at her favorite local Italian restaurant called Sanducci’s Trattoria.

For me to review an Italian restaurant, it has to exceed my high expectations. As a native New Yorker, I did not need to go out often for Italian food growing up. It’s what my grandmother made, it’s what my mother made, and it’s obviously what I can do as well. I find myself disappointed often when I go out to eat for Italian–(except pizza: without the brick oven at home, the results can never be as good). There are a few gems, however, that are absolutely what I need from an Italian place: I need an upperscale interpretation of classic comfort Italian dishes with heightened complexity. This place can make what we all know and love but take it to the next level (all without totally breaking the bank: it’s a little bit more than going to your local pizzeria but less than going to a fine dining establishment.)  While I recommend this place, I will be honest about what I felt foot the bill, and what I could do without again…

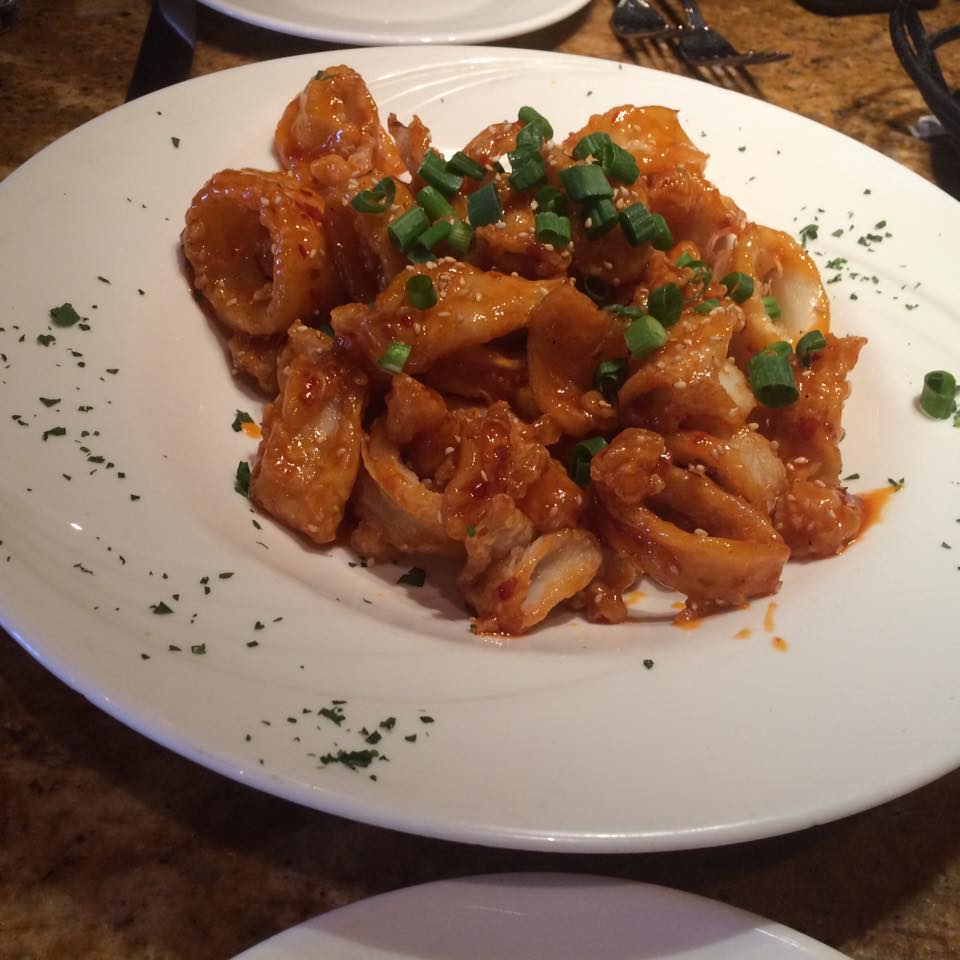
Appetizer: Ginger Sesame Fried Calamari

This is definitely my favorite item here. I know what you’re thinking. Sesame and ginger are not Italian. But the way they fry the calamari is–it’s light and delicate, not rubbery or chewy. P.S: I am totally inspired to re-create this…

12932932_10206092381761765_6753725958021960775_n

Calamari must start with a flour based dredge; if you ever eat calamari with a heavy breading (breadcrumbs versus the latter mention of flour), move away. It is too light and delicate of a fish for all that! Also, calamari should always be lightly fried because if it is in oil too long, it will become greasy and tough to chew. This calamari clearly has perfect flour coating to get the crispiness necessary.

The sauce, like I said, un-Italian but rather Asian in its style, is absolutely delicious. It is a sweet chili base with hints of honey and red pepper flake (maybe some orange–that’s something I was sensing), and the sesame seeds really coordinate well with the crunch of the properly prepared calamari. The aroma is very floral and sweet from the glaze. The green onions also bring fresh, brightness to the dish by distributing just the lightest flavor of onion to the fish. By the way, if you want to sound like you’re an Italian New Yorker, say GAL-A-MAAAHD–the slang will give you some respect, or at least, will give you a laugh for a minute.

Rating: 10 out of 10

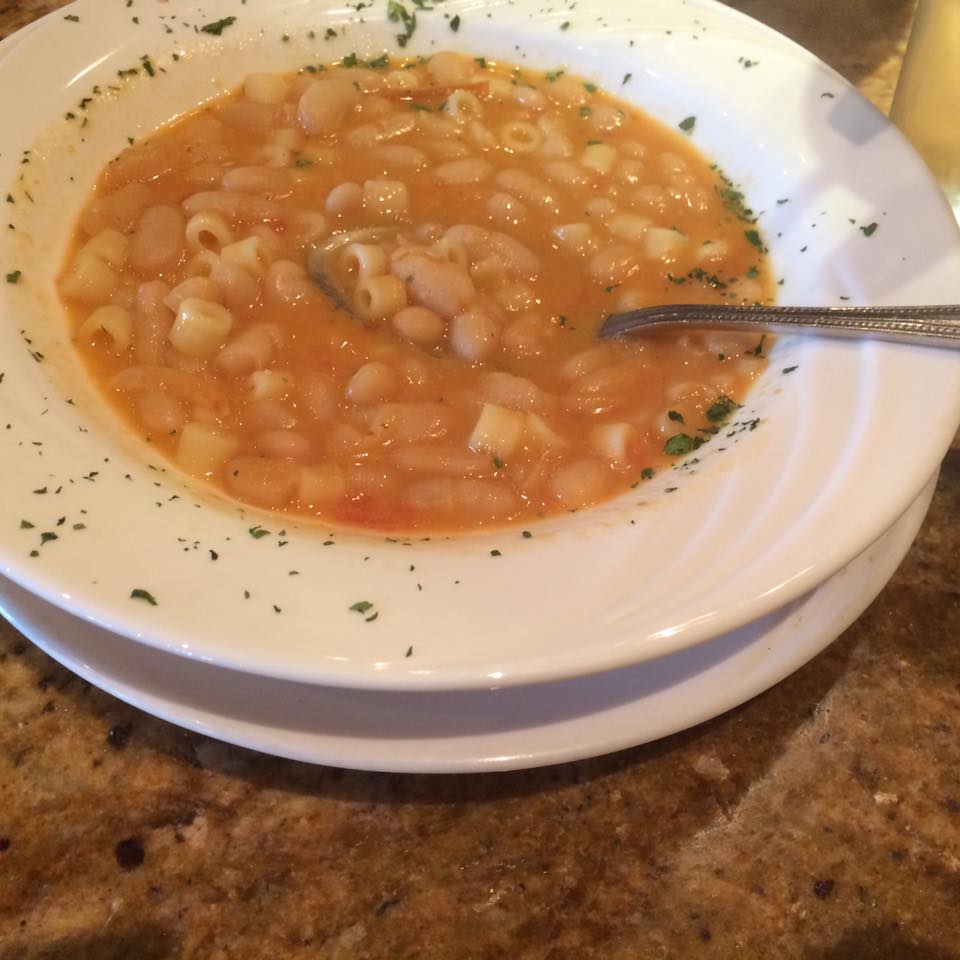
Soup: Pasta Fagioli

My favorite peasant food from Italy is Pasta Fagioli. I am obsessed with white beans (cannellini beans), and this soup is one of my favorite dishes my grandmother makes. But it’s not quite like my Nonna’s!

942547_10206092381561760_6317465968215179088_n

Pasta fagioli is a white bean soup; however, my grandmother always made it thick so it was more like a sauce for pasta. The way she makes it looks like vodka sauce versus liquid-y soup like this. So of course, there is a bias there, but I will happily give it a go.

I tasted the garlic notes and the broth had the right amount of seasoning herb wise, but I believe it fell short on the parmesan. I needed to add the cheese to take it to a new height, or at the very least, what I expect pasta fagioli to do for me. The onion notes in the soup were present, and it was good–but again–it needed the cheese! If you order this, make sure you put copious amount of cheese because the parmesan base is missing here.

Rating: 7.5 out of 10

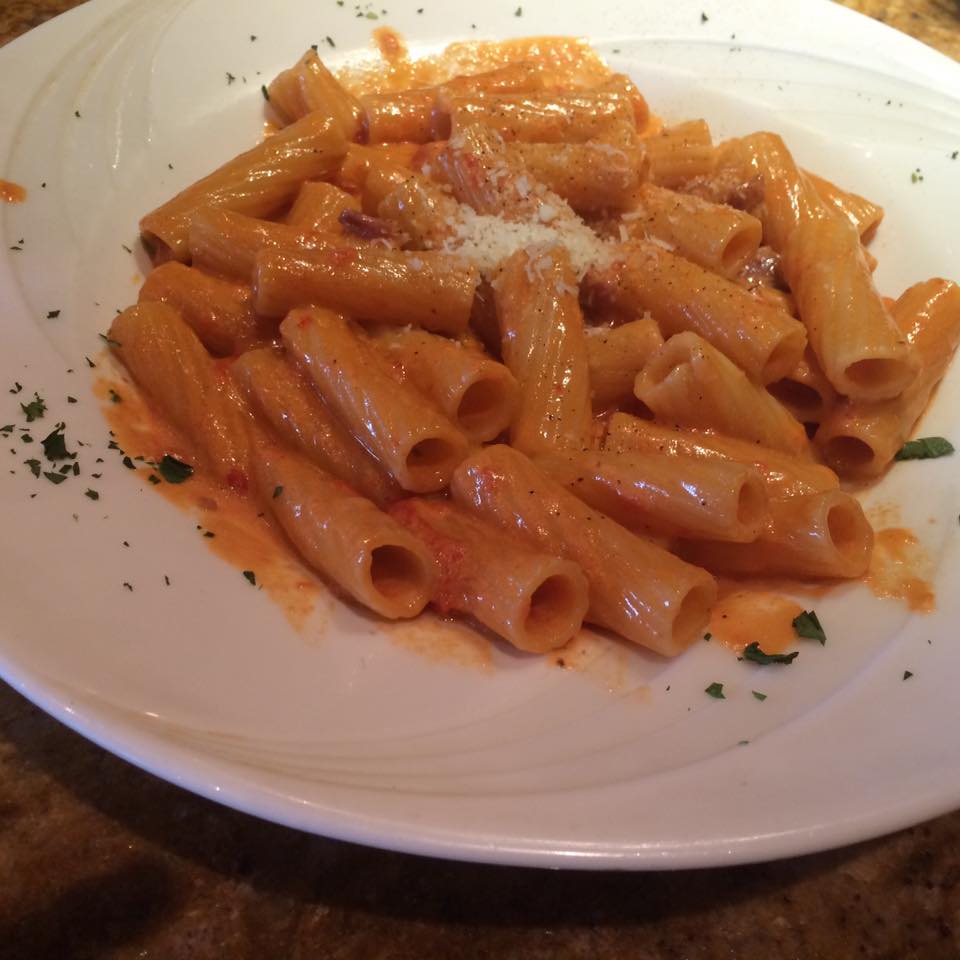
Entree: Penne alla Vodka

The way to test an Italian restaurant is to eat a popular dish and see how it is prepared. The sauce was cheesy and creamy as expected; however, the meat (prosciutto) was a bit too large for the delicate pasta. This was very flavorful with a minor execution error.

12933153_10206092381441757_1353599105885798210_n

The tomato-y, creamy-base was very flavorful with the ham profile in the sauce. There was a balance of spice that was countered with the coolness from the area, without overwhelming the sauce. My only complaint of this dish is that the prosciutto was chunked almost like a piece of sausage. Prosciutto, dried, cured Italian ham, is an excellent complement to vodka sauce, but should be used sparingly. Thinly sliced prosciutto is better suited here. I also think more green would have made this great; I like vodka sauce with green peas!

Rating: 8.5 out of 10

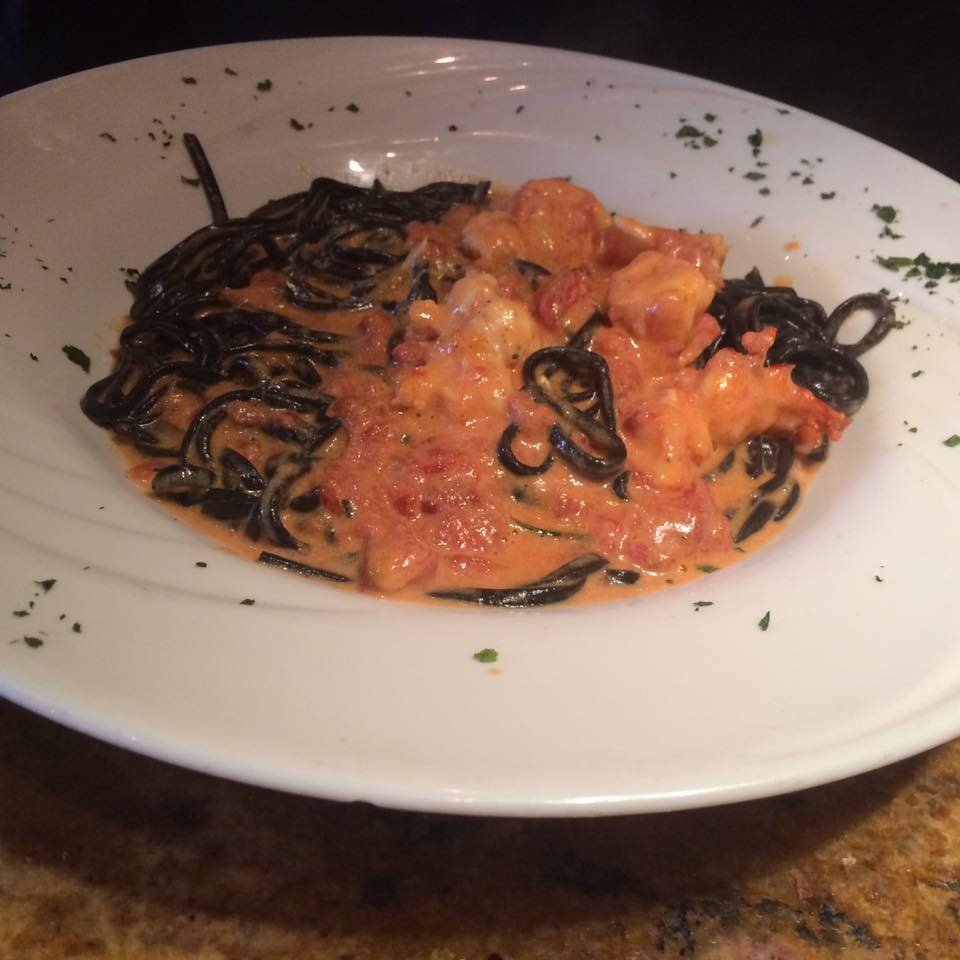
Entree: Homemade Black Linguini with Chunks of Brazilian Lobster Tails in Pink Cognac Sauce

The last test of a good Italian restaurant is to see what they do beyond the expected–again, heightened complexity. This is Cassandra’s “go-to” that she orders often. As opposed to a typical “vodka sauce,” this blush rosa sauce is made with cognac which adds a touch of class and refinement. 

10390893_10206092381081748_8087021238209292961_n

This is one of those dishes you see on a menu and say, “Ooh–that sounds interesting!” One of the privileges that people should take advantage of when they go out to eat is to try something they could not readily make at home. Although making pasta isn’t necessarily difficult, fresh pasta should always be commended as it makes a world of difference for taste.

This pasta in particular is black in color; if this is off-putting to you, be comforted with the reason as to why: it is made this color from squid ink. Oh, you don’t like squid? If you like calamari, you like squid! The pasta has a very modern appearance when black–it does not look nor taste conventional. Although not overpowering, there is a slight seafood flavor that comes from the squid’s ink that is perfectly appropriate in this dish.

The sauce, because it has a cognac base, has a slight sweetness that pairs well with the tomato cream sauce. If you like vodka sauce, but want to kick it up a notch, this is the sauce for you to try. Cognac and lobster are the two ingredients that make this pasta become eligible as First Class. Brazilian lobster, when prepared properly, is excellent and succulent (I personally love Maine Lobster better as it is sweeter).

Cassandra mentioned that this dish usually has better lobster (she felt it was slightly overcooked the day we tried it); however, I could see how this dish is a favorite of hers, and how I will definitely look to order it again when I am back in Bergen county! This is Italian elegance with modern flair–a perfect, romantic meal.

Rating: 9 out of 10

Chicken Parmigiana with Homemade Plum Tomato Basil Sauce

Happy Valentine’s Day!

chickenparm

Sorry I am late in posting; between traveling by plane and catching up with last minute grading, I have been swamped!

I believe that Valentine’s Day is perfect for trying to impress your loved one; however, sometimes simple is best. My best friend’s (soon-to-be) husband loves chicken parmesan, and really wouldn’t be craving something gourmet or fancy. He has simple taste and there is nothing wrong with that. If anything, you should be glad. Your life is much easier knowing you don’t have to break the bank or that you don’t need to be particularly talented in cooking to make what he or she wants.

I, on the other hand, requested for Zach to make lobster tail, crab legs, and lamb. Valentine’s Day, and any other special, intimate occasion (such as an anniversary) requires you to know what your significant other desires. Whether this person has a simple palette, or an extremely expensive one does not matter. To show your love, you need to make something that will be impressive, but more importantly, thoughtful. Make a dish that shows that you were thinking of what he or she would love most. Impressive is not always expensive–it’s all about effort and thought. Period.

I made this chicken parmigiana (or parmesan for you non-Italian people) last night for my best friend, her fiancé, Zach, and me, but I figured it would be nice to share this for those of you who need last minute ideas to enjoy your Valentine’s Day in. You could alternatively go out to eat today, but as a former waitress, I can assure you that there is nothing worse than going out today. Your food will take forever to come out, the service will be subpar, and you might feel rushed by the massive amounts of people waiting for you and your honey to scoot. I say stay in for this day. Besides, nothing says love like effort, right? It could be equally romantic to eat-in, if not, more so. 🙂

Stay tuned for tomorow’s post! For those of you who are looking for the ultimate Italian dessert,  I will be posting my infamous tiramisu on Monday. Unfortunately, it is not a dessert you can make last minute; you need to make it the night before, but is absolutely divine! 🙂

The Sawwwwce

  • 1 (28 ounces) can whole tomatoes (Please try to get plum tomatoes–and if available, San Marzano!)
  • 1 {28 ounces) can diced tomatoes
  • 1 (28 ounces) can crushed tomato
  • 1 stick of butter
  • 1 yellow onion finely diced
  • 4 cloves of garlic, minced (use a garlic press if you have it!)
  • 12-18 leaves of fresh basil chiffonade
  • 1 tablespoon of dried oregano
  • 1 tablespoon of garlic powder
  • 1 tablespoon of onion powder
  • 1/2 tablespoon of crushed red pepper
  • 1/3 cup of sugar (do it in small increments! This is to counteract the bitterness of the tomatoes, but too much sugar isn’t good either!)
  • 1/2 cup of dry red wine
  1. Mince up your garlic cloves, and dice up your onion finely.
  2. In a large pot, pour some olive oil and sauté your onion. Stir around frequently.
  3. Once the onion becomes aromatic, add the garlic. DO NOT BURN THE GARLIC. It’s an Italian sin. Stir baby, stir!
  4. Now that the garlic and onion have been cooking together for about two minutes, add your half a cup of dry red wine and reduce for 3-5 minutes.
  5. Next, add your crushed tomatoes. Stir. As the sauce is bubbling, hand crush the tomatoes (whole tomatoes) so they are chunky, and add the diced tomatoes. As you stir, mush up the tomatoes (diced) with the back of a wooden spoon.
  6. Throw in all the spices (reserve the butter towards the end of the sauce process.)
  7. Leave the sauce to simmer on medium for at least an hour. The longer, the better.
  8. Towards the end, add sugar (small bits at a time) until the acidity is counteracted. Right before you’re about to fry the chicken at the end, add the butter and more fresh basil, if desired. Taste your sauce–always! Leave the sauce to simmer on low while you’re making the pasta and chicken.

The Pollo

  • 2 1/2 cups of Seasoned Italian Bread Crumbs
  • 6 skinless boneless chicken breast (buy them thinly sliced or pound them thinly!)
  • 3 large eggs
  • 1¼ cups all-purpose flour
  • 3 tablespoons of garlic powder (divided in two: 1 1/2 in seasoned breadcrumbs and 1 1/2 in with whisked eggs)
  • 1 tablespoon of salt
  • 1 tablespoon of pepper
  • 6  tablespoons extra-virgin olive oil, divided
  • 6 cups of my sauce, your sauce, or the jarred sauce (eep!)
  • 3 cups coarsely-grated, well-drained fresh water-packed mozzarella, divided
  • 1 cup freshly-grated Parmesan cheese, divided
  • 1 cup freshly-grated Pecorino Romano cheese, divided** (optional, but recommended)
  1. Pre-heat your oven 350 degrees, set up your dredging stations, and get your chicken out of the refrigerator.
  2. Place chicken breast halves between sheets of plastic wrap.  Using a meat mallet, pound chicken breasts to 1/3-inch thickness.  Alternatively, go to the butcher/grocery store and purchase chicken breasts that are thinly sliced. Sprinkle both sides of chicken with salt & pepper.
  3. Place flour in a large dish and add salt and pepper.  Whisk eggs to blend in a separate large dish. Add parmesan cheese and garlic powder to the eggs and whisk. Place breadcrumbs in yet another large dish.  Add more parmesan and garlic powder to the breadcrumbs. Coat each chicken breast with flour, then eggs, then breadcrumbs. Make sure you have a dry and a wet hand!
  4. Preheat oven to 350°F.  Heat 2 tablespoons of the olive oil and 1-2 tablespoons of butter in a large cast-iron or non-stick skillet over medium-high heat. (Make sure you use butter as that will counteract the high smoking point). Working in batches, add chicken to skillet and cook until browned (about 4 minutes per side, adding more butter as needed). Transfer chicken breasts to a platter, and drain the oil by placing a paper towel underneath (change the paper towel as needed.)
  5. Spread 1 cup of tomato sauce in the bottom of a large roasting dish (I used a 9 x 13). Arrange 1 layer of browned chicken breasts over the sauce.  Spoon 2 cups of sauce over that layer, or you may do what I do which is do about 1/3 cup of sauce per chicken cutlet. Sprinkle half of the mozzarella, Parmesan & Pecorino over.  Repeat with remaining chicken, sauce, mozzarella, Parmesan & Pecorino.
  6. Bake until cheeses melt and chicken is cooked through, about 30 minutes. If you are making pasta, now would be the time to boil water and make spaghetti (once the water boils, it takes about 10 minutes.) Make sure you stir your pasta and make salty, salty water for the pasta!) Drain and add a few ladles of your sauce.
  7. Serve the spaghetti with sauce on a plate. Throw some grated cheese on top. Next, put the chicken parmigiana cutlet on top. Add more grated cheese (you get the idea). Eat immediately and enjoy!