Chipotle Chicken Panini with Fresh Mozzarella, Basil, and Red Onion

chipotle-chicken-panini-with-fresh-mozzarella-basil-and-red-onion

Happy Tuesday!

I am so embarrassed. I went an entire month without blogging. What’s even more embarrassing? I cooked plenty of food, and took plenty of pictures–I just haven’t had time to write about it…

Here’s the whole host of excuses…

1.) I moved.

2.) I got a new job.

3.) As of Saturday, I am now MARRIED. Yay!

I will try to stay on top of this–I promise. It was really hard for me to choose what to post as I have made infinite meals since the last time I posted, but this one is a definite winner and perfect work week meal.

Anyway, I don’t know about you, but every now and again, I have a craving for Panera. I was inspired to re-create their Chicken Frontega Panini–and not only do I think I nailed the same flavor profile, but I think this actually tastes better.

Before I got married, I had a bridal shower, and man was I spoiled! I got all these kitchen gadgets, but my favorite of all is my panini press. I used to rough it out by using a grill pan and placing another cast iron skillet on top to get those grill marks, but it is never perfect. And if you’re one of those people who thinks a panini press is a glorified grilled cheese maker, I will seriously take an issue with you. Panini presses are much more industrial and have the finesse to seriously bring your sandwich game to a whole other level.

So Public Service Announcement: Get a panini press if you don’t have one already! I recommend a Cuisinart. My machine was not only used for pressing the bread, but it was also used to grill the chicken. Who wants copious amounts of dishes, especially during the week? Not this girl!

This powerful tool is my secret weapon for saving time and making an unforgettable sandwich.

When Zach and I ate this, we were lost for words. You will be equally speechless. Dinner in 15 minutes (including time to grill the chicken) has never been so good. Enjoy!

Ingredients (Serving Four)

  • 1/4 cup mayonnaise
  • 1 chipotle pepper in adobo sauce + 1 or 2 teaspoons liquid from can

**Alternatively, you can buy Chipotle Mayo already made–I recommend “Just Mayo’s Chipoltle”–it’s fantastic!**

  • 1 loaf focaccia bread, cut into quarters or 4 focaccia buns                                                                                                                                                                                                              **Thicker bread is always great in a panini press, but here’s a little secret–I used just Maier’s Italian bread (nothing special), and this still came outstanding. I will certainly not discourage the garlicly, herb goodness of focaccia, but even if you just have plain white bread, you’ll be okay–promise. 
  • 2 chicken breasts (about 8 ounces each), grilled on the panini press (first)
  • Four tablespoons of garlic powder
  • Two tablespoons of salt and pepper, divided
  • 8oz mozzarella ball, sliced (try to get it fresh in water!)
  • 1 plum tomato, sliced thinly
  • 1/2 small red onion, sliced very thinly
  • 10-12 fresh basil leaves, chiffonade (ribbons) or leave leaves (how pun-y!) whole

Directions

1.) First, season your chicken with salt, pepper, and garlic powder. Plug in your panini press and get it really hot. Spray the panini press with cooking spray.

2.) Once the press is hot enough, grill the chicken in the press. Don’t push down all the way, but as the chicken cooks (about 6-8 minutes), gradually press to flatten the chicken.

3.) While the chicken is cooking, prep your toppings. Slice the tomato, red onion, mozzarella, and chiffonade the basil.

4.) If you are making chipotle mayo, add mayonnaise, chipotle pepper, and adobo sauce to a mini food processor bowl then process until smooth. If you don’t feel like making a huge mess and don’t mind a chunkier sauce, hand chop the pepper up very finely then stir with sauce into mayonnaise. Taste and add more sauce to your liking. If you don’t feel like making a sauce, then at this time get out your store bought, but delicious chipotle mayo.

5.) Take your chicken off the grill once there are substantial grill marks, and the internal temperature reaches 160 degrees. Leave chicken aside to cool for a second. Once chicken has cooled a bit, slice chicken length wise into strips.

6.) Assemble! Smear about a tablespoon of chipotle mayo on each side of the bread. Next, add your chicken strips on top of each slide (go across evenly.) If desired, add more chipotle mayo on the chicken itself. Next, add the cheese slices (one-two slices of mozzarella for each side of the sandwich. Lastly, top the sandwich with sliced tomato, red onion, and basil. Press top layer of sandwich on top of the bottom layer.

7.) Spray your panini press once again. Also, spray your sandwich on both sides with cooking spray. As you did with the chicken, you should gradually press down on the sandwich and cook until golden brown. Cut diagonally for best appearance. Enjoy!


Crab and Shrimp Gnocchi with Parmesan White Wine Cream Sauce

crabandshrimpgnocchi

Happy Sunday!

Each time I think of a gnocchi, my mind immediately takes me back to Venice in 2012. My friend Cassandra and I fell in love with the pillow soft potato pasta dumpling after eating these with this Gorgonzola cream sauce. This is a pasta that we will never forget. A pasta consistency I have been trying to master since I left that splendid city–but I don’t quite have it yet. If you have never had a gnocchi, you are missing out! It is truly the perfect blend of potato and flour. Although I am a believer of all things homemade, today’s dish simply requests that you use a package of gnocchi. Making gnocchi from scratch is a pain to master, and quite frankly, is more of a winter endeavor or one made for a rainy day. Pre-packaged gnocchi are even better than typical pasta–it cooks in 2-3 minutes!

Crab and shrimp take the flavor of this dish to new heights, especially as the sauce’s base is almost Alfredo-like with heavy cream and parmigiana cheese.  Feel free to switch up the seafood–add lobster or clams if you like! Seafood and cheese go really well together! I know it seems taboo, but they’re awesome together.

I made a similar dish about a year and a half ago; coincidentally, the same company I had then I am having other today! If you are looking for the same flavor profile with more lemon and added texture (the other version I’ve made of this has Panko bread crumbs), read my old post; it’s called Crab Meat Gnocchi with Melted Havarti and Gruyere.

This meal is great for a quick, romantic night in or as a side dish for company. It’s intimate enough for two, and it’s elegant enough for entertaining. Bon appetit!

Ingredients

  • 2 tablespoons of unsalted butter
  • 4 cloves of fresh garlic (minced)
  • 1 jumbo shallot finely chopped
  • 1 1/2 cups of white wine (I used pinot grigio)
  • 3/4 cup of heavy cream
  • 1/2 of a fresh lemon (should be about 1/3 cup of lemon juice)
  • 2 cups (approximately) of grated parmesan cheese
  • 15 large shrimp, peeled and deveined (do not buy precooked shrimp)
  • another 2 tablespoons of unsalted butter
  • 8 ounces of lump crab meat (I used 16 ounces thinking I love lump crab meat, but this is pricey and almost too much crab meat for the amount of pasta!)
  • 1 pound of gnocchi
  • parsley for garnish (fresh or dried)

Instructions

  1. Fill a pot with salted water and bring to a boil.
  2. Insert pre-packaged gnocchi into boiling water. Cook about 2-3 minutes and stir. Gnocchi are done when they are floating on top.
  3. Drain gnocchi and pat dry with a paper towel. Keep aside.
  4. Use two tablespoons of butter to saute shrimp that are peeled and deveined. Add salt, pepper, and optional red pepper flakes to shrimp. Shrimp should be done in about 2-3 minutes (upon turning pink and no longer translucent–do not overcook!)
  5. Mince garlic and dice shallot.
  6. Melt 2 tablespoons of butter and saute shallots for about 4-5 minutes at medium high heat. Stir to keep from burning. Add a bit of water if they are not sauteeing properly. Look for translucence in your shallots.
  7. Throw in the garlic after the shallots have been sauteed. Stir to keep garlic from burning. Cook garlic and shallots about 2-3 minutes until aromatic.
  8. To deglaze your pan, add 1 cup of white wine and stir shallots and garlic. Let it reduce a bit, and then had the other 1/2 cup.  Once it reduces about halfway, add heavy cream and lower your heat to low. Simmer for about 3-5 minutes.
  9. Next, get a mesh strainer and scoop out the shallots. Press the shallots into the mesh strainer to drain all the liquid. There should be almost no shallots left in the sauce. You may need to squeeze the liquid in a new pan.
  10. Kick your heat back to a medium high with the drained liquid. Add your parmesan cheese. Squeeze in half the lemon, carefully not getting seeds inside. Stir frequently You may add more cream if you need it.
  11. Lower the heat the low. Add the crab meat and cooked shrimp. Stir together and let heat through for about 5 minutes. Tip: Make sure your crab meat is out of the refrigerator right before starting to cook so you don’t add cold crab meat to your hot pasta!


Blueberry Zucchini Cake with Lemon Buttercream

Blueberryzucchini


Happy Saturday!

I haven’t blogged again a while. Life has been changing so fast for me lately; I can barely keep up! Moving, new employment opportunities, and an upcoming wedding is enough to stall my recipes.  I just had my bachelorette party last night, and even though I am exhausted, I am not only making this cake, but I am also writing about it. If I can make this cake on only a few hours sleep, know that you can too. This is easy and delicious. Zucchini cake is perfect for summer baking as zucchini is plentiful and in season!

My future mother-in-law told me about this recipe. A woman from her church made this Blueberry Zucchini Cake, and she told me that it was a huge hit. I do believe in the power in numbers; that is, if you bring a dish or eat a dish at a potluck and almost everyone is coming back for seconds, that means that it’s a dish worth recreating yourself. She wanted the recipe, and the woman from her church gave it to her; here’s the original recipe.

If you love zucchini bread, you will love this cake. Zucchini has a lot of water, and thus, it makes for incredibly moist baked goods. I also think the inclusion of oil in this recipe also helps assure you that you’ll have a good bite. In addition, the amount of flour and eggs makes this cake dense, but I think it works well. Lemon and blueberry are always a great marriage; the perfect balance of sweet and tart. I was a little alarmed when I saw that there is four cups of powdered sugar for the icing, but it makes a firm icing that I think is necessary for the texture of the cake, and the sugar isn’t as overpowering as one may think.

Lastly, this zucchini cake made me remember why I love a food processor. My mother-in-law and I made this cake using the food processor for two purposes: 1.) to shred the zucchini quickly and evenly, and 2.) to whip up the lemon buttercream. If you do not have a food processor, go get one immediately. It’s a very underused kitchen tool that I think needs to be brought out more than once in a great while. It makes the prep work of cooking and baking such a breeze!

P.S If you make too much zucchini, freeze it in a ziplock bag. You could make my favorite zucchini fritters, too. They’re latka style and tasty!

Zucchini Cake

    • 3 large eggs
    • 1 cup vegetable oil
    • 1 Tbsp vanilla extract
    • 2 1/4 cups sugar
    • 2 cups shredded zucchini (depending on the size of your zucchini, you will need 1-2 pieces of zucchini)
    • 3 cups all purpose flour
    • 1 tsp salt
    • 1 tsp baking powder
    • 1/4 tsp baking soda
    • 1 pint blueberries (tossed in 1 tsp flour so they don’t sink down into your cake!)
Lemon Buttercream
  • 1 cup butter, (2 sticks, 8 ounces) at room temperature
  • 4 cups confectioners’ sugar
  • juice of one lemon (buy two just in case you don’t have enough juice)

Directions

  1. Set oven to 350 degrees.
  2. Lightly grease and flour a 9×13 baking pan. Preferably, use a dark pan (but if you only have glass, it’s okay; just watch your edges!
  3. You will make your cake first; while your cake is cooling in the refrigerator, then you make your icing!
  4. Prep your ingredients. Cut a zucchini in half lengthwise. Scoop out the seeds with a spoon. Cut off the ends of the zucchini and discard. Slice your zucchini halves into smaller pieces to throw into your food processor. Use the shredding attachment until you get two cups. Do not drain the liquid.
  5. Once you have shredded your zucchini, beat the eggs, oil, vanilla and sugar until well blended. Fold in the zucchini.
  6. Whisk the flour, salt, baking powder, and baking soda to combine. Slowly add it to the wet mixture, mixing just enough to blend. I add about 1/3 of the flour at a time, sometimes 1/4 of the flour. DO NOT OVERMIX! IT WILL BE CHEWY OTHERWISE!
  7. Fold in the blueberries, and pour the batter into the prepared pan. Bake for about 50 minutes, just until the top is turning golden and a toothpick inserted in the center comes out without wet batter clinging to it. Cool on a rack. You may need to cook the cake more
  8. To make the frosting, put the softened butter into the bowl of a food processor and process until creamy. Add the sifted powdered sugar, one cup at a time, processing till smooth after each addition. After the second cup of sugar, add in the lemon juice. Scrape down the sides of the machine as necessary. Adjust the texture by adding a little more lemon or a little more sugar depending on your taste.
  9. Frost the cooled cake and store in the refrigerator.
  10. Enjoy with company; it’s your new easy to make and eat potluck dessert. 🙂


Bacardi Gold Spiked Peach Trifles

Bacardi Gold

Happy Saturday!

I love to cook; I like to bake, but people–it’s summer. All the recipes should be easy, light, and fun. More time should be spent outdoors than in during this time of year. Today’s post will make sure that you are enjoying life instead of slave driving in the kitchen (although I have a lot of fun in here, usually!) This recipe is tasty, fun, and easy. It’s particularly a crowd pleaser because of the booze (I used Bacardi Gold Rum)–alcohol in desserts always piques people’s interest. Now if you need to sober up this recipe, not to worry–this tastes fine with lesser or no alcohol, too.

I made this trifle last week to complement my future Mother In Law’s grilled kebabs. Her friend made this really awesome bean and rice salad (yes, rice can be made into a salad–I will post that recipe eventually), and I figured I would make dessert. I wanted to utilize the peaches that she had on the counter, and my mind went immediately to the trifle. It’s so easy, and it’s great to make ahead! Store bought pound cake makes this recipe nice because you won’t need to turn on your oven, either!

For those of you who don’t know what a trifle is, essentially it’s a layered dessert that traditionally has alternates sponge cake, fruit, and custard/pudding filling in a “trifle” (which is a large glass bowl that’s used for entertaining). I find that the trifle bowl does look lovely for presentation, but once you dig into it to scoop some out, it gets messy and ruins all the beauty you destroyed in preparing it. To me, I rather make the dessert more fun by making this into individual servings. Because mine have booze, I like to put these in martini glasses. Alternatively, you could use a smaller pudding cup as well. Any smaller glass can do!

For this trifle, I am using vanilla pudding, pound cake, and sweet, ripened peaches. They are perfectly paired for summer, and they take almost no time to prepare.

These peach trifles are not only easy to make, but they are easy to devour. As many of my readers know, I don’t always look for the simplest recipes to make. I always complicate things to make it gain just the slightest edge in flavor. I have made this trifle many times in many variations. When I feel like I need more of a challenge, I will substitute the pudding out and actually create a vanilla bean custard instead. But the truth…is in the pudding.

Yes, I used (gasp) pudding mix, and to make my crime worsened, I even used INSTANT PUDDING. You can get a soft set from instant pudding in about 5 minutes by simply whisking whole milk and the pudding powder. When the pool or the ocean is calling my name, I rather not turn on the stove and waste an extra 20, 30 minutes. If you really feel guilty about not making “real pudding,” by all means, go traditionally here. Or go gourmet like I’ve done before and make a fine custard. Up to you, peaches. 🙂

Lastly, I do believe in the authenticity of whipped cream being fresh. You do not prepare the whipped cream until you’re about to serve, but every thing else could made ahead. I usually make this about 4-5 hours before serving.

By the way, if you are drawn to this because of the alcohol, I would like to say that there is flexibility in which type of alcohol you use as well. When I made this recipe originally, I used Jim Bean (this is a southern inspired recipe that calls for bourbon). I personally think the rum is more summery, and it complements the peaches very well, but using bourbon is perfectly acceptable; that’s what I used last year! Rum and cake are always a great pairing, just ask the Caribbean natives! 🙂

Grocery List

1 (3 1/2-ounce) package instant vanilla pudding mix (or you can use the larger package if you plan on making more)
2 cups milk
6-8 large fresh peaches, peeled and diced
3 tablespoons granulated sugar
1/2 (20-ounce) package pound cake
1/3 cup gold rum (I used Bacardi)**–Again, if you want to leave the booze out, that’s perfectly fine!
1 cup whipping cream
2 tablespoons powdered sugar
1 teaspoon of vanilla extract
1/2 cup sliced almonds, toasted


Simple Directions (Recipe makes 6-8 individual servings)

1.) Prepare pudding mix according to package directions, using 2 cups milk. Cover and chill 5 minutes in the refrigerator.

2.) Peel the skin off your peaches. Once the peaches are peeled, slice them into a cubed dice. Discard the pit and skins.

3.) If your peaches aren’t particularly sweet, toss diced peaches with granulated sugar (1-3 teaspoons, depending on sweetness of the peaches in their natural state.) Taste to make sure.

4.) Cut pound cake into cubes. Place half of cake cubes on bottom of a martini class; drizzle evenly with half of gold rum.

5.) Next, spoon half of peach mixture evenly over cake cubes. Spread half of pudding over peaches. Repeat with remaining cake cube, rum, peach mixture, and pudding. Cover and chill at least 2 hours.

6.) Upon being ready to serve, beat whipping cream at medium speed with an electric mixer until foamy; gradually add powdered sugar, beating until soft peaks form. Spread whipped cream over trifle; sprinkle with almonds. Enjoy!


Pork and Poblano Stuffed Mini Bell Peppers with Melted Jack Cheese

Pork and Poblano Stuffed Mini Bell Peppers with Melted Jack Cheese.jpg

Update 5/5/20: I made a Youtube Tutorial making these peppers. Check it out by clicking here!

Happy Saturday!

I am not making excuses, but I have not blogged in a while because I have been super overwhelmed with life. I’ve moved back to Pennsylvania from North Carolina; this consumed a lot of my free time. I also started teaching summer school and have been booked up with weddings galore! In fact, my best friend is getting married tomorrow, so I need to finish this post quickly so I can attend to her needs. I have to be ready on standby!

Speaking of celebration, I think the best foods to eat are hor d’oeuvres which to me simply means fancy finger food. There’s something to be said about food that requires no silverware or linen. These peppers are a great appetizer for a crowd mainly because of their size! If you have never worked with a mini bell pepper, I highly recommend it. They are colorful, fun, and they cook in no time at all. They have all the sweetness of your conventional bell pepper, but they are “fun-sized.” They are quite the party.

The flavor can be as intense or as relaxed as you want it to be, but if you like regular stuffed peppers, you know that spiciness is not necessarily a requirement. I use a poblano pepper and ground pork to stuff these peppers. I have also done a rendition of this recipe adding leftover saffron rice and some corn, so if you have any of these handy, by all means, add it! These peppers are small, so they can’t contain too much, but if you’re like me, you’ll do open heart surgery and make sure each pepper is maxed out in its capacity.

I will say that if you don’t have dainty fingers, you might find stuffing these peppers to be slightly tedious. A conventional stuffed pepper takes hardly no time to prepare because the pepper is about the size of a hand. Stuffing these little guys are a bit of an art form, but it’s worth it. This would be a fun recipe to make with a friend–divide and conquer!

I made these for a fourth of July party; I tamed the spices to a mild taste level so people wouldn’t have sweat more than they would already on a 90 degree day; however, if you like spicy food, go ahead and chop up a jalapeño or a habanero alongside with the poblano to bring up the heat. You could also add more spices to your taste level. Make sure you taste your filling before you put it in the pepper! Tasting is key.

I think what also makes these peppers very tasty is the fact they have a roasted flavor from being first sautéed in a bath of olive oil in a frying pan. Cooking the peppers first, not just throwing them in the oven, assures perfect tenderness and flavor development.

Let’s get this party started! These would be perfect for a Mexican themed party; I first made these for a Cinco de Mayo recipe, but these are perfectly suited for any summer celebration. 🙂 I doubled the recipe when I made this last to make about 50 peppers, but this is the scaled down version for a smaller gathering.

Ingredients
3 tablespoons extra-virgin olive oil
1 pound assorted baby bell peppers (about 24)
1 small onion, diced
1 poblano chile pepper, seeded and diced (Remember–you can add a jalapeño or habanero to kick these up!)
3 cloves garlic, minced
1/2 teaspoon ground cumin
1/2 teaspoon dried oregano
1/2 teaspoon ancho chile powder**
1 teaspoon chipotle chile powder**
Kosher salt
1/2 pound ground pork
1/4 cup chopped fresh cilantro (optional–I personally am not a HUGE fan of cilantro, but it fits here)
3 ounces jack cheese, diced (about 3/4 cup)**(Feel free to use more cheese. That never hurts

**-(The ancho and chipotle powders are very distinctive in flavor, but I will say they are optional if you don’t feel like running to the store–you can use regular chile powder, but these two have more authentic Mexican profile)

Directions

1.) First, prep your ingredients. Dice your poblano (or other spicy peppers) and onion finely. Next, mince your garlic finely.

2.) Once your ingredients are prepped, heat the olive oil in a large nonstick skillet over medium heat. Add the baby bell peppers (whole) in a single layer and cook, turning, until the skins blister and start browning. Depending on your stovetop, it could take anywhere from 5-10 minutes. You don’t want to overcrowd the pan. Make sure you flip them and see a slight char. You should also towards the end be able to feel with a fork if they are soft and tender (not overly soft, but enough to bend and not be raw.)

3.) Once you’re done cooking the peppers, use the same pan and add the onion and poblano. If you need more olive oil, add it before sautéeing the onion and poblano. Make sure the onion is translucent before adding the garlic, cumin, oregano, ancho and chipotle chile powders and 1 teaspoon salt to the skillet. The whole mixture should be tender in a little under ten minutes.

4.) Next, raise the heat to medium high and add the pork. Cook, breaking up the meat with a wooden spoon, until no longer pink, about 6 minutes. Remove from the heat and let the final mixture cool.
5.) While the mixture is cooling, preheat the oven to 425 degrees.

6.) Here’s the fun part: stuffing the peppers! Make a slit in each baby bell pepper with a knife, cutting from stem to tip. Once slit open, use your index finger to scoop out the few seeds that are in there and to carefully make a little room for the filling.

7.) Crumble the meat mixture into small bits, then stir in the cilantro. Stuff 2 to 3 teaspoons of the meat mixture into each pepper using your fingers or a small spoon; transfer to a baking sheet.

8.) Put a piece of jack cheese on top of each individual pepper. Cut each piece of cheese so it fits inside the pepper(cubes work well or long strips). You may stuff the cheese so that it is tucked all inside, or you may just put the slice cheese right on top and have it melt all over if you’re in a rush.
9.) Bake until the peppers are hot and the cheese melts, about 10 minutes. Once the peppers come out, sprinkle kosher salt on the peppers (just a pinch.)

10.) Eat these peppers immediately. Have a margarita with salt on your rim to complement this fiesta

. 🙂

Southern Style Crab Cake Melt with Cheddar, Remoulade, and Roasted Asparagus

SouthernCrabCake.jpg

Happy Tuesday!

I apologize for not posting; I’ve been overwhelmed between preparing to move, ending my school year, and so on. But no more excuses–I am here to stay!

I prepared this recipe yesterday to help my neighbor Jennifer with her “Surf and Turf” themed Memorial Day party. She was dead set on us making a ceviche, but I know that I am not one that likes to experiment on a large group of people. The little experience I have with ceviche tells me that I should 1.) get the freshest seafood ever and 2.) I need enough acid/time to marinate the fish. And so, I encouraged her to let me go with one of my favorite things to eat instead…crab!

I love crab cakes, crab legs with drawn butter, soft-shell crab, she-crab soup, or a crab gnocchi bake; Zach and I could devour Snow Crab, in particular, for days. Crab has such a distinct sweetness and flavor that it is totally undeniable. Crab cakes are definitely a weakness of mine, but they’re often…mediocre. I’ve had them out and have been disappointed. They can be dry, loaded with fillers (and thus, very little crab), and quite frankly, unaffordable for the average person dining out.

It’s one of the more expensive items you can purchase in a restaurant, and it may be an item you are afraid to make yourself because..

1.) It’s costly–chicken, anyone?

2.) It’s seafood–frightening for some.

But trust me when I say it isn’t that scary at all! And while I agree it’s not the cheapest meal to make, it’s so worth it. For this recipe, I use good quality canned crab (Phillips’). Yes, you could use fresh crab. Sure, you can cook your own crab and pick them to pieces, but you’ll die of starvation by the time you’re finished. Good quality canned crab is appropriate for this dish!

You should make this if you’re a crab lover and/or you’re looking to impress. Even if you’re not entertaining a few guests, this recipe can be easily even made for a single person (yes, you read that right), so that you can make yourself a 15 minute meal that tastes divine.

Now I have a “holiday” crab cake recipe I make, and I also make a salmon cake that is similar to the recipe I am providing here. This crab cake melt, however, is less fuss. When you’re cooking for a crowd, you don’t want complicated. You want tasty and easy, and this is perfectly that.

From all my experiences making seafood cakes (I’ve made tons), the best base has…

1.) Creamy components (Mayo, Sour Cream, and/or Remoulade)

2.) Butter Crackers (Like Club or Ritz)

3.) Sautéed Diced Peppers and/or Onions

Sure, you can make a deep fried one with typical breading (Panko or Italian-Style), but I don’t think that does anything to actually accentuate the natural taste of the crab cake. I personally (and for this recipe) broil, not fry the crab cakes. The flavor is much more prominent, and I believe the crushed cracker breading approach creates the right texture.

Now what heightens this dish (without taking away the excellent seafood flavor) is the cheddar that is melted. This crab cake melt, as the name implies, involves smothering the crab cake in gooey cheese on top of a split English muffin. It’s amazing! The first time I had a Crab Cake Melt was in Downtown Wilmington, NC. Not only was it fantastic, but it was only $9.99 at an awesome place called Paddy’s Hollow.

For the price of two crab cakes at the aforementioned restaurant, you can serve a hearty appetizer for 12, so let’s get started! Again, this recipe can easily be scaled down to a romantic meal for two, so don’t feel the need to invite company over…

Because I doubt you’ll want to share. 🙂

Ingredients for Side Dish: Roasted Asparagus

  • 1 bunch of fresh Asparagus
  • 1-2 tablespoons of Extra Virgin Olive Oil
  • Salt and Pepper

Ingredients for Remoulade (Make first to add to your crab cake mixture!)

    • 3 cups mayonnaise (or sour cream!)
    • ½ cup Dijon mustard
    • 1 tablespoon Worcestershire
    • 1 tablespoon hot sauce (I like Cholula!)
    • 1 teaspoon Cajun seasoning blend** (optional)
    • 1 teaspoon paprika
    • 1 tablespoon freshly squeezed lemon juice
    • 1 tablespoon prepared horseradish
    • 1 tablespoon ketchup, plus more if needed
    • 1 tablespoon finely minced garlic
    • 2 tablespoons chopped capers
    • 2 tablespoons sweet pickle relish
    • 2 tablespoons finely diced celery
    • 2 tablespoons finely chopped flat-leaf parsley
    • 1 tablespoon finely diced green onion tops
    • Kosher salt and freshly ground black pepper

Ingredients for Crab Cake for 2 (Multiply most ingredients by 6 to create 12!)

  • 2.5-3 ounces of lumped crab meat (canned)
  • 3 tablespoon of sour cream (or mayo)
  • 1 tablespoon Worcestershire
  • 1 tablespoon hot sauce (Cholula or Sriracha works for me!)
  • 1 tablespoon Dijon mustard
  • 1/6th of a sleeve of Club Crackers, crushed finely (if you’re making for 12, use a whole sleeve)
  • 1 beaten egg** (for 12 servings, I only needed 2-3 large eggs to bind!)
  • 3 sliced and diced jarred roasted sweet bell peppers OR 3 sliced and diced sweet MINI bell peppers (you must sauté beforehand) FINELY DICED
  • Salt and pepper, to taste
  • 1-2 tablespoons of homemade Remoulade (P.S: If you don’t have time, you can buy this, too–but fresh is best!)

For serving…

  • 1 split English muffin (or 1 package of English muffins for company; I recommend Thomas’ English muffins)
  • 2 slices of Cheddar cheese


Directions for Side Dish: Roasted Asparagus

  1. Slice off woody ends of fresh asparagus.
  2. On a sheet pan, evenly spread out asparagus. Coat with olive oil, salt, and pepper.
  3. Once oven is preheated to 400 degrees, cook for 10 minutes. Do not cook it any longer than that! If you’re serving this for company, cook the asparagus last.

Remoulade Directions

  1. In a large mixing bowl, add the mayonnaise or sour cream. Whisk in the mustard, Worcestershire, hot sauce, seasoning blend, paprika, lemon juice, and horseradish. Add the ketchup and whisk together. Add more ketchup as needed to get the pink coloring necessary.
  2. Once the color is achieved, add in the garlic, capers, relish, celery, parsley, and green onion. Stir to combine and add salt and pepper to taste. Cover and refrigerate for at least an hour.

Crab Cakes Directions

  1. First, slice and dice your sweet bell peppers very finely. If your peppers are not jarred (in other words, fresh peppers), sauté them in 1 tablespoon of extra virgin olive oil and 1 teaspoon of Worcestershire. Stir until soft and fragrant. Put aside to cool–do not add to mixture until cooled as you are adding them to eggs! You don’t want scrambled eggs, do you now? 🙂
  2. Once the peppers are cooled (or if they’re jarred, simply diced), add them to a bowl. Next, add the canned crab, hot sauce, Dijon mustard, mayo/sour cream, beaten egg(s), and remoulade. Over the sink, pulverize your cracker sleeve finely. You may use a food processor if you don’t feel like smashing the crackers yourself. Tip: Use your index finger and thumb to break up large pieces! Once the crackers are crushed, add them to the mixture. Stir lightly to combine; don’t overmix! Make sure your mixture looks nice and moist. If it doesn’t look super moist, add a little bit more remoulade, sour cream, and Dijon mustard.
  3. Next, split your English muffins in half. Toast your English muffins about halfway.
  4. Once the English muffins are toasted, place sliced cheddar on the bottom of each English muffin half.
  5. On top of the cheddar, scoop out a generous amount of crab cake mixture  that will eventually be distributed on each English muffin slice. You don’t have to shape it with your hands–simply plop on top.
  6. **Alternatively, you can place the cheddar on top of the crab cake depending on how particular you are about presentation! If the cheese slice is too large, you’re better off putting the cheese on the bottom.
  7. When ready to serve (and remember, these can be made ahead), broil for about 10 minutes until golden brown.
  8. Serve with remoulade on top!


Pan Seared Brown Butter Sea Scallops with Parmesan and Pea Risotto

Pan Seared Brown Butter Sea Scallops with Parmesan and Pea Risotto

Happy Tuesday!

I am exhausted. I admit it (I rarely do). I’ve been driving and flying all over the place lately. This weekend, I drove to Raleigh to fly back home to Pennsylvania to host and attend my best friend’s bridal shower. I am a tired soul. On my late flight home last night, I was thinking about what I wanted to make for dinner the next day (and the rest of the week–I’m a foodie, after all). All I could think about was my succulent sea scallops I had in my freezer. But would I have the energy to prepare this vision? You better believe it!

This meal that I (selfishly) made only for myself today sounds romantic and date night appropriate. Seafood screams “expensive” and “restaurant” as well as “risotto.” And while I wouldn’t be objected to making this for my significant other, I want to stress that to make this delicious meal doesn’t warrant a special occasion. I made this dinner in about 25 minutes from prep to plate. I know that this doesn’t sound weeknight friendly, but believe me, it is. This is quite the impressive feat.

Sea scallops, similar to crab, has a unique sweetness unlike other fish. Sea scallops are supreme to bay. Sea scallops are the larger of the two; to help you remember, think of the vastness of the sea. If a sea is huge, so is the sea scallop. Bays are just the “connection to the body of water”, so bay scallops aren’t as large as the latter. I believe that size matters when it comes to scallops. Bay scallops are okay for dishes where they are not quite the star of a dish, but for this dinner, you need to invest in the sea scallops. Are they pricier? Yes, but you’re worth it. Besides, you can get a great deal on frozen scallops (and when they thaw, they are virtually the same as if they were fresh off the dock) every now and again. I paid about $13.00 for 1 1/2 pounds! Not a bad deal, if you ask me. Once you see them on sale, snag them and put them in your freezer for whenever you’re feeling inspired!

Now for the next layer of luxury: Risotto. Risotto is not just rice; if you haven’t had risotto, you’re in for a treat. Risotto is an Italian preparation of arborio rice. Risotto, if done properly, is rich and creamy without a lick of cream (could you imagine that?) The starches as they are slowly released create a thickness to the rice. Risotto isn’t necessarily difficult to make, although it takes patience and careful attention. Please follow my directions carefully as I have seen risotto be destroyed by impatience by adding too little liquid, too much liquid, or not stirring enough. It’s about balance! I add grated parmesan at the end to add to the creaminess and nuttiness that is to complement the brown butter.

The scallops and risotto are paired beautifully naturally, but they are enhanced with the brown butter. If you’ve never had browned butter, you are in for a treat. The nuttiness and depth comes out in butter when the butter itself is cooked. All you need to do is melt butter in a frying pan and wait for it to change to a medium brown. Some people like deeper brown butters, but be careful not to burn it! You can stir occasionally to see what’s happening.

Enough talking–let’s cook!

All The Fish In The Sea

Risotto

  • 1 tablespoon butter
  • 1 tablespoon of extra virgin olive oil
  • 1 minced clove garlic
  • 1/2 diced yellow onion (very finely)
  • 1 cup arborio rice
  • ½ cup white wine (I used Pinot Grigio)
  • 3-4 cups of chicken broth  (I would grab a 32 ounce carton–it’s better to have more than less!)
  • ½ cup of frozen peas
  • ½ cup Parmesan cheese, or more to taste
  • salt and pepper to taste (preferably, freshly cracked)
Seared Scallops
  • 1 pound jumbo scallops (use leftover brown butter to sear scallops)**
  • salt and pepper to taste (preferably, freshly cracked)

**-If you are using frozen scallops, thaw them by placing them in a plastic bag and submerging them in cold water for a half an hour. You can do this as you’re making the risotto. The scallops only take 3 minutes to cook!

***-Whether your scallops are frozen or fresh, pat them dry with a paper towel (extra dry!) so there is no liquid. This is to ensure an excellent sear!

Brown Butter
  • 3-4 tablespoons butter

Directions for Risotto:

First, make your risotto. This takes the longest! Cut up your garlic and onion.   In a large non-stick skillet over medium heat, melt the butter and olive oil. Add the garlic and diced onion and saute for a minute or two until soft and fragrant. Add the arborio rice so it toasts a bit, but then stir to coat with butter and olive oil. Add the white wine. Add the chicken broth, ½ cup at a time, and simmer and stir after each addition until the rice is soft and creamy. You must stir very frequently, but let it simmer every 30 seconds or so in order to adequately cook the rice! Each time you add the 1/2 cup of broth, stir constantly so that the rice is absorbing the liquid. Once it seems like the liquid is almost all absorbed, add more (approximately 3 cups). Do not burn the rice! This process of ladling liquid into the risotto should take about 20 minutes. Taste the rice and make sure it’s soft and creamy. The starches should be released so that the mixture is thick without adding anything. Towards the end of cooking, add the frozen peas. Lastly, add the parmesan and stir until incorporated. Crack salt and pepper to taste.

Directions for Brown Butter:

Put a few tablespoons of butter in a clean skillet over medium heat and stir it while watching it closely – when it starts to look golden and foamy, remove from heat, and place a bowl aside.

Directions for Scallops: 

With the leftover butter that is in the pan for the brown butter you should be able to cook the scallops. You do not want too much oil because that will get in the way of the sear on the scallop. If you have too little oil, the scallop will stick to the pan. There should be butter on the pan with brown/black solids from before. Before cooking the scallops, pat the scallops dry with a paper towel. Next, sprinkle with the scallop with freshly cracked sea salt and pepper, and add to pan. They should sizzle. If you don’t hear a sizzle, pull it out and wait until it’s heated long enough. Shake gently to prevent sticking. After 2-3 minutes, flip each scallop over. They should have a pretty golden brown exterior and an opaque inside. Transfer to a paper towel lined plate to absorb excess oil.

All Together:

Scoop risotto into a bowl. Place approximately 4-6 scallops per person on top of the risotto. Drizzle the brown butter on top of the scallops as well as a little bit on the risotto. Enjoy!

Fried Chicken and Belgian Waffle Sliders with Arugula, Tomato, and Avocado and Maple Dijon Sauce

13165960_10206335818207524_8884107941874790437_n

Happy Sunday!

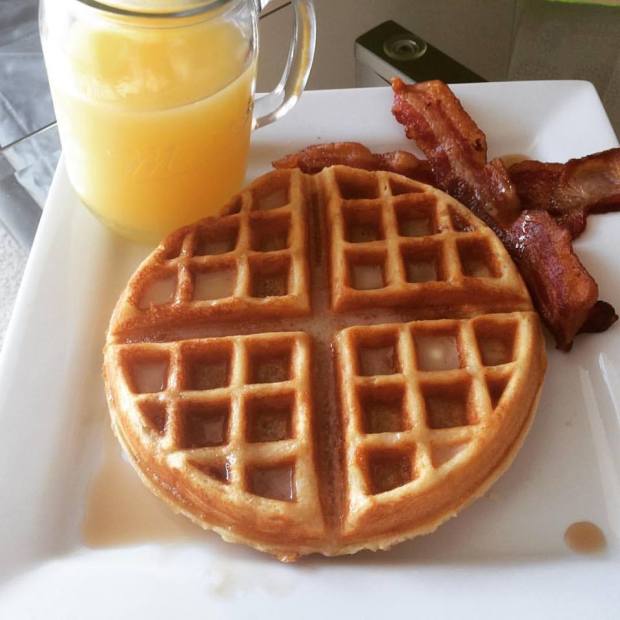
So I have this tradition I’ve had for quite some time since I’ve lived on my own…I make waffles on Sunday. Some people find solace in attendance of church services, others take long drives–me? I make waffles. It gives me a sense of inner peace, and it’s something I look forward to by the week’s final end. My fiancé bought me an awesome Waring professional Belgian waffle maker for my birthday last year, and I have used it religiously with utter delight. I am a lover of brunch with champagne, and I think that to be a proper brunch host, I just needed to have a solid waffle maker. Thanks, Zach!

I made my Belgian cuties as usual today for my love and me…except it’s just two of us, and I slipped by making extra batter. It was probably the best mistake I made today. The worst mistake I made was going to Michael’s (the crafts store) thinking that I could only buy one thing…ugh. My credit card is officially whacked for the month. 🙂

13177799_10206331925590211_5924864210540749297_n

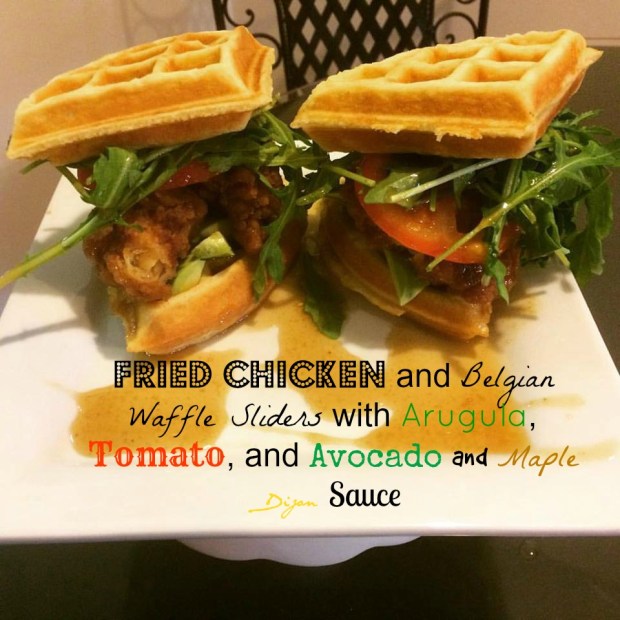
I could eat these for the rest of the week, but that might get old. I decided to make them as sandwiches…genius! I recalled a Pinterest post and thought that today would be the day to give it a go. I didn’t follow the recipe for the waffle batter like they specified as I used my waffle recipe from this morning. The recipe in the Pinterest post is excellent for a savory waffle, so when you go make this yourself, feel free to use that one, but just know that you don’t necessarily need a savory waffle for this awesome sandwich. I believe the chicken, avocado, tomato, and arugula add enough savoriness, but to each their own!

If you are a southerner, or if you have a southern palate, you know how amazing fried chicken and waffles is. It’s a wonderful balance of sweet and savory, and it’s an excellent brunch item as it encompasses the best BUTTERMILK items. Ladies and gents–I do require you use buttermilk for your chicken, and preferably also for your waffles. Buttermilk does absolute wonders, and it is my secret weapon for today. Tip: If you don’t feel like running out and buying buttermilk, you can always add a little vinegar to regular milk and bam! The chemistry experiment will suffice as your vice.

This recipe is relatively simple, but if you have time on your side, go for the overnight yeast waffles versus my fast waffles (especially for breakfast). They are both good, but the yeast waffles are superb.

Same thing for the chicken–it’s best to let the chicken marinate in buttermilk overnight, and dredged so that the outside dries out and the inside remains moist (you know, the crispiest fried chicken ever.) Time is your friend, but if you’re short on time, you can always take short cuts. Heck, you can even buy fried chicken to not make a mess. I just won’t allow you to make Eggo waffles in lieu of a homemade batter. If you do want simple box mix, I like to use Aunt Jemina in a pinch. But please, let go of that EGGO. 🙂

This post is going to look really long, but that’s because I included three options for waffles. First, pick your waffle you want to make. I offer the savory version that has cheddar and scallions from Candid Appetite, my easy waffle, and my overnight waffle (which is great when time is on your side.) They’e all good–it just depends on your need.

After you make your waffles, then work on your chicken.

Lastly, ASSSSSSEEEEMMMMMBBBLLLEE!

STEP ONE: Waffle Batter Ingredients and Instructions (Pick One!)

Savory Version from Candid Appetite:

Ingredients

2 cups (250 grams) all-purpose flour

¼ cup (55 grams) light-brown sugar

1 teaspoon (8 grams) baking soda

1 ½ teaspoons (6 grams) baking powder

½ teaspoon (4 grams) salt

2 teaspoons (14 grams) freshly cracked black pepper

3 large eggs, room temperature

Instructions: 

  1. Preheat waffle iron.
  2. In a large bowl stir together the flour, brown sugar, baking soda, baking powder, salt and black pepper. Make a well in the center of the bowl and set aside.
  3. Crack the eggs into a small bowl and whisk together. Pour into the center of the dry ingredients. Add the melted butter and buttermilk. Using a wooden spoon, stir the waffle batter until just combined. It should be sightly lumpy. If the batter appears to be too thick, add a splash of buttermilk and stir until pouring consistency is reached. Fold in the cooked chopped bacon, shredded cheddar cheese, and sliced green onions.
  4. Lightly grease the waffle iron with cooking spray or melted butter. Pour in about ½ cup batter in each waffle cavity, more or less depending on size of waffle iron. Cook until the waffles are golden brown and crispy.

Easy Weekend Waffle from Lei Mangia :

2 cups  flour

4 teaspoons  baking powder

1⁄2 teaspoon  salt

1⁄4 cup  sugar

1 teaspoon pure vanilla extract 

2 eggs (you could separate yolks from whites, whip up whites until fluffy and add to batter if you have time, but again it’s the easy waffle!)

1⁄2 cup of Canola oil

2 cups milk (but buttermilk, preferably!)

Instructions: 

  1. Preheat waffle iron.
  2. Sift the dry ingredients together in a large bowl.
  3. Separate the eggs.
  4. In small bowl, beat egg whites until stiff.** (or to make it simple,  don’t separate the eggs–the whites will make your waffle fluffier, though.)
  5. Mix together the egg yolks, milk and oil and stir slightly.
  6. Add to dry ingredients and mix well.
  7. Fold in beaten egg whites.
  8. Put 2/3-1 cup of waffle mixture in the center of the waffle iron. Do not close your iron until all the mixture is properly distributed! Cook for about 5 minutes (depending on your waffle maker’s setting.)

Perfect Overnight Belgian Waffles (Based off of Barefoot Contessa and modified by Lei Mangia):

½ cup warm water (110 to 115 degrees) 
1 package (1/4 ounce) active dry yeast, at room temperature 
2 teaspoons sugar 
2 cups lukewarm whole milk (90 to 100 degrees) 
¼ pound (1 stick) unsalted butter, melted
plus extra for the waffle iron** (Or use cooking spray like Pam)
2 tablespoons honey  (I usually leave the honey out–it’s up to you!)
1 teaspoon pure vanilla extract 
1¼ teaspoons kosher salt 
2 cups all-purpose flour 
2 extra-large eggs 
¼ teaspoon baking soda 

Instructions: The night before, combine the water, yeast, and sugar in a very large bowl (the batter will expand enormously).

  1. Allow it to stand for about 5 minutes, until the yeast dissolves and the mixture has started to foam, which tells you the yeast is alive. Stir in the milk, butter, honey*, vanilla, and salt. Add the flour and whisk until the batter is smooth.
  2. Cover the bowl with plastic wrap and allow it to sit overnight at a cool room temperature.
  3. The next morning, preheat a Belgian waffle iron according to manufacturer’s instructions and brush the top and bottom with melted butter (or use cooking spray, which is easier).
  4. Beat the eggs together with the baking soda and whisk them into the batter until combined.
  5. Pour just enough of the batter onto the hot waffle iron to cover the grids (1/3 to ½ cup each, depending on your waffle maker), close, and cook for 5 to 6 minutes on medium heat, until the waffles are golden brown. Remember: It’s always best to go on a lighter setting and leave it in longer versus overcooking!

STEP TWO: Make Your Finger Lickin’ Chicken!

1 pound chicken breast cutlets, cut in half

1½ cups buttermilk

1 tablespoon of hot sauce, optional (but recommended, and I love Cholula!)

1½ cups all-purpose flour

1 teaspoon salt

1 teaspoon cayenne pepper

1 teaspoon garlic powder

1 teaspoon black pepper

canola oil for frying (fill a cast iron skillet!)

Instructions;
  1. Place the chicken in a large bowl. Cover with buttermilk and add the hot sauce, if using. Toss together until evenly mixed and all the chicken is submerged in the buttermilk. Cover with plastic wrap and place in the fridge for at least 30 minutes. If you don’t have the time, this step is not crucial but it will help make the chicken tender and juicy. You can leave it up to overnight, which if you’re doing this ahead, I totally recommend!
  2. In a shallow dish combine the flour, salt, cayenne pepper, garlic powder, and black pepper.
  3. To coat the chicken, grab a piece from the buttermilk bowl, slightly drain off, and throw into the flour.
  4. Pat the flour into the chicken, on both sides. Return to the buttermilk bowl (with the rest of the chicken) and coat both sides.
  5. Place the chicken back into the flour, once more, and coat both sides. We’re double dipping the chicken. Lay the coated chicken on a rack placed over a baking sheet. Repeat in this manner until all the chicken is coated.
  6. Allow the coated chicken to rest for at least 10 minutes, this will allow the fry to dry a bit and stick to the chicken.
  7. In the meantime, heat about 2 inches of oil in a heavy duty pan, such as a cast iron skillet.
  8. Once the oil is hot, fry the chicken in batches. Cook for about 5 minutes on the first side, turn over once golden brown and crispy, continue to cook for another 4 minutes on the other side.
  9. Drain the chicken and place on a separate rack set over a baking sheet. You can keep the cooked chicken warm in a 200°F oven until all the chicken is fried and you’re ready to serve.

Or, you can buy fried chicken and save yourself the fuss. 🙂

STEP THREE: Assembling Your Sandwich

Ingredients

1 cup of arugula

1 thinly sliced tomato (preferably off the vine)

1/2 slice of ripened avocado

1/4 cup of pure Maple syrup

3-4 tablespoons of Dijon Mustard

Prepared Waffle and Chicken

The Finale…

  1. Take your waffle and divide it into sections (mine has four sections per waffle which makes two sandwiches per waffle.)
  2. Slice avocado and tomato. Rinse arugula.
  3. Mix maple syrup and Dijon mustard together to create sauce.
  4. Put thin avocado slices on the bottom piece of the waffle.
  5. Place chicken on top of the avocado. Drizzle sauce.
  6. Put sliced tomato on top of avocado layer. Put a half a handful of arugula on top of the tomato. Slightly dress the arugula with more sauce.
  7. Place another waffle piece on top. You may use a toothpick to keep it together, if you like.
  8. Eat! You may need a knife and fork, but that’s only half the fun. 🙂


Thyme and Rosemary T-Bone Steak with Potatoes and Broccoli

13000282_10206201178601618_8624191865594800461_n

Happy Saturday!

I don’t think there is a meal out there that is more satisfying than a steak. To be honest, I eat burgers more than I eat steaks, but when I do have a hunch for a steak, I just have to have it!

I have a fairly good amount of experience with steak and flavor combinations as I worked in a steakhouse as a waitress. I have had my share in making dry rubs, wet marinades, savory toppings like bleu cheese crumbles and caramelized onions. In addition, my father always had a keen sense for how steak should taste (he’s partial to Prime Rib).  Honestly, there isn’t much that is necessary for a delicious steak, but what will sure kill its flavor is overcooking it.

I apologize if I offend anyone, but you really should not be eating steak over medium rare. I love rare to medium rare (believe it or not–I range depending on the cut of steak!) I know that the blood for some people is too much, but really–eating carcinogenic charcoal is a lot more unnerving to me personally. To me, the flavor of the steak comes through when it’s prepared the proper way.

There are many cuts of steak I love to prepare, but I think one of the most romantic cuts (that is, a steak you can split for two), is a T-Bone steak. What I love about the T-Bone is that it’s two different steaks inside one. One half is a New York Strip and the other half is a Filet Mignon. The only problem with cooking a T-Bone steak is that the Filet Mignon, because it’s much smaller in proportion to the New York Strip, will naturally cook more quickly than its counterpart. This is only good is your significant other likes slightly more cooked meat and is partial to the Filet, but if you are sharing equally, you need to be thoughtful to how you prepare your steak with the challenges presented: two different meats, and a bone. Steak on the bone has definitely more flavor, but with the bone inside, the steak will be rarer near the bone and thus appear uneven.

I used to get really pissed off when customers would send a T-Bone back at my job; they would eat almost their entire steak, and then bam! They would cut near the bone and freak out when they saw a little blood. If only these patrons knew that the bone is blocking the distribution of heat hence the rarer inside. Ugh. At least now you know! Knowledge is power.

This meal is great if you are looking to cook a simple, romantic dinner for two.

I decided to make this mostly foolproof by using a few tricks…

1.) The steak is “reverse seared” which means it’s slow cooked in the oven for a short amount of time and THEN seared in a hot, cast iron skillet. Many times, people try to sear the outside first and then finish in the oven, but there is less consistency. If you want more control, this is the method for you.

2.) I used my microwave for my vegetables. Sue me. They taste wonderfully.

3.) Even though I use a few short cuts, I am ultimately using the freshest ingredients: the best meat I can find, fresh herbs versus dried (sorry!), and freshly cracked pepper and salt to form that wonderful crust.

Alright, enough talking. Let’s eat!

Ingredients

  • 1 1/2 pound T-Bone Steak (or any other steak of your choice)
  • 1 Steamable Potato Bag (go for petite potatoes or even red potatoes)
  • 1 Steamable Broccoli Bag
  • Four cloves of garlic
  • 2 tablespoons of olive oil
  • 1 tablespoon of Canola oil
  • 1 tablespoon of butter (salted or unsalted–your call)
  • Fresh thyme (at least 5 sprigs)
  • Fresh rosemary (at least two sprigs)
  • Freshly cracked salt and pepper (no table salt!)

Meat and Greet

  1. Take your steak out of the refrigerator so it comes to room temperature. Lay it out on a plate and add salt and pepper liberally. With a garlic press, smash four cloves of garlic and press them deeply into the steak.To infuse the steak with herby flavor, take off thyme leaves and rosemary leaves. You will remove these herbs before cooking.
  2. Preheat your oven to 250 degrees. Get a wire rack and baking sheet. Line the baking sheet with aluminum foil for easy clean up.
  3. While you’re waiting for the oven to pre-heat, make your potatoes. Get olive oil, thyme and rosemary leaves (about 1 sprig of each–more to taste) and rub them on all the potatoes before microwaving. Throw the potatoes in the microwave (it’s usually about 8 minutes) once they are all evenly coated. You may need to microwave them again to make them fork tender (about another 2-3 minutes.)
  4. Once the oven is pre-heated, put the seasoned steak on the rack (take off the herbs). Cook the steak in the oven (flipping mid way through) for about 30 minutes (could be more if the steak is really thick–look at it every 10-15 minutes to be careful!)
  5. Take the steak out and let it rest. In the meantime, heat up your cast iron skillet with 1 ounce of Canola oil (it has a high smoke point) on medium high heat.
  6. Once the skillet is hot enough, sear the steak on about 2-3 minutes per side until a crust forms (this will create a medium rare). Towards the end, melt 1 tablespoon of butter and throw in some whole thyme and rosemary sprigs for aromatics. Baste the steak in the melted butter. Remove the aromatics (the sprigs) after about two minutes.
  7. Let the steak rest. As the steak is resting on the rack, microwave your steamable broccoli. Once the broccoli is done (about 5 minutes), add salt and pepper.
  8. You may re-heat your potatoes in the microwave on a plate with leftover thyme/rosemary leaves, or you may crisp the potatoes up in the already hot cast iron skillet–your choice!
  9. Slice thinly to share, or you may split the Filet Migon from the New York Strip. Your choice! 🙂


Stuffed Porkchops with Jalapeño Popper Filling, Roasted Brussel Sprouts, and Petite Sweet Potatoes

12938287_10206132379921694_296138030822302642_n-2.jpg

Happy Tuesday!

I love jalapeño poppers…I don’t think I can ever get enough. It reminds me of a fiesta, football, and a fun time–each and every time.I actually don’t think I eat these enough. But when I do, I go crazy. I love the combination of moderate heat with the coolness of cream cheese. And to make matters better, they’re deep fried which almost guarantees perfection. I used to work at Texas Roadhouse as a waitress, and what I always loved most was when someone couldn’t handle the heat and sent back one of my favorite appetizers: “Snakebites.”

514.jpg

These were, contrary to popular belief, not made from actual snakes, and no–they have nothing to do with that awful liquor shot with Jack Daniels, Tequila, and Tabasco. These are the signature “jalapeño poppers” of Texas Roadhouse, and they are absolutely fabulous. They aren’t your typical whole jalapeño pepper stuffed with cheese; instead, snakebites are buttermilk dredged and fried cheese balls that are mixed with finely diced peppers (sweet bell peppers and jalapeño). I think the sweet peppers really complement the heat and flavor of the jalapeño without stealing the latter pepper’s limelight. They are absolutely perfect–be assured.

What we used to also do in the restaurant (please–if you go to Texas Roadhouse, do not ask them to do this for you because it is somewhat of a pain!) is order a custom early dine pork chop (hey–it was $8.99 between 4-6 and I got a 30% discount!). With this pork chop, I would want to “spice it up”, so I would butterfly the chop (if you are unfamiliar with the term simply means splitting it in half without fully cutting it) and add the snakebite filling inside. It is beyond delicious. I bet you it would be even better with a freshly fried “snakebite” on top too…ooh.

**Note: If you are not a pork chop fan, fear not! Some may think that pork too often dries out, but I assure you that if you prepare it well, you will change your mind. And if I am not going to convince you that pork chops can be made succulent and tasty, then at the very least make this filling for a stuffed grilled chicken breast, or maybe another protein of your choice. The options are endless, but I think chicken or pork would be best.

I haven’t had my custom pork chop in years, and I suddenly felt a need to re-create it again. I also knew that my freezer had a few lonely pork chops waiting to be defrosted. And when I want something, I will go to any length to have it. This recipe is cost efficient, tasty, and requires minimal effort. Go for the gold! Speaking of easy–my side dishes, the brussel sprouts and petite sweet potatoes, are cooked primarily in a microwave and you would never know the difference in taste–hey ho! For authentic caramelization on the brussel sprouts, however, I roasted them for ten minutes after cooking them in the microwave. Vegetables in those microwavable bags are your friends, people!

P.S: If you have extra filling, you may make your very own appetizer of “Snakebites” similar to Texas Roadhouse. Maybe I’ll post that later in the week…:) It’s always great to repurpose your ingredients! Let’s get started!

First–Yo’ Fiesta Filling for Yo’ Poppa’

Ingredients…

8 ounce package of cream cheese

1 cup of shredded Monterey Jack cheese

1 small, finely diced red bell pepper

1 small, finely diced yellow bell pepper

1 small, finely diced and deseeded jalapeño pepper

Directions: First, finely dice all the aforementioned peppers (really finely!) In a medium sized bowl, mix cream cheese, jack cheese, and peppers together. Make sure everything is well incorporated. Grab plastic wrap and form the cream cheese mixture into a log. Refrigerate immediately for later use.

Second–Get To The Choppa’

Ingredients…

1 package of pork chops (should be four in a package; I used boneless and centercut–preferably thick chops. You could alternatively get bone in chops–they are delicious too!)

1 bag of microwavable brussel sprouts** (Trader Joe’s makes an excellent product!)

1 bag of microwavable petite sweet potatoes**

4 tablespoons of olive oil, divided (some for pork, some for potatoes, some for brussel sprouts)

2 tablespoons of salt and pepper (more or less to taste) for pork and/or brussel sprouts

1 teaspoon of crushed red pepper (optional) for pork and/or brussel sprouts

**–only if you are making the side dishes

Start With Your Side Dishes: Brussel Sprouts and Petite Sweet Potatoes

  1. First, make your side dishes. Microwave your sweet potatoes first (they should take about eight minutes in the microwave.
  2. Before microwaving, coat the potatoes with olive oil in the microwavable –approximately two tablespoons. The sweet potatoes will not need any more preparation after being microwaved.
  3. Next, microwave the brussel sprouts (do not add any oil.) Let both items cool before handling.
  4. Pre-heat your oven (or toaster oven as brussel sprouts are small) so you can roast your brussel sprouts to enhance the caramelized flavor.
  5. On a small sheet pan, put a silicone liner or aluminum foil.
  6. Cut the ends of the brussel sprouts, and cut each sprout in half. Place halved brussel sprouts on the sheet pan.
  7. Drizzle olive oil, salt, pepper, and red pepper flake on brussel sprouts (about 1 tablespoon of olive oil–add more if you like, and about half a teaspoon of salt, pepper, and red pepper flake).
  8. Roast coated brussel sprouts in the oven for approximately 10-15 until caramelized and brown.

Finish Your Main Course: Jalapeño Popped Stuffed Pork Chop

  1. Start Your Base: Season your pork chop with remaining amounts of olive oil, salt, pepper, and red pepper flake (more or less to taste.)
  2. Begin to Butterfly: Place your left hand flat on the pork chop (if you’re right handed, vice versa for left handed) and using a sharp knife, butterfly the pork chop. Your opposite hand is essentially “sawing” the chop in half that it is split, but make sure you don’t cut all the way through and split the chop in two separate halves! If this is too difficult, you may grill the pork chops and put the filling on top, alternatively.
  3. Take the jalapeño mixture out of the refrigerator and portion about 1-2 ounces of the filling and stuff inside the pork chop.  DO NOT OVERFILL! IT WILL OOZE OUT. If you have cooking twine, you may tie the chop to keep the filling in, but this isn’t necessary.
  4. Heat up cast iron grill pan or outdoor grill. Make sure the grill is very hot!
  5. Once the grill is heated, please pork chop on grill. Make sure you get a nice brown sear and grill marks. You should cook each side about 5-6 minutes on each side (if appropriately thick, about 1 inch). Don’t forget to flip and make sure it has that great color!
  6. If you desire to use a food them orator, it should be done at 140 degrees Fahrenheit.)
  7. Reheat your side dishes lightly in the microwave and put on the plate with the pork chop. Devour immediately!