Tiramisu & He’ll Love You!

tiramisu

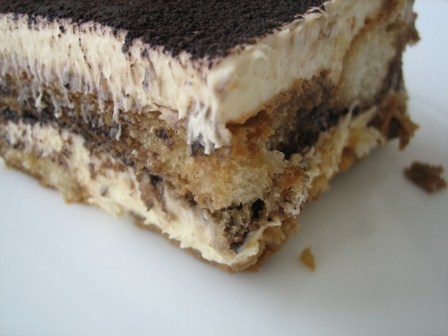
I never thought that I only made Tiramisu for Valentine’s Day, but I just recently thought about all the times I ever made it, and I suddenly realized–yes, this is my traditional, go-to-and-impress-him dessert. If it’s not Valentine’s Day, it somehow has been responsible for making people fall in love. True story: Two friends of mine married their spouses shortly after making this dessert. I don’t believe it’s a coincidence. There’s something about its layered espresso goodness that makes everyone smile and swoon. Tiramisu, which literally means “pick me up,” has plenty of coffee, espresso, liqueur, and rum to keep you going!

What’s the best thing about making Tiramisu? It’s fancy and tasty without the need for an oven. I love making this dessert in the summertime for that reason. There is technically no baking involved, but you will need a good stand mixer (or regular electric mixer) because you will need to make sure you get the consistency of the mascarpone and whipped cream mixture right. Other than that, this is the perfect dessert to make for your sweetheart. You can make it in about forty minutes of prep work, leave it overnight, and wake up to a decadent treat.

The most expensive and probably difficult ingredients to find if you do not live in an Italian neighborhood are mascarpone and ladyfingers. When I asked for the mascarpone cheese in my neighborhood grocery store, the attendant asked me if it was similar to parmigiana cheese. Uh, no! This is a sweet, Italian cream cheese! Although he could not help me, I eventually found what I was looking for by the chocolate covered strawberries. Maybe other people see that this, too, is the best Valentine’s Day treat? The secret must be out…

Can you use regular Philadelphia cream cheese instead? No. If you need to order it from Amazon.com because you live in Minnesota, then so be it. It’s worth the wait. I will say that if you are feeling extra creative, you can make your own savoiardi (ladyfingers), but the ones that come from Italian bakeries are more than excellent.

Okay, as with any baking where you are whipping a cream, you need to make sure your bowls that you are mixing with are chilled. If you really are short on time, throw them in a freezer and start to prepare everything else in the meantime. Cold bowls will help get the nice, fluffy peak you need out of your mixture.

To begin, you need the following:

A stand-mixer (or electric mixer–DO NOT MIX BY HAND WITH A WHISK)

Two mixing bowls (chilled)

A 13 x 9 inch pan (you can do any similar size if needed, but you may have more or less mixture needed)

A rubber spatula

Cast of Characters (Ingredients):

2 cups strong brewed coffee, room temperature
1½ tablespoons instant espresso powder
6½ tablespoons Kahlua, divided, 2½ tablespoons Bacardi Rum (you can also substitute vanilla and coffee extract if you need it without alcohol, but I highly recommend using the coffee liqueur and rum!)
6 egg yolks
⅔ cup sugar
¼ teaspoon salt
¾ cup cold heavy cream, divided
24 ounces mascarpone cheese
14 ounces dried ladyfingers (savoiardi) <–Typically, two boxes worth.
3½ tablespoons Dutch-processed cocoa powder <–Go for unsweetened! I used Hershey’s Cocoa Unsweetened. If available, go for the dark cocoa powder–that’s my favorite!

Directions

1. Prepare the ladyfinger coffee mixture. Brew two cups of strong coffee (and if you have, you can also brew one shot of espresso) and pour into a large bowl. Measure 2 1/2 tablespoons of Kahlua, 2½ tablespoons Bacardi Rum, and  1½ tablespoons of Instant Espresso Powder. Stir all ingredients into the espresso powder has dissolved. If you don’t have Instant Espresso Powder, feel free to substitute Instant Coffee Powder, but DO NOT use actual coffee or espresso grinds as these will not dissolve.

2. Crack eggs and separate whites from yolks. In a stand mixer fitted with whisk attachment, beat yolks at low speed until just combined. Gradually add sugar and salt and beat at medium-high speed until pale yellow, 1½ to 2 minutes, scraping down bowl with rubber spatula once or twice. Add ⅓ cup of the heavy cream to yolks and beat at medium speed until just combined, 20 to 30 seconds, and then scrape bowl. Do not over beat!

***If you have pasteurized eggs and want to eat Tiramisu traditionally, proceed. For those of you who are bothered by the concept of a raw egg, you can do this optional step to cook the eggs lightly.***

OPTIONAL: Set the bowl with yolks over a medium saucepan containing 1 inch of gently simmering water; cook, constantly scraping along bottom and sides of bowl with heatproof rubber spatula, until mixture coats back of spoon and registers 160 degrees on instant-read thermometer, 4 to 7 minutes. Remove from heat and stir vigorously to cool slightly, then set aside to cool to room temperature, about 15 minutes.

3. Whisk in remaining 4 tablespoons Kahlua until combined. Transfer bowl to standing mixer fitted with whisk attachment, add mascarpone, and beat at medium speed until no lumps remain, 30 to 45 seconds. Transfer mixture to large bowl and set aside. DO NOT OVERBEAT! IF IT IS LIQUEFIED, YOU CANNOT FIX IT.

4. In a now-empty mixer bowl, beat the remaining heavy cream (about 6.5-7 tablespoons) at medium speed until frothy, 1 to 1½ minutes. Increase speed to high and continue to beat until the cream holds stiff peaks, 1 to 1½ minutes longer. Using a rubber spatula, fold one-third of the whipped cream into mascarpone mixture to lighten, then gently fold in remaining whipped cream until no white streaks remain. Set mascarpone mixture aside.

5. Assemble your lady fingers by soaking them first, one-by-one, into a 13 x 9 pan. Grab one ladyfinger, drop and roll in the coffee/rum mixture for about two seconds. Do not let it get soggy! Because it will be sit overnight, it will continue to get very moist. In fact, by the third day of leftovers, it may be almost “too wet.” It’s just an excuse to eat it all right away.

6. For each ladyfinger you soak, you must put the cookie on the bottom of the Pyrex. You are making one layer with just soaked ladyfingers first. You may have to break some in half to fit perfectly for your individual pan.

7. Apply the first half of mascarpone mixture over ladyfingers; use rubber spatula to spread mixture to sides and into corners of dish and smooth surface. Place 2 tablespoons cocoa in fine-mesh strainer and dust cocoa over mascarpone or simply sprinkle it on. You can also sprinkle a little espresso powder for more oomph!

8. Repeat dipping and arrangement process of ladyfingers by placing the newly soaked ladyfingers on top of mascarpone mixture; spread remaining mascarpone mixture over ladyfingers and dust with remaining 1½ tablespoons cocoa. If you have any leftover crumbs from the ladyfingers, feel free to sprinkle these on top as well. Cover with plastic wrap and refrigerate overnight or at least 6-8 hours. Cut into pieces and serve chilled. Leftovers can be stored, tightly wrapped, in the refrigerator for up to 3 days.

Southern Style Crab Cake Melt with Cheddar, Remoulade, and Roasted Asparagus

SouthernCrabCake.jpg

Happy Tuesday!

I apologize for not posting; I’ve been overwhelmed between preparing to move, ending my school year, and so on. But no more excuses–I am here to stay!

I prepared this recipe yesterday to help my neighbor Jennifer with her “Surf and Turf” themed Memorial Day party. She was dead set on us making a ceviche, but I know that I am not one that likes to experiment on a large group of people. The little experience I have with ceviche tells me that I should 1.) get the freshest seafood ever and 2.) I need enough acid/time to marinate the fish. And so, I encouraged her to let me go with one of my favorite things to eat instead…crab!

I love crab cakes, crab legs with drawn butter, soft-shell crab, she-crab soup, or a crab gnocchi bake; Zach and I could devour Snow Crab, in particular, for days. Crab has such a distinct sweetness and flavor that it is totally undeniable. Crab cakes are definitely a weakness of mine, but they’re often…mediocre. I’ve had them out and have been disappointed. They can be dry, loaded with fillers (and thus, very little crab), and quite frankly, unaffordable for the average person dining out.

It’s one of the more expensive items you can purchase in a restaurant, and it may be an item you are afraid to make yourself because..

1.) It’s costly–chicken, anyone?

2.) It’s seafood–frightening for some.

But trust me when I say it isn’t that scary at all! And while I agree it’s not the cheapest meal to make, it’s so worth it. For this recipe, I use good quality canned crab (Phillips’). Yes, you could use fresh crab. Sure, you can cook your own crab and pick them to pieces, but you’ll die of starvation by the time you’re finished. Good quality canned crab is appropriate for this dish!

You should make this if you’re a crab lover and/or you’re looking to impress. Even if you’re not entertaining a few guests, this recipe can be easily even made for a single person (yes, you read that right), so that you can make yourself a 15 minute meal that tastes divine.

Now I have a “holiday” crab cake recipe I make, and I also make a salmon cake that is similar to the recipe I am providing here. This crab cake melt, however, is less fuss. When you’re cooking for a crowd, you don’t want complicated. You want tasty and easy, and this is perfectly that.

From all my experiences making seafood cakes (I’ve made tons), the best base has…

1.) Creamy components (Mayo, Sour Cream, and/or Remoulade)

2.) Butter Crackers (Like Club or Ritz)

3.) Sautéed Diced Peppers and/or Onions

Sure, you can make a deep fried one with typical breading (Panko or Italian-Style), but I don’t think that does anything to actually accentuate the natural taste of the crab cake. I personally (and for this recipe) broil, not fry the crab cakes. The flavor is much more prominent, and I believe the crushed cracker breading approach creates the right texture.

Now what heightens this dish (without taking away the excellent seafood flavor) is the cheddar that is melted. This crab cake melt, as the name implies, involves smothering the crab cake in gooey cheese on top of a split English muffin. It’s amazing! The first time I had a Crab Cake Melt was in Downtown Wilmington, NC. Not only was it fantastic, but it was only $9.99 at an awesome place called Paddy’s Hollow.

For the price of two crab cakes at the aforementioned restaurant, you can serve a hearty appetizer for 12, so let’s get started! Again, this recipe can easily be scaled down to a romantic meal for two, so don’t feel the need to invite company over…

Because I doubt you’ll want to share. 🙂

Ingredients for Side Dish: Roasted Asparagus

  • 1 bunch of fresh Asparagus
  • 1-2 tablespoons of Extra Virgin Olive Oil
  • Salt and Pepper

Ingredients for Remoulade (Make first to add to your crab cake mixture!)

    • 3 cups mayonnaise (or sour cream!)
    • ½ cup Dijon mustard
    • 1 tablespoon Worcestershire
    • 1 tablespoon hot sauce (I like Cholula!)
    • 1 teaspoon Cajun seasoning blend** (optional)
    • 1 teaspoon paprika
    • 1 tablespoon freshly squeezed lemon juice
    • 1 tablespoon prepared horseradish
    • 1 tablespoon ketchup, plus more if needed
    • 1 tablespoon finely minced garlic
    • 2 tablespoons chopped capers
    • 2 tablespoons sweet pickle relish
    • 2 tablespoons finely diced celery
    • 2 tablespoons finely chopped flat-leaf parsley
    • 1 tablespoon finely diced green onion tops
    • Kosher salt and freshly ground black pepper

Ingredients for Crab Cake for 2 (Multiply most ingredients by 6 to create 12!)

  • 2.5-3 ounces of lumped crab meat (canned)
  • 3 tablespoon of sour cream (or mayo)
  • 1 tablespoon Worcestershire
  • 1 tablespoon hot sauce (Cholula or Sriracha works for me!)
  • 1 tablespoon Dijon mustard
  • 1/6th of a sleeve of Club Crackers, crushed finely (if you’re making for 12, use a whole sleeve)
  • 1 beaten egg** (for 12 servings, I only needed 2-3 large eggs to bind!)
  • 3 sliced and diced jarred roasted sweet bell peppers OR 3 sliced and diced sweet MINI bell peppers (you must sauté beforehand) FINELY DICED
  • Salt and pepper, to taste
  • 1-2 tablespoons of homemade Remoulade (P.S: If you don’t have time, you can buy this, too–but fresh is best!)

For serving…

  • 1 split English muffin (or 1 package of English muffins for company; I recommend Thomas’ English muffins)
  • 2 slices of Cheddar cheese


Directions for Side Dish: Roasted Asparagus

  1. Slice off woody ends of fresh asparagus.
  2. On a sheet pan, evenly spread out asparagus. Coat with olive oil, salt, and pepper.
  3. Once oven is preheated to 400 degrees, cook for 10 minutes. Do not cook it any longer than that! If you’re serving this for company, cook the asparagus last.

Remoulade Directions

  1. In a large mixing bowl, add the mayonnaise or sour cream. Whisk in the mustard, Worcestershire, hot sauce, seasoning blend, paprika, lemon juice, and horseradish. Add the ketchup and whisk together. Add more ketchup as needed to get the pink coloring necessary.
  2. Once the color is achieved, add in the garlic, capers, relish, celery, parsley, and green onion. Stir to combine and add salt and pepper to taste. Cover and refrigerate for at least an hour.

Crab Cakes Directions

  1. First, slice and dice your sweet bell peppers very finely. If your peppers are not jarred (in other words, fresh peppers), sauté them in 1 tablespoon of extra virgin olive oil and 1 teaspoon of Worcestershire. Stir until soft and fragrant. Put aside to cool–do not add to mixture until cooled as you are adding them to eggs! You don’t want scrambled eggs, do you now? 🙂
  2. Once the peppers are cooled (or if they’re jarred, simply diced), add them to a bowl. Next, add the canned crab, hot sauce, Dijon mustard, mayo/sour cream, beaten egg(s), and remoulade. Over the sink, pulverize your cracker sleeve finely. You may use a food processor if you don’t feel like smashing the crackers yourself. Tip: Use your index finger and thumb to break up large pieces! Once the crackers are crushed, add them to the mixture. Stir lightly to combine; don’t overmix! Make sure your mixture looks nice and moist. If it doesn’t look super moist, add a little bit more remoulade, sour cream, and Dijon mustard.
  3. Next, split your English muffins in half. Toast your English muffins about halfway.
  4. Once the English muffins are toasted, place sliced cheddar on the bottom of each English muffin half.
  5. On top of the cheddar, scoop out a generous amount of crab cake mixture  that will eventually be distributed on each English muffin slice. You don’t have to shape it with your hands–simply plop on top.
  6. **Alternatively, you can place the cheddar on top of the crab cake depending on how particular you are about presentation! If the cheese slice is too large, you’re better off putting the cheese on the bottom.
  7. When ready to serve (and remember, these can be made ahead), broil for about 10 minutes until golden brown.
  8. Serve with remoulade on top!


Thyme and Rosemary T-Bone Steak with Potatoes and Broccoli

13000282_10206201178601618_8624191865594800461_n

Happy Saturday!

I don’t think there is a meal out there that is more satisfying than a steak. To be honest, I eat burgers more than I eat steaks, but when I do have a hunch for a steak, I just have to have it!

I have a fairly good amount of experience with steak and flavor combinations as I worked in a steakhouse as a waitress. I have had my share in making dry rubs, wet marinades, savory toppings like bleu cheese crumbles and caramelized onions. In addition, my father always had a keen sense for how steak should taste (he’s partial to Prime Rib).  Honestly, there isn’t much that is necessary for a delicious steak, but what will sure kill its flavor is overcooking it.

I apologize if I offend anyone, but you really should not be eating steak over medium rare. I love rare to medium rare (believe it or not–I range depending on the cut of steak!) I know that the blood for some people is too much, but really–eating carcinogenic charcoal is a lot more unnerving to me personally. To me, the flavor of the steak comes through when it’s prepared the proper way.

There are many cuts of steak I love to prepare, but I think one of the most romantic cuts (that is, a steak you can split for two), is a T-Bone steak. What I love about the T-Bone is that it’s two different steaks inside one. One half is a New York Strip and the other half is a Filet Mignon. The only problem with cooking a T-Bone steak is that the Filet Mignon, because it’s much smaller in proportion to the New York Strip, will naturally cook more quickly than its counterpart. This is only good is your significant other likes slightly more cooked meat and is partial to the Filet, but if you are sharing equally, you need to be thoughtful to how you prepare your steak with the challenges presented: two different meats, and a bone. Steak on the bone has definitely more flavor, but with the bone inside, the steak will be rarer near the bone and thus appear uneven.

I used to get really pissed off when customers would send a T-Bone back at my job; they would eat almost their entire steak, and then bam! They would cut near the bone and freak out when they saw a little blood. If only these patrons knew that the bone is blocking the distribution of heat hence the rarer inside. Ugh. At least now you know! Knowledge is power.

This meal is great if you are looking to cook a simple, romantic dinner for two.

I decided to make this mostly foolproof by using a few tricks…

1.) The steak is “reverse seared” which means it’s slow cooked in the oven for a short amount of time and THEN seared in a hot, cast iron skillet. Many times, people try to sear the outside first and then finish in the oven, but there is less consistency. If you want more control, this is the method for you.

2.) I used my microwave for my vegetables. Sue me. They taste wonderfully.

3.) Even though I use a few short cuts, I am ultimately using the freshest ingredients: the best meat I can find, fresh herbs versus dried (sorry!), and freshly cracked pepper and salt to form that wonderful crust.

Alright, enough talking. Let’s eat!

Ingredients

  • 1 1/2 pound T-Bone Steak (or any other steak of your choice)
  • 1 Steamable Potato Bag (go for petite potatoes or even red potatoes)
  • 1 Steamable Broccoli Bag
  • Four cloves of garlic
  • 2 tablespoons of olive oil
  • 1 tablespoon of Canola oil
  • 1 tablespoon of butter (salted or unsalted–your call)
  • Fresh thyme (at least 5 sprigs)
  • Fresh rosemary (at least two sprigs)
  • Freshly cracked salt and pepper (no table salt!)

Meat and Greet

  1. Take your steak out of the refrigerator so it comes to room temperature. Lay it out on a plate and add salt and pepper liberally. With a garlic press, smash four cloves of garlic and press them deeply into the steak.To infuse the steak with herby flavor, take off thyme leaves and rosemary leaves. You will remove these herbs before cooking.
  2. Preheat your oven to 250 degrees. Get a wire rack and baking sheet. Line the baking sheet with aluminum foil for easy clean up.
  3. While you’re waiting for the oven to pre-heat, make your potatoes. Get olive oil, thyme and rosemary leaves (about 1 sprig of each–more to taste) and rub them on all the potatoes before microwaving. Throw the potatoes in the microwave (it’s usually about 8 minutes) once they are all evenly coated. You may need to microwave them again to make them fork tender (about another 2-3 minutes.)
  4. Once the oven is pre-heated, put the seasoned steak on the rack (take off the herbs). Cook the steak in the oven (flipping mid way through) for about 30 minutes (could be more if the steak is really thick–look at it every 10-15 minutes to be careful!)
  5. Take the steak out and let it rest. In the meantime, heat up your cast iron skillet with 1 ounce of Canola oil (it has a high smoke point) on medium high heat.
  6. Once the skillet is hot enough, sear the steak on about 2-3 minutes per side until a crust forms (this will create a medium rare). Towards the end, melt 1 tablespoon of butter and throw in some whole thyme and rosemary sprigs for aromatics. Baste the steak in the melted butter. Remove the aromatics (the sprigs) after about two minutes.
  7. Let the steak rest. As the steak is resting on the rack, microwave your steamable broccoli. Once the broccoli is done (about 5 minutes), add salt and pepper.
  8. You may re-heat your potatoes in the microwave on a plate with leftover thyme/rosemary leaves, or you may crisp the potatoes up in the already hot cast iron skillet–your choice!
  9. Slice thinly to share, or you may split the Filet Migon from the New York Strip. Your choice! 🙂


Kahlua and Bacardi Tiramisu

KahluaandBacardiTiramisu.jpg

This is my absolute favorite dessert I make. Seriously. It’s one of those recipes that your grandmother makes on special occasions, but never will tell you quite everything that’s in it when everyone asks. Grandma does not want her notoriety to vanish for the sake of appeasing your curiosity. It’s so alluring and delicious that as grandma, you are expected to make it, and as the envious family member, you are expected not to be able to ever learn how to make it!

This is my traditional, go-to-and-impress-him dessert for Valentine’s Day, but don’t feel the need to wait for a holiday. Make this because it’s Wednesday. Make this because you love chocolate and coffee. Make this because you love yourself-you don’t need a special occasion at all. There’s something about its layered espresso goodness that makes everyone smile. Tiramisu, which literally means “pick me up,” has plenty of coffee, espresso, liqueur, and rum to keep you going!

Once she starts making Tiramisu, she will be just fine!

What’s the best thing about making Tiramisu? It’s fancy and tasty without the need for an oven. There is technically no baking involved, but you will need a good stand mixer (or regular electric mixer) because you will need to make sure you get the consistency of the mascarpone and whipped cream mixture right. Other than that, this is the perfect dessert to make for your sweetheart. You can make it in about forty minutes of prep work, leave it overnight, and wake up to a decadent treat.

Cast of Characters (Ingredients):

2 cups strong brewed coffee, room temperature
1 1/2tablespoons instant espresso powder
6 1/2 tablespoons Kahlua, divided, 2 1/2 tablespoons Bacardi Rum
6 egg yolks
2/3 cup sugar
1/4 teaspoon salt
3/4 cup cold heavy cream, divided
24 ounces mascarpone cheese
14 ounces dried ladyfingers (savoiardi) <–Typically, two boxes worth.
3 1/2 tablespoons Dutch-processed cocoa powder <–Go for unsweetened! I used Hershey’s Cocoa Unsweetened.

The most expensive and probably difficult ingredients to find if you do not live in an Italian neighborhood are mascarpone and ladyfingers. When I asked for the mascarpone cheese in my neighborhood grocery store, the attendant asked me if it was similar to parmigiana cheese. Uh, no! This is a sweet, Italian cream cheese! Although he could not help me, I eventually found what I was looking for by the chocolate covered strawberries. Maybe other people see that this, too, is the best Valentine’s Day/anniversary/romantic occasion dessert? The secret must be out…

Can you use regular Philadelphia cream cheese instead? No. If you need to order it from Amazon.com because you live in Minnesota, then so be it. It’s worth the wait. I will say that if you are feeling extra creative, you can make your own savoiardi (ladyfingers), but the ones that come from Italian bakeries are more than excellent.

Okay, as with any baking where you are whipping a cream, you need to make sure your bowls that you are mixing with are chilled. If you really are short on time, throw them in a freezer and start to prepare everything else in the meantime. Cold bowls will help get the nice, fluffy peak you need out of your mixture.

To begin, you need the following:

A stand-mixer (or electric mixer–DO NOT MIX BY HAND WITH A WHISK)

Two mixing bowls (chilled)

A 13 x 9 inch Pyrex (you can do any similar size if needed, but you may have more or less mixture needed)

A rubber spatula

Get on the Grind

1. Prepare the ladyfinger coffee mixture. Brew two cups of coffee (and if you have, you can also brew one shot of espresso) and pour into a large bowl. Measure 2 1/2 tablespoons of Kahlua, 2 1/2 tablespoons Bacardi Rum, and  1 1/2 tablespoon of Instant Espresso Powder. Stir all ingredients into the espresso powder has dissolved.

2. Crack eggs and separate whites from yolks. In bowl of standing mixer fitted with whisk attachment, beat yolks at low speed until just combined. Gradually add sugar and salt and beat at medium-high speed until pale yellow, 1 1/2 to 2 minutes, scraping down bowl with rubber spatula once or twice. Add 1/3 cup of the heavy cream to yolks and beat at medium speed until just combined, 20 to 30 seconds, and then scrape bowl. Do not over beat!

***If you have pasterurized eggs and want to eat Tiramisu traditionally, proceed. For those of you who are bothered by the concept of a raw egg, you can do this optional step to cook the eggs lightly.***

OPTIONAL: Set the bowl with yolks over a medium saucepan containing 1 inch of gently simmering water; cook, constantly scraping along bottom and sides of bowl with heatproof rubber spatula, until mixture coats back of spoon and registers 160 degrees on instant-read thermometer, 4 to 7 minutes. Remove from heat and stir vigorously to cool slightly, then set aside to cool to room temperature, about 15 minutes.

3. Whisk in remaining 4 tablespoons Kahlua until combined. Transfer bowl to standing mixer fitted with whisk attachment, add mascarpone, and beat at medium speed until no lumps remain, 30 to 45 seconds. Transfer mixture to large bowl and set aside. DO NOT OVERBEAT! IF IT IS LIQUIFIED, YOU CANNOT FIX IT.

4. In now-empty mixer bowl, beat the remaining heavy cream at medium speed until frothy, 1 to 1 1/2minutes. Increase speed to high and continue to beat until the cream holds stiff peaks, 1 to 1 1/2minutes longer. Using a rubber spatula, fold one-third of the whipped cream into mascarpone mixture to lighten, then gently fold in remaining whipped cream until no white streaks remain. Set mascarpone mixture aside.

5. Assemble your lady fingers by soaking them first, one-by-one, into a 13 x 9 Pyrex. Grab one ladyfinger, drop and roll in the coffee/rum mixture for about two seconds. Do not let it get soggy! Because it will be sit overnight, it will continue to get very moist. In fact, by the third day of leftovers, it may be almost “too wet.” It’s just an excuse to eat it all right away.

6. For each ladyfinger you soak, you must put the cookie on the bottom of the Pyrex. You are making one layer with just soaked ladyfingers first. You may have to break some in half to fit perfectly for your individual pan.

7. Apply the first half of mascarpone mixture over ladyfingers; use rubber spatula to spread mixture to sides and into corners of dish and smooth surface. Place 2 tablespoons cocoa in fine-mesh strainer and dust cocoa over mascarpone or simply sprinkle it on. You can also sprinkle a little espresso powder for more oomph!

8. Repeat dipping and arrangement process of ladyfingers by placing the newly soaked ladyfingers on top of mascarpone mixture; spread remaining mascarpone mixture over ladyfingers and dust with remaining 1 1/2 tablespoons cocoa. Cover with plastic wrap and refrigerate overnight or at least 6-8 hours. Cut into pieces and serve chilled. Leftovers can be stored, tightly wrapped, in the refrigerator for up to 3 days.