Butternut Squash Soup with Bacon and Pepitas

23000199_10210341984319173_4556405168983165118_o.jpg


Happy Sunday!

What says fall more than pumpkin? Butternut Squash. Step aside there, Jack. Butternut Squash is so much nuttier, creamy, and versatile to its cousin the pumpkin.

Save the pumpkin for the lattes, the rolls, and the pies. Butternut Squash is your best friend for your fall menu.

This Butternut Squash soup is one of the first recipes I ever made growing up (first was Pasta Fagioli, second was Butternut Squash soup, and my third dish I ever made was Butternut Squash Ravioli–see?) I remember making this for my father who was deeply opposed because he had never enjoyed a squash soup in the past. He dropped his spoon in awe. He gave me compliments galore–a man who seldom says much as his expectations were higher than high.

And so, I aim to relive this fond memory by making this at least once a year during the peak of fall. But to be honest, this year has be so unseasonably warm that I haven’t wanted to turn on my oven. Luckily, today was rainy and it was Sunday, so it was perfect day for me to make soup.

Also–mild confession–I am watching what I am eating. For those who know me, I never diet. The reason I don’t diet is probably pretty obvious–I love food, and usually the best tasting foods aren’t the lightest.

But this soup is the exception. It’s delicious, healthy, low-calorie–but firstly great tasting. I have been perusing blogs and Pinterest lately to find other food miracles, but I find some are disappointing, like when I attempted to make pancakes out of bananas and ground oats. No, they’re not the same. Most of these recipes “resemble” the “guilty pleasures” in appearance, but the taste leaves something to be desired. This soup is guilty pleasure that is also guilt-free calorically. It’s also loaded with vitamins, minerals, and antioxidants galore.

The flavor and texture is what I enjoy most–it’s creamy, nutty, and buttery without having to add anything. The secret to me is slowly roasting the butternut squash first as it enhances its natural sweetness. But beware: some people who make this soup load it with unnecessary, dessert intensity sweetness–like brown sugar, cinnamon, and wayyyyy too much nutmeg which totally kills the flavor. Not all recipes are made equal for this soup–that’s for sure.

I have a lot of optional additives like apple, sour cream, bacon, and pepitas (pumpkin seeds). You make this soup your own. In terms of the apple, I don’t personally cook the apple in the soup, although the original recipe included that step, so I have it there, but I personally think it’s necessary. Make this any way you like! If you’re vegan or vegetarian, feel free to leave out the bacon, but I personally love the flavor and texture it adds!

Also a note on butternut squash–I know they are a pain to cut, but it’s best to buy it whole. To make it easier (and safer) to cut, microwave it about 5 minutes first before you try to split it in half to roast. I prefer roasting it in the skin for flavor and caramelization reasons. If you happen to use pre-cut butternut squash (no judgement, I have done it before!), just make sure you buy two 20 ounce containers otherwise it won’t be enough squash for the amount of chicken stock. Also, I believe roasting it in the skin tastes more flavorful, but if you’re short on time, it will be still very good.

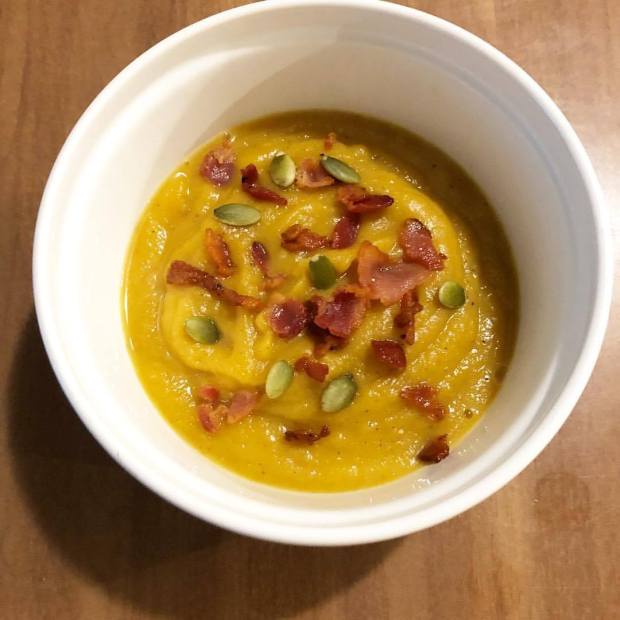
Butternut Squash Soup with Crumbled Bacon and Pepitas (Serves 4-6)

Ingredients

1 large butternut squash (about 2.5-3 pounds)

Olive oil (to drizzle on squash halves)

Pinch of grated nutmeg

Salt and black pepper, to taste

2 strips bacon

1 medium to large onion, diced

Three cloves of garlic finely minced/pressed (must be fresh–none of that jar stuff!)

1 tablespoon of minced or grated fresh ginger

1 green apple, peeled, cored, and chopped (optional, I never use do this, but feel free!)

4 cups low-sodium chicken stock (you may use broth, but I think stock is richer)

Optional Condiments

Chopped chives

Sour cream

Chopped Bacon (I hate to say this is optional, but…it is.)

Pepitas (get a small bag–they go a long way)

Instructions

STEP 1

Preheat the oven to 375°F.  To soften the squash, put the whole squash in the microwave for five minutes. This will help with slicing. Slice the squash in half lengthwise and scoop out the seeds. Rub the halves with a touch of  olive oil and season with nutmeg, salt, and pepper. Place on a baking sheet and roast until the flesh is very soft, about 35 to 40 minutes. Set aside to cool.

STEP 2

Heat a large pot over medium heat. Add the bacon and cook until crispy, 5 to 7 minutes. Transfer to a plate and reserve. Alternatively, if you are not garnishing your soup with bacon, you may saute the onions, garlic, and ginger in canola oil or olive oil. Add the onion, minced garlic, and ginger to the hot pot and cook until the onion is translucent (but not browned), about 3 minutes. Add the apple and cook until soft, another 3 minutes or so (I don’t include the apple in my recipe, but feel free to follow this if you want.)

STEP 3

When the squash is cool enough to handle, scoop out the flesh and add it to a blender or large food processor. Add the contents of the pot and pour in enough broth to cover. (Be careful not to overfill; work in batches if necessary.) Process until very smooth and return to the pot. Stir in the remaining broth and bring to a simmer. Season with salt, pepper, and a touch more nutmeg (it may have enough nutmeg, so don’t over do this). Garnish with crumbled bacon, chives, pepitas, and sour cream (if using).

Enjoy! A cup is roughly 80 calories. If you add on all the condiments for one serving, this is about 120 calories. 🙂

Fried Chicken and Belgian Waffle Sliders with Arugula, Tomato, and Avocado and Maple Dijon Sauce

13165960_10206335818207524_8884107941874790437_n

Happy Sunday!

So I have this tradition I’ve had for quite some time since I’ve lived on my own…I make waffles on Sunday. Some people find solace in attendance of church services, others take long drives–me? I make waffles. It gives me a sense of inner peace, and it’s something I look forward to by the week’s final end. My fiancé bought me an awesome Waring professional Belgian waffle maker for my birthday last year, and I have used it religiously with utter delight. I am a lover of brunch with champagne, and I think that to be a proper brunch host, I just needed to have a solid waffle maker. Thanks, Zach!

I made my Belgian cuties as usual today for my love and me…except it’s just two of us, and I slipped by making extra batter. It was probably the best mistake I made today. The worst mistake I made was going to Michael’s (the crafts store) thinking that I could only buy one thing…ugh. My credit card is officially whacked for the month. 🙂

13177799_10206331925590211_5924864210540749297_n

I could eat these for the rest of the week, but that might get old. I decided to make them as sandwiches…genius! I recalled a Pinterest post and thought that today would be the day to give it a go. I didn’t follow the recipe for the waffle batter like they specified as I used my waffle recipe from this morning. The recipe in the Pinterest post is excellent for a savory waffle, so when you go make this yourself, feel free to use that one, but just know that you don’t necessarily need a savory waffle for this awesome sandwich. I believe the chicken, avocado, tomato, and arugula add enough savoriness, but to each their own!

If you are a southerner, or if you have a southern palate, you know how amazing fried chicken and waffles is. It’s a wonderful balance of sweet and savory, and it’s an excellent brunch item as it encompasses the best BUTTERMILK items. Ladies and gents–I do require you use buttermilk for your chicken, and preferably also for your waffles. Buttermilk does absolute wonders, and it is my secret weapon for today. Tip: If you don’t feel like running out and buying buttermilk, you can always add a little vinegar to regular milk and bam! The chemistry experiment will suffice as your vice.

This recipe is relatively simple, but if you have time on your side, go for the overnight yeast waffles versus my fast waffles (especially for breakfast). They are both good, but the yeast waffles are superb.

Same thing for the chicken–it’s best to let the chicken marinate in buttermilk overnight, and dredged so that the outside dries out and the inside remains moist (you know, the crispiest fried chicken ever.) Time is your friend, but if you’re short on time, you can always take short cuts. Heck, you can even buy fried chicken to not make a mess. I just won’t allow you to make Eggo waffles in lieu of a homemade batter. If you do want simple box mix, I like to use Aunt Jemina in a pinch. But please, let go of that EGGO. 🙂

This post is going to look really long, but that’s because I included three options for waffles. First, pick your waffle you want to make. I offer the savory version that has cheddar and scallions from Candid Appetite, my easy waffle, and my overnight waffle (which is great when time is on your side.) They’e all good–it just depends on your need.

After you make your waffles, then work on your chicken.

Lastly, ASSSSSSEEEEMMMMMBBBLLLEE!

STEP ONE: Waffle Batter Ingredients and Instructions (Pick One!)

Savory Version from Candid Appetite:

Ingredients

2 cups (250 grams) all-purpose flour

¼ cup (55 grams) light-brown sugar

1 teaspoon (8 grams) baking soda

1 ½ teaspoons (6 grams) baking powder

½ teaspoon (4 grams) salt

2 teaspoons (14 grams) freshly cracked black pepper

3 large eggs, room temperature

Instructions: 

  1. Preheat waffle iron.
  2. In a large bowl stir together the flour, brown sugar, baking soda, baking powder, salt and black pepper. Make a well in the center of the bowl and set aside.
  3. Crack the eggs into a small bowl and whisk together. Pour into the center of the dry ingredients. Add the melted butter and buttermilk. Using a wooden spoon, stir the waffle batter until just combined. It should be sightly lumpy. If the batter appears to be too thick, add a splash of buttermilk and stir until pouring consistency is reached. Fold in the cooked chopped bacon, shredded cheddar cheese, and sliced green onions.
  4. Lightly grease the waffle iron with cooking spray or melted butter. Pour in about ½ cup batter in each waffle cavity, more or less depending on size of waffle iron. Cook until the waffles are golden brown and crispy.

Easy Weekend Waffle from Lei Mangia :

2 cups  flour

4 teaspoons  baking powder

1⁄2 teaspoon  salt

1⁄4 cup  sugar

1 teaspoon pure vanilla extract 

2 eggs (you could separate yolks from whites, whip up whites until fluffy and add to batter if you have time, but again it’s the easy waffle!)

1⁄2 cup of Canola oil

2 cups milk (but buttermilk, preferably!)

Instructions: 

  1. Preheat waffle iron.
  2. Sift the dry ingredients together in a large bowl.
  3. Separate the eggs.
  4. In small bowl, beat egg whites until stiff.** (or to make it simple,  don’t separate the eggs–the whites will make your waffle fluffier, though.)
  5. Mix together the egg yolks, milk and oil and stir slightly.
  6. Add to dry ingredients and mix well.
  7. Fold in beaten egg whites.
  8. Put 2/3-1 cup of waffle mixture in the center of the waffle iron. Do not close your iron until all the mixture is properly distributed! Cook for about 5 minutes (depending on your waffle maker’s setting.)

Perfect Overnight Belgian Waffles (Based off of Barefoot Contessa and modified by Lei Mangia):

½ cup warm water (110 to 115 degrees) 
1 package (1/4 ounce) active dry yeast, at room temperature 
2 teaspoons sugar 
2 cups lukewarm whole milk (90 to 100 degrees) 
¼ pound (1 stick) unsalted butter, melted
plus extra for the waffle iron** (Or use cooking spray like Pam)
2 tablespoons honey  (I usually leave the honey out–it’s up to you!)
1 teaspoon pure vanilla extract 
1¼ teaspoons kosher salt 
2 cups all-purpose flour 
2 extra-large eggs 
¼ teaspoon baking soda 

Instructions: The night before, combine the water, yeast, and sugar in a very large bowl (the batter will expand enormously).

  1. Allow it to stand for about 5 minutes, until the yeast dissolves and the mixture has started to foam, which tells you the yeast is alive. Stir in the milk, butter, honey*, vanilla, and salt. Add the flour and whisk until the batter is smooth.
  2. Cover the bowl with plastic wrap and allow it to sit overnight at a cool room temperature.
  3. The next morning, preheat a Belgian waffle iron according to manufacturer’s instructions and brush the top and bottom with melted butter (or use cooking spray, which is easier).
  4. Beat the eggs together with the baking soda and whisk them into the batter until combined.
  5. Pour just enough of the batter onto the hot waffle iron to cover the grids (1/3 to ½ cup each, depending on your waffle maker), close, and cook for 5 to 6 minutes on medium heat, until the waffles are golden brown. Remember: It’s always best to go on a lighter setting and leave it in longer versus overcooking!

STEP TWO: Make Your Finger Lickin’ Chicken!

1 pound chicken breast cutlets, cut in half

1½ cups buttermilk

1 tablespoon of hot sauce, optional (but recommended, and I love Cholula!)

1½ cups all-purpose flour

1 teaspoon salt

1 teaspoon cayenne pepper

1 teaspoon garlic powder

1 teaspoon black pepper

canola oil for frying (fill a cast iron skillet!)

Instructions;
  1. Place the chicken in a large bowl. Cover with buttermilk and add the hot sauce, if using. Toss together until evenly mixed and all the chicken is submerged in the buttermilk. Cover with plastic wrap and place in the fridge for at least 30 minutes. If you don’t have the time, this step is not crucial but it will help make the chicken tender and juicy. You can leave it up to overnight, which if you’re doing this ahead, I totally recommend!
  2. In a shallow dish combine the flour, salt, cayenne pepper, garlic powder, and black pepper.
  3. To coat the chicken, grab a piece from the buttermilk bowl, slightly drain off, and throw into the flour.
  4. Pat the flour into the chicken, on both sides. Return to the buttermilk bowl (with the rest of the chicken) and coat both sides.
  5. Place the chicken back into the flour, once more, and coat both sides. We’re double dipping the chicken. Lay the coated chicken on a rack placed over a baking sheet. Repeat in this manner until all the chicken is coated.
  6. Allow the coated chicken to rest for at least 10 minutes, this will allow the fry to dry a bit and stick to the chicken.
  7. In the meantime, heat about 2 inches of oil in a heavy duty pan, such as a cast iron skillet.
  8. Once the oil is hot, fry the chicken in batches. Cook for about 5 minutes on the first side, turn over once golden brown and crispy, continue to cook for another 4 minutes on the other side.
  9. Drain the chicken and place on a separate rack set over a baking sheet. You can keep the cooked chicken warm in a 200°F oven until all the chicken is fried and you’re ready to serve.

Or, you can buy fried chicken and save yourself the fuss. 🙂

STEP THREE: Assembling Your Sandwich

Ingredients

1 cup of arugula

1 thinly sliced tomato (preferably off the vine)

1/2 slice of ripened avocado

1/4 cup of pure Maple syrup

3-4 tablespoons of Dijon Mustard

Prepared Waffle and Chicken

The Finale…

  1. Take your waffle and divide it into sections (mine has four sections per waffle which makes two sandwiches per waffle.)
  2. Slice avocado and tomato. Rinse arugula.
  3. Mix maple syrup and Dijon mustard together to create sauce.
  4. Put thin avocado slices on the bottom piece of the waffle.
  5. Place chicken on top of the avocado. Drizzle sauce.
  6. Put sliced tomato on top of avocado layer. Put a half a handful of arugula on top of the tomato. Slightly dress the arugula with more sauce.
  7. Place another waffle piece on top. You may use a toothpick to keep it together, if you like.
  8. Eat! You may need a knife and fork, but that’s only half the fun. 🙂


Thyme and Rosemary T-Bone Steak with Potatoes and Broccoli

13000282_10206201178601618_8624191865594800461_n

Happy Saturday!

I don’t think there is a meal out there that is more satisfying than a steak. To be honest, I eat burgers more than I eat steaks, but when I do have a hunch for a steak, I just have to have it!

I have a fairly good amount of experience with steak and flavor combinations as I worked in a steakhouse as a waitress. I have had my share in making dry rubs, wet marinades, savory toppings like bleu cheese crumbles and caramelized onions. In addition, my father always had a keen sense for how steak should taste (he’s partial to Prime Rib).  Honestly, there isn’t much that is necessary for a delicious steak, but what will sure kill its flavor is overcooking it.

I apologize if I offend anyone, but you really should not be eating steak over medium rare. I love rare to medium rare (believe it or not–I range depending on the cut of steak!) I know that the blood for some people is too much, but really–eating carcinogenic charcoal is a lot more unnerving to me personally. To me, the flavor of the steak comes through when it’s prepared the proper way.

There are many cuts of steak I love to prepare, but I think one of the most romantic cuts (that is, a steak you can split for two), is a T-Bone steak. What I love about the T-Bone is that it’s two different steaks inside one. One half is a New York Strip and the other half is a Filet Mignon. The only problem with cooking a T-Bone steak is that the Filet Mignon, because it’s much smaller in proportion to the New York Strip, will naturally cook more quickly than its counterpart. This is only good is your significant other likes slightly more cooked meat and is partial to the Filet, but if you are sharing equally, you need to be thoughtful to how you prepare your steak with the challenges presented: two different meats, and a bone. Steak on the bone has definitely more flavor, but with the bone inside, the steak will be rarer near the bone and thus appear uneven.

I used to get really pissed off when customers would send a T-Bone back at my job; they would eat almost their entire steak, and then bam! They would cut near the bone and freak out when they saw a little blood. If only these patrons knew that the bone is blocking the distribution of heat hence the rarer inside. Ugh. At least now you know! Knowledge is power.

This meal is great if you are looking to cook a simple, romantic dinner for two.

I decided to make this mostly foolproof by using a few tricks…

1.) The steak is “reverse seared” which means it’s slow cooked in the oven for a short amount of time and THEN seared in a hot, cast iron skillet. Many times, people try to sear the outside first and then finish in the oven, but there is less consistency. If you want more control, this is the method for you.

2.) I used my microwave for my vegetables. Sue me. They taste wonderfully.

3.) Even though I use a few short cuts, I am ultimately using the freshest ingredients: the best meat I can find, fresh herbs versus dried (sorry!), and freshly cracked pepper and salt to form that wonderful crust.

Alright, enough talking. Let’s eat!

Ingredients

  • 1 1/2 pound T-Bone Steak (or any other steak of your choice)
  • 1 Steamable Potato Bag (go for petite potatoes or even red potatoes)
  • 1 Steamable Broccoli Bag
  • Four cloves of garlic
  • 2 tablespoons of olive oil
  • 1 tablespoon of Canola oil
  • 1 tablespoon of butter (salted or unsalted–your call)
  • Fresh thyme (at least 5 sprigs)
  • Fresh rosemary (at least two sprigs)
  • Freshly cracked salt and pepper (no table salt!)

Meat and Greet

  1. Take your steak out of the refrigerator so it comes to room temperature. Lay it out on a plate and add salt and pepper liberally. With a garlic press, smash four cloves of garlic and press them deeply into the steak.To infuse the steak with herby flavor, take off thyme leaves and rosemary leaves. You will remove these herbs before cooking.
  2. Preheat your oven to 250 degrees. Get a wire rack and baking sheet. Line the baking sheet with aluminum foil for easy clean up.
  3. While you’re waiting for the oven to pre-heat, make your potatoes. Get olive oil, thyme and rosemary leaves (about 1 sprig of each–more to taste) and rub them on all the potatoes before microwaving. Throw the potatoes in the microwave (it’s usually about 8 minutes) once they are all evenly coated. You may need to microwave them again to make them fork tender (about another 2-3 minutes.)
  4. Once the oven is pre-heated, put the seasoned steak on the rack (take off the herbs). Cook the steak in the oven (flipping mid way through) for about 30 minutes (could be more if the steak is really thick–look at it every 10-15 minutes to be careful!)
  5. Take the steak out and let it rest. In the meantime, heat up your cast iron skillet with 1 ounce of Canola oil (it has a high smoke point) on medium high heat.
  6. Once the skillet is hot enough, sear the steak on about 2-3 minutes per side until a crust forms (this will create a medium rare). Towards the end, melt 1 tablespoon of butter and throw in some whole thyme and rosemary sprigs for aromatics. Baste the steak in the melted butter. Remove the aromatics (the sprigs) after about two minutes.
  7. Let the steak rest. As the steak is resting on the rack, microwave your steamable broccoli. Once the broccoli is done (about 5 minutes), add salt and pepper.
  8. You may re-heat your potatoes in the microwave on a plate with leftover thyme/rosemary leaves, or you may crisp the potatoes up in the already hot cast iron skillet–your choice!
  9. Slice thinly to share, or you may split the Filet Migon from the New York Strip. Your choice! 🙂


White Chicken Enchiladas with Green Chiles

12540607_10205588777891983_2190789161727716198_n

Happy Friday! I am so stoked that it’s the weekend. I graded so many papers this week that I think I am now partially blind, and my hand is marginally numb from correcting comma splices, run ons, and fragments. For the sake of my sanity, I am happy the weekend is here because I will be able to spend time with one of my best friends from New Jersey; she drove down to visit me on Wednesday night.

My secret weapon on Monday was an oven roasted chicken (or grocery store rotisserie chicken), and today I am using that same chicken to re-purpose for another meal. As you know from my previous post, I needed make ahead meals for this week because of my hectic work schedule. But as time consuming and stressful that work can be, I also wanted for my friend to have a freshly prepared, home cooked meal for when she arrived from her 9+ hour drive.  I needed the balance of convenience, simplicity, and flavor. It’s a great recipe for company because of its taste, affordability, and quantity.

And so when I was thinking about what to make for my friend, I thought about the recipe that I make almost all the time; it is nearly a routine meal. As much as I like to experiment and make new things, there is also something rewarding about making something familiar, well-practiced, and nearly fool proof. There is no risk and all award. It’s one of those recipes that will be added to my family’s rotation–it’s the go-to dinner for so many reasons, and I could not be happier to share this recipe with you.

The first time I came across the recipe was randomly on Pinterest; I went onto the Pioneer Woman’s website and stumbled upon her recipe. Although her recipe is the basis, I modify it a bit for my taste. Feel free to look at the original recipe and cross reference it with mine!

Alright, back to the nostalgia. I found this recipe on Pinterest after searching “Green Chile Recipes.” You see, the previous week I had Zach’s mother’s White Chicken Chili with Green Chiles (which is so good that I am sure eventually I’ll have to make a post about that, too!) and I knew this recipe would be equally easy to devour. It is the same flavor profile: sour cream, heavy cream, and green chiles.  Zach loves southwestern food, so I knew that making this recipe would be perfect for the both of us.

And although I say it’s great to make for a small company, I can honestly believe I’ve made it for myself, with no company over at all, countless times.

Get On The Bandwagon:

  • 2-1/2  to 3 cups cooked, shredded chicken
  • 2 cups chicken broth
  • 3 tablespoons canola oil
  • 10 corn or flour tortillas (depending on your preference)
  • 1 large yellow onion, finely diced
  • 3-4 cloves of garlic, minced finely
  • 3 4oz cans of whole roasted, diced green chiles
  • 1 teaspoon paprika
  • 1/2 cup heavy cream
  • 2 tablespoons butter
  • 2 tablespoons flour
  • 1 cup sour cream
  • 2-1/2 cups Monterey Jack cheese, shredded
  • 1/2 cup of Mexican Blend cheese, finely shredded
  • 9 X 13 pan
  • Two frying pans

On The Road:

  1. Optional step: Heat 2 tablespoons canola oil in a small skillet over medium to high heat to fry tortillas. Do not fry for longer than 10-20 seconds per side. You do not need to do this step if you don’t want a slightly crunch texture.
  2. To begin, tablespoon canola oil in separate skillet over medium heat. Add onions  and saute for 1-2 minutes. Next, add the garlic. Stir around and make sure the onions are cooked until translucency. Make sure you do not burn the garlic!
  3. Add chicken, half of the green chilis, and 1/2 teaspoon paprika. Stir together. Add more paprika to get a rosy color and to your taste. Add a bit of salt and pepper. No, I won’t tell you how much. Figure it out! 🙂
  4. Add 1/2 cup chicken broth to chicken and green chili mixture–stir to incorporate moisture. Next, add cream and stir, allowing mixture to bubble and get hot. Turn off heat and set aside. If the mixture looks liquid-y, turn up the heat to high to bubble up, and then turn the heat down to low. Stir around to desired consistency; you want moisture without excessive liquid.
  5. In a separate large skillet, melt butter and sprinkle in flour in equal parts to make a roux. Whisk together and cook over medium heat for a minute until the flour is well dissolved. Once the roux is formed, pour in the rest of the chicken broth, 1 1/2 cups. Whisk together and cook for another minute or two. Stir in the other half of the chilies. Reduce heat, then stir in sour cream. Add 1 1/2 cups grated cheese and stir to melt and make sure there is a thick consistency. Add 1/2 teaspoon paprika–but probably more. You want a rosy hue. Keep tasting and add salt and pepper as needed.
  6. Once the sauce is made, you must put together the enchiladas. Individually spoon chicken mixture into tortilla and roll up. Do not overstuff. Place seam side down in a 9 x 13 casserole dish.
  7. Pour cheese mixture all over the top of the tortillas. Admire its beauty.
  8. Top with the half cup of fiesta blend cheese. Put in a pre-heated, 350 degree oven for 30 minutes.
  9. Eat immediately! Put sour cream, hot sauce (I like Cholula),  chopped chives, or picante sauce to your liking. It’s flavorful alone without the condiments as well. 🙂