Who doesn’t love cookies and milk? Cookies and ice cream? Cookies and cream? These are just combinations that are timeless, comforting, and remind us all of our childhood. But why not be able to indulge in this cult classic as an adult?
Going low carb/Keto hasn’t been difficult for me because I don’t feel deprived. I have an admittedly insatiable sweet tooth, and making excellent alternatives to treats is what I love to do. I realize that sugar is my health downfall–I’ve eaten healthfully my entire life otherwise. Now, I have dessert almost every night (not huge, a little something sweet), and have lost over 40 pounds in six months. This is a dessert that can be enjoyed by all. However, I posted a regular carbohydrate/sugar version for those who want it. The steps are the same–all that changes it the type of flour/sugar/chocolate chips used.
Keto/Low Carb Ingredients: Cookie Cup Layer
- 1 1/4 cup of blanched almond flour (140 g)
- 2 tablespoons of ground flax (13 g)
- 1/2 cup of erythritol (96 g)- I recommend Lakanto/Swerve the most!
- 1/4 teaspoon of baking soda (1.5g)
- 1/2 teaspoon of salt (3 g)
- 1/4 cup of butter, softened (56 g)
- 2 tablespoons of cream cheese, softened (28g)
- 1 egg
- 1 teaspoon of vanilla extract
- 3/4 cup of sugar-free chocolate chips, divided (149 g)–I HIGHLY recommend ChocZero–they are the best!
Keto/Low Carb Ingredients: Vanilla Whipped Cream
- 1 cup of heavy whipping cream
- 2 tablespoons of powdered erythritol–I recommend Lakanto/Swerve the most!
- 1/2 teaspoon of vanilla extract
Keto/Low Carb Instructions
- First, combine dry ingredients. Add blanched almond flour, ground flaxseed, erythritol, baking soda, and salt and whisk to combine.
- After combining the dry ingredients, add the wet ingredients which are the softened butter, cream cheese, egg, and vanilla. Make sure the butter and cream cheese are softened beforehand!
- Next, mix until combined and then fold in the chocolate chips.
- Get a piece of plastic wrap. Wrap and chill the dough in the fridge for at least an hour. That’s the secret!
- About 50 minutes into the chill, preheat your oven to 350 degrees. Also, grease your cupcake tin.
- Once the dough is chilled, we are going to press the cookie dough into the bottom and sides of the greased cupcake tins.
- We are going to bake these cups for ten minutes.
- Note: If the cookie dough puffs up while baking, we are going to use the back of a buttered spoon to press it back into the perfect cup shape. It makes sense to wait until they come right out of the oven, and then gently use the buttered spoon to push the dough back into the shape it should be.
- Once they’re done baking, allow them to cool. Again, make sure they’re cup-like in shape; if you don’t fix it while it’s hot, they will stay in the shape they were left in.
- Cool in pans for 10 mins, then place on a wire rack to cool completely.
- Next, line the inside of each cup of 1 teaspoon of melted chocolate chips. Spread the chocolate along the sides as well as you did the dough. Allow it to harden.
- While waiting for the chocolate to harden, make the vanilla whipped cream.
- Whip up heavy cream, powdered erythritol, and vanilla extract. Beat on high to form fluffy, stiff peaks.
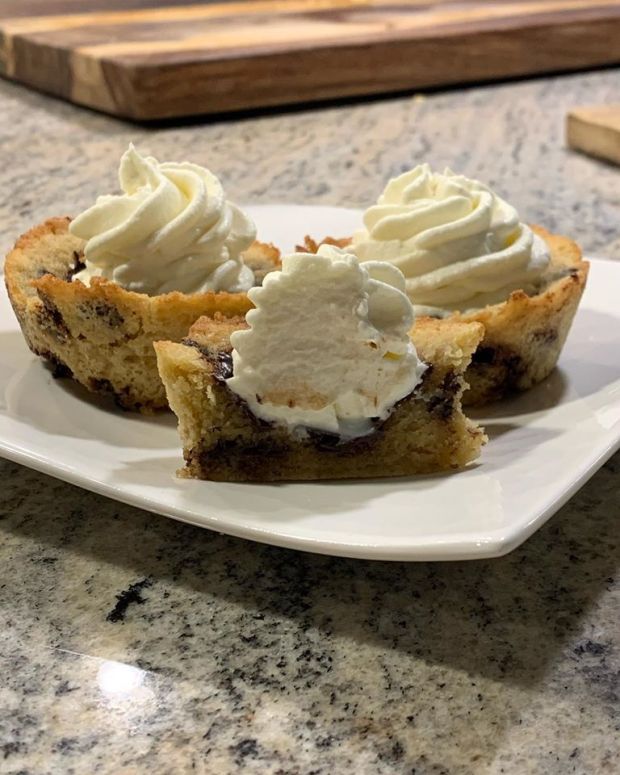
- Once the chocolate shell on the inside of the cookie cup has hardened, we are going to fill each cup with two tablespoons of vanilla whipped cream. If you like, pipe the whipped cream for a nicer presentation!
Traditional/Regular Carbs: Cookie Cup Layer
- 2 1/4 cups all-purpose flour
- 1/2 teaspoon baking soda
- 1 teaspoon of sea salt
- 1 cup unsalted butter room temperature
- 1/2 cup granulated sugar
- 1 cup light brown sugar packed
- 2 large eggs room temperature
- 2 teaspoon vanilla extract
- 1 3/4 cups mini chocolate chips semi-sweet or regular size, divided (1/4 cup is for the melted chocolate layer)
Traditional/Regular Carbs: Vanilla Whipped Cream
- 1 cup of heavy whipping cream
- 2 tablespoons of powdered sugar
- 1/2 teaspoon of vanilla extract
Traditional/Regular Carbs: Instructions
- First, combine dry ingredients. Whisk together flour, baking soda, and salt, set aside.
- Beat butter and sugars on medium-high until pale and fluffy (approx. 2-3 minutes). Reduce speed and add eggs (one at a time), and vanilla. Beat until combined.
-
Add flour mixture and mix until just combined. Fold in chocolate chips (1 1/2 cups reserve 1/4 cup for the chocolate layer).
- Get a piece of plastic wrap. Wrap and chill the dough in the fridge for at least an hour. That’s the secret!
- About 50 minutes into the chill, preheat your oven to 350 degrees. Also, grease your cupcake tin.
- Once the dough is chilled, we are going to press the cookie dough into the bottom and sides of the greased cupcake tins.
- We are going to bake these cups for fifteen minutes.
- Note: If the cookie dough puffs up while baking, we are going to use the back of a buttered spoon to press it back into the perfect cup shape. It makes sense to wait until they come right out of the oven, and then gently use the buttered spoon to push the dough back into the shape it should be.
- Once they’re done baking, allow them to cool. Again, make sure they’re cup-like in shape; if you don’t fix it while it’s hot, they will stay in the shape they were left in.
- Cool in pans for 10 mins, then place on a wire rack to cool completely.
- Next, line the inside of each cup of 1 teaspoon of melted chocolate chips. Spread the chocolate along the sides as well as you did the dough. Allow it to harden.
- While waiting for the chocolate to harden, make the vanilla whipped cream.
- Whip up heavy cream, powdered sugar, and vanilla extract. Beat on high to form fluffy, stiff peaks.
- Once the chocolate shell on the inside of the cookie cup has hardened, we are going to fill each cup with two tablespoons of vanilla whipped cream. If you like, pipe the whipped cream for a nicer presentation!


