Chipotle Chicken Enchiladas

17862712_772168166275974_7380401935341695984_n

Happy Saturday, everyone!

Cinco de Mayo is just around the corner! I love this holiday because of all the vibrant colors and flavors that come to play. It’s always a fiesta at my house, but I do happen to celebrate this day often. Last year, my neighbor and I had an Asian Fusion version with Korean Fried Chicken Tacos, Mexican Street Corn Dip, and Southwest Eggrolls. Best party ever.

And while I would love to do that again, this Cinco De Mayo I need a dish that comes together easily as I have a hectic work week in my impending future. What better way to stay festive than to make these enchiladas, a top 5 favorite for my husband! There is so much flavor and very little prep. What shocks me the most is that this is made without any aromatics–garlic or onion–but of course, these would be lovely additions if you so choose.

I love making White Chicken Enchiladas with Green Chilis, but every once in a while, I love going for comforting heat from Chipotle Peppers. This recipe is also way easier and is even made…wait for it…in a blender. The sauce is made in minutes, and if you buy your chicken ahead (such as a store-bought rotisserie), you’re riding in the fast lane for sure.

This is a great weeknight rotation recipe in addition to being good for company. Of course, this would be the perfect make-ahead for your Cinco De Mayo party! Ole!

Chipotle Chicken Enchiladas  (Serves 4-6)

Ingredients

  • 9 corn tortillas or flour tortillas (Alternatively, you can make four largely stuffed tortillas if you use the large burrito size ones)
  • 1 15-ounce can of crushed fire-roasted tomatoes with green chiles (like Rotel)
  • 1 cup low-sodium chicken broth
  • 2 tablespoons of fresh cilantro
  • 1-2 small chipotle chiles in adobo, plus 1-2 teaspoon sauce from the can (less or more depending on your spice tolerance)
  • 1/2 teaspoon ground cumin
  • Kosher salt and freshly ground pepper
  • 2 cups shredded rotisserie chicken (skin removed)
  • 1/2 cup sour cream (plus more for serving)
  • 1 cup shredded jack cheese, plus a handful more for topping
  • 1 cup shredded cheddar cheese, plus a handful more for topping
  • Diced avocado and hot sauce (optional)
  • 2 tablespoons of vegetable oil, divided

Instructions

  1. Preheat your oven to 350 degrees.
  2. Tear a tortilla into small pieces and put into a blender. Add the diced tomatoes, chicken broth, cilantro, chipotle, adobo sauce (from the can), and cumin. Puree until smooth.
  3. Heat 1 tablespoon vegetable oil in a large skillet over medium-high heat. Add the pureed sauce and simmer, stirring occasionally, until slightly thickened, for about ten minutes. Remove from the heat and season with salt and pepper to taste.
  4. Shred your chicken, removing the skin. Place in a separate bowl. You may use two forks to shred the chicken, or you may use your hands (if the chicken is not scorching hot).
  5. Meanwhile, coat a 9 by 13 baking dish with vegetable oil.
  6. Going back to the chicken, mix the shredded chicken, sour cream, half a cup of each cheese and a pinch each of salt and pepper in a medium bowl.  If desired, take about two to three tablespoons of the sauce and mix into the chicken as well.
  7. Next, warm the remaining 8 tortillas in the microwave as the label directs.
  8. When ready to assemble, spoon about 1/4 cup of the chicken mixture down the center of each tortilla and roll up, seam side down. Arrange side by side in the prepared baking dish and brush with the remaining 1 tablespoon vegetable oil.
  9. Spread sauce lightly on the rolled tortillas. Before putting into the oven, spread a handful of jack and a handful of cheddar on top of each enchilada.
  10. Cook in the oven for about 20 minutes. If you like a bubbly top, you may broil for two minutes towards the end.
  11. Garnish with chopped cilantro, hot sauce, and/or diced avocado, if desired.


Chipotle Chicken Panini with Fresh Mozzarella, Basil, and Red Onion

chipotle-chicken-panini-with-fresh-mozzarella-basil-and-red-onion

Happy Tuesday!

I am so embarrassed. I went an entire month without blogging. What’s even more embarrassing? I cooked plenty of food, and took plenty of pictures–I just haven’t had time to write about it…

Here’s the whole host of excuses…

1.) I moved.

2.) I got a new job.

3.) As of Saturday, I am now MARRIED. Yay!

I will try to stay on top of this–I promise. It was really hard for me to choose what to post as I have made infinite meals since the last time I posted, but this one is a definite winner and perfect work week meal.

Anyway, I don’t know about you, but every now and again, I have a craving for Panera. I was inspired to re-create their Chicken Frontega Panini–and not only do I think I nailed the same flavor profile, but I think this actually tastes better.

Before I got married, I had a bridal shower, and man was I spoiled! I got all these kitchen gadgets, but my favorite of all is my panini press. I used to rough it out by using a grill pan and placing another cast iron skillet on top to get those grill marks, but it is never perfect. And if you’re one of those people who thinks a panini press is a glorified grilled cheese maker, I will seriously take an issue with you. Panini presses are much more industrial and have the finesse to seriously bring your sandwich game to a whole other level.

So Public Service Announcement: Get a panini press if you don’t have one already! I recommend a Cuisinart. My machine was not only used for pressing the bread, but it was also used to grill the chicken. Who wants copious amounts of dishes, especially during the week? Not this girl!

This powerful tool is my secret weapon for saving time and making an unforgettable sandwich.

When Zach and I ate this, we were lost for words. You will be equally speechless. Dinner in 15 minutes (including time to grill the chicken) has never been so good. Enjoy!

Ingredients (Serving Four)

  • 1/4 cup mayonnaise
  • 1 chipotle pepper in adobo sauce + 1 or 2 teaspoons liquid from can

**Alternatively, you can buy Chipotle Mayo already made–I recommend “Just Mayo’s Chipoltle”–it’s fantastic!**

  • 1 loaf focaccia bread, cut into quarters or 4 focaccia buns                                                                                                                                                                                                              **Thicker bread is always great in a panini press, but here’s a little secret–I used just Maier’s Italian bread (nothing special), and this still came outstanding. I will certainly not discourage the garlicly, herb goodness of focaccia, but even if you just have plain white bread, you’ll be okay–promise. 
  • 2 chicken breasts (about 8 ounces each), grilled on the panini press (first)
  • Four tablespoons of garlic powder
  • Two tablespoons of salt and pepper, divided
  • 8oz mozzarella ball, sliced (try to get it fresh in water!)
  • 1 plum tomato, sliced thinly
  • 1/2 small red onion, sliced very thinly
  • 10-12 fresh basil leaves, chiffonade (ribbons) or leave leaves (how pun-y!) whole

Directions

1.) First, season your chicken with salt, pepper, and garlic powder. Plug in your panini press and get it really hot. Spray the panini press with cooking spray.

2.) Once the press is hot enough, grill the chicken in the press. Don’t push down all the way, but as the chicken cooks (about 6-8 minutes), gradually press to flatten the chicken.

3.) While the chicken is cooking, prep your toppings. Slice the tomato, red onion, mozzarella, and chiffonade the basil.

4.) If you are making chipotle mayo, add mayonnaise, chipotle pepper, and adobo sauce to a mini food processor bowl then process until smooth. If you don’t feel like making a huge mess and don’t mind a chunkier sauce, hand chop the pepper up very finely then stir with sauce into mayonnaise. Taste and add more sauce to your liking. If you don’t feel like making a sauce, then at this time get out your store bought, but delicious chipotle mayo.

5.) Take your chicken off the grill once there are substantial grill marks, and the internal temperature reaches 160 degrees. Leave chicken aside to cool for a second. Once chicken has cooled a bit, slice chicken length wise into strips.

6.) Assemble! Smear about a tablespoon of chipotle mayo on each side of the bread. Next, add your chicken strips on top of each slide (go across evenly.) If desired, add more chipotle mayo on the chicken itself. Next, add the cheese slices (one-two slices of mozzarella for each side of the sandwich. Lastly, top the sandwich with sliced tomato, red onion, and basil. Press top layer of sandwich on top of the bottom layer.

7.) Spray your panini press once again. Also, spray your sandwich on both sides with cooking spray. As you did with the chicken, you should gradually press down on the sandwich and cook until golden brown. Cut diagonally for best appearance. Enjoy!


Chicken Parmigiana with Homemade Plum Tomato Basil Sauce

Happy Valentine’s Day!

chickenparm

Sorry I am late in posting; between traveling by plane and catching up with last minute grading, I have been swamped!

I believe that Valentine’s Day is perfect for trying to impress your loved one; however, sometimes simple is best. My best friend’s (soon-to-be) husband loves chicken parmesan, and really wouldn’t be craving something gourmet or fancy. He has simple taste and there is nothing wrong with that. If anything, you should be glad. Your life is much easier knowing you don’t have to break the bank or that you don’t need to be particularly talented in cooking to make what he or she wants.

I, on the other hand, requested for Zach to make lobster tail, crab legs, and lamb. Valentine’s Day, and any other special, intimate occasion (such as an anniversary) requires you to know what your significant other desires. Whether this person has a simple palette, or an extremely expensive one does not matter. To show your love, you need to make something that will be impressive, but more importantly, thoughtful. Make a dish that shows that you were thinking of what he or she would love most. Impressive is not always expensive–it’s all about effort and thought. Period.

I made this chicken parmigiana (or parmesan for you non-Italian people) last night for my best friend, her fiancé, Zach, and me, but I figured it would be nice to share this for those of you who need last minute ideas to enjoy your Valentine’s Day in. You could alternatively go out to eat today, but as a former waitress, I can assure you that there is nothing worse than going out today. Your food will take forever to come out, the service will be subpar, and you might feel rushed by the massive amounts of people waiting for you and your honey to scoot. I say stay in for this day. Besides, nothing says love like effort, right? It could be equally romantic to eat-in, if not, more so. 🙂

Stay tuned for tomorow’s post! For those of you who are looking for the ultimate Italian dessert,  I will be posting my infamous tiramisu on Monday. Unfortunately, it is not a dessert you can make last minute; you need to make it the night before, but is absolutely divine! 🙂

The Sawwwwce

  • 1 (28 ounces) can whole tomatoes (Please try to get plum tomatoes–and if available, San Marzano!)
  • 1 {28 ounces) can diced tomatoes
  • 1 (28 ounces) can crushed tomato
  • 1 stick of butter
  • 1 yellow onion finely diced
  • 4 cloves of garlic, minced (use a garlic press if you have it!)
  • 12-18 leaves of fresh basil chiffonade
  • 1 tablespoon of dried oregano
  • 1 tablespoon of garlic powder
  • 1 tablespoon of onion powder
  • 1/2 tablespoon of crushed red pepper
  • 1/3 cup of sugar (do it in small increments! This is to counteract the bitterness of the tomatoes, but too much sugar isn’t good either!)
  • 1/2 cup of dry red wine
  1. Mince up your garlic cloves, and dice up your onion finely.
  2. In a large pot, pour some olive oil and sauté your onion. Stir around frequently.
  3. Once the onion becomes aromatic, add the garlic. DO NOT BURN THE GARLIC. It’s an Italian sin. Stir baby, stir!
  4. Now that the garlic and onion have been cooking together for about two minutes, add your half a cup of dry red wine and reduce for 3-5 minutes.
  5. Next, add your crushed tomatoes. Stir. As the sauce is bubbling, hand crush the tomatoes (whole tomatoes) so they are chunky, and add the diced tomatoes. As you stir, mush up the tomatoes (diced) with the back of a wooden spoon.
  6. Throw in all the spices (reserve the butter towards the end of the sauce process.)
  7. Leave the sauce to simmer on medium for at least an hour. The longer, the better.
  8. Towards the end, add sugar (small bits at a time) until the acidity is counteracted. Right before you’re about to fry the chicken at the end, add the butter and more fresh basil, if desired. Taste your sauce–always! Leave the sauce to simmer on low while you’re making the pasta and chicken.

The Pollo

  • 2 1/2 cups of Seasoned Italian Bread Crumbs
  • 6 skinless boneless chicken breast (buy them thinly sliced or pound them thinly!)
  • 3 large eggs
  • 1¼ cups all-purpose flour
  • 3 tablespoons of garlic powder (divided in two: 1 1/2 in seasoned breadcrumbs and 1 1/2 in with whisked eggs)
  • 1 tablespoon of salt
  • 1 tablespoon of pepper
  • 6  tablespoons extra-virgin olive oil, divided
  • 6 cups of my sauce, your sauce, or the jarred sauce (eep!)
  • 3 cups coarsely-grated, well-drained fresh water-packed mozzarella, divided
  • 1 cup freshly-grated Parmesan cheese, divided
  • 1 cup freshly-grated Pecorino Romano cheese, divided** (optional, but recommended)
  1. Pre-heat your oven 350 degrees, set up your dredging stations, and get your chicken out of the refrigerator.
  2. Place chicken breast halves between sheets of plastic wrap.  Using a meat mallet, pound chicken breasts to 1/3-inch thickness.  Alternatively, go to the butcher/grocery store and purchase chicken breasts that are thinly sliced. Sprinkle both sides of chicken with salt & pepper.
  3. Place flour in a large dish and add salt and pepper.  Whisk eggs to blend in a separate large dish. Add parmesan cheese and garlic powder to the eggs and whisk. Place breadcrumbs in yet another large dish.  Add more parmesan and garlic powder to the breadcrumbs. Coat each chicken breast with flour, then eggs, then breadcrumbs. Make sure you have a dry and a wet hand!
  4. Preheat oven to 350°F.  Heat 2 tablespoons of the olive oil and 1-2 tablespoons of butter in a large cast-iron or non-stick skillet over medium-high heat. (Make sure you use butter as that will counteract the high smoking point). Working in batches, add chicken to skillet and cook until browned (about 4 minutes per side, adding more butter as needed). Transfer chicken breasts to a platter, and drain the oil by placing a paper towel underneath (change the paper towel as needed.)
  5. Spread 1 cup of tomato sauce in the bottom of a large roasting dish (I used a 9 x 13). Arrange 1 layer of browned chicken breasts over the sauce.  Spoon 2 cups of sauce over that layer, or you may do what I do which is do about 1/3 cup of sauce per chicken cutlet. Sprinkle half of the mozzarella, Parmesan & Pecorino over.  Repeat with remaining chicken, sauce, mozzarella, Parmesan & Pecorino.
  6. Bake until cheeses melt and chicken is cooked through, about 30 minutes. If you are making pasta, now would be the time to boil water and make spaghetti (once the water boils, it takes about 10 minutes.) Make sure you stir your pasta and make salty, salty water for the pasta!) Drain and add a few ladles of your sauce.
  7. Serve the spaghetti with sauce on a plate. Throw some grated cheese on top. Next, put the chicken parmigiana cutlet on top. Add more grated cheese (you get the idea). Eat immediately and enjoy!


White Chicken Enchiladas with Green Chiles

12540607_10205588777891983_2190789161727716198_n

Happy Friday! I am so stoked that it’s the weekend. I graded so many papers this week that I think I am now partially blind, and my hand is marginally numb from correcting comma splices, run ons, and fragments. For the sake of my sanity, I am happy the weekend is here because I will be able to spend time with one of my best friends from New Jersey; she drove down to visit me on Wednesday night.

My secret weapon on Monday was an oven roasted chicken (or grocery store rotisserie chicken), and today I am using that same chicken to re-purpose for another meal. As you know from my previous post, I needed make ahead meals for this week because of my hectic work schedule. But as time consuming and stressful that work can be, I also wanted for my friend to have a freshly prepared, home cooked meal for when she arrived from her 9+ hour drive.  I needed the balance of convenience, simplicity, and flavor. It’s a great recipe for company because of its taste, affordability, and quantity.

And so when I was thinking about what to make for my friend, I thought about the recipe that I make almost all the time; it is nearly a routine meal. As much as I like to experiment and make new things, there is also something rewarding about making something familiar, well-practiced, and nearly fool proof. There is no risk and all award. It’s one of those recipes that will be added to my family’s rotation–it’s the go-to dinner for so many reasons, and I could not be happier to share this recipe with you.

The first time I came across the recipe was randomly on Pinterest; I went onto the Pioneer Woman’s website and stumbled upon her recipe. Although her recipe is the basis, I modify it a bit for my taste. Feel free to look at the original recipe and cross reference it with mine!

Alright, back to the nostalgia. I found this recipe on Pinterest after searching “Green Chile Recipes.” You see, the previous week I had Zach’s mother’s White Chicken Chili with Green Chiles (which is so good that I am sure eventually I’ll have to make a post about that, too!) and I knew this recipe would be equally easy to devour. It is the same flavor profile: sour cream, heavy cream, and green chiles.  Zach loves southwestern food, so I knew that making this recipe would be perfect for the both of us.

And although I say it’s great to make for a small company, I can honestly believe I’ve made it for myself, with no company over at all, countless times.

Get On The Bandwagon:

  • 2-1/2  to 3 cups cooked, shredded chicken
  • 2 cups chicken broth
  • 3 tablespoons canola oil
  • 10 corn or flour tortillas (depending on your preference)
  • 1 large yellow onion, finely diced
  • 3-4 cloves of garlic, minced finely
  • 3 4oz cans of whole roasted, diced green chiles
  • 1 teaspoon paprika
  • 1/2 cup heavy cream
  • 2 tablespoons butter
  • 2 tablespoons flour
  • 1 cup sour cream
  • 2-1/2 cups Monterey Jack cheese, shredded
  • 1/2 cup of Mexican Blend cheese, finely shredded
  • 9 X 13 pan
  • Two frying pans

On The Road:

  1. Optional step: Heat 2 tablespoons canola oil in a small skillet over medium to high heat to fry tortillas. Do not fry for longer than 10-20 seconds per side. You do not need to do this step if you don’t want a slightly crunch texture.
  2. To begin, tablespoon canola oil in separate skillet over medium heat. Add onions  and saute for 1-2 minutes. Next, add the garlic. Stir around and make sure the onions are cooked until translucency. Make sure you do not burn the garlic!
  3. Add chicken, half of the green chilis, and 1/2 teaspoon paprika. Stir together. Add more paprika to get a rosy color and to your taste. Add a bit of salt and pepper. No, I won’t tell you how much. Figure it out! 🙂
  4. Add 1/2 cup chicken broth to chicken and green chili mixture–stir to incorporate moisture. Next, add cream and stir, allowing mixture to bubble and get hot. Turn off heat and set aside. If the mixture looks liquid-y, turn up the heat to high to bubble up, and then turn the heat down to low. Stir around to desired consistency; you want moisture without excessive liquid.
  5. In a separate large skillet, melt butter and sprinkle in flour in equal parts to make a roux. Whisk together and cook over medium heat for a minute until the flour is well dissolved. Once the roux is formed, pour in the rest of the chicken broth, 1 1/2 cups. Whisk together and cook for another minute or two. Stir in the other half of the chilies. Reduce heat, then stir in sour cream. Add 1 1/2 cups grated cheese and stir to melt and make sure there is a thick consistency. Add 1/2 teaspoon paprika–but probably more. You want a rosy hue. Keep tasting and add salt and pepper as needed.
  6. Once the sauce is made, you must put together the enchiladas. Individually spoon chicken mixture into tortilla and roll up. Do not overstuff. Place seam side down in a 9 x 13 casserole dish.
  7. Pour cheese mixture all over the top of the tortillas. Admire its beauty.
  8. Top with the half cup of fiesta blend cheese. Put in a pre-heated, 350 degree oven for 30 minutes.
  9. Eat immediately! Put sour cream, hot sauce (I like Cholula),  chopped chives, or picante sauce to your liking. It’s flavorful alone without the condiments as well. 🙂


Croissant Honey Dijon Chicken Salad with Split Red Grapes and Roasted Pecans

12548848_10205565603032626_5410911449507926635_n

Happy Monday!

As I am writing this post, it is actually Sunday. Tomorrow is the last day of school for my students (I have block scheduling in the school I teach), and so, I will have 89 students handing in their final research paper (which are at a minimum of 4 pages each.) The math is not very comforting; I will be spending approximately 30 hours this week grading papers on top of proctoring the state examinations. I am dreading this week, but I want to take the stress off of myself by spending my weekend balancing…

Cleaning

Cooking

Relaxing (believe it or not!)

I am writing my blog in advance because I want to talk about planning your meals in advance. Often times, people think of meal planning as only important if one is dieting, or if someone is planning to entertain guests. Plan your meals and you will save money, time, and your health.

If your life is anything like mine, you are so busy during the work week and rarely have time to make lunch or dinner. So what happens? We fall to temptation; we go to fast food havens and order take out. We grab packaged candy bars and chips and hope for the best.

Now I know my last two posts were not the healthiest, but generally speaking, I like to eat a balanced, healthy meal at least 5 out of the 7 days of the week. But often times my goals combat the realities of the work place, and I, too, fall short. I’ll incessantly spend money going out to eat for convenience. There is just not enough time in the day…

Except, of course, there is time often the day before. We make time for the things we love like our friends, family and binge watching television shows on Netflix. And so, you should love yourself enough and prioritize food. If you plan your meals in advance, it will take a load off your shoulders for the week, and you can feel satisfied because you’ll have tasty home cooked meals that are affordable and easy to manipulate.

Another personal challenge I have is that I live alone; although, I often host parties and have friends over. During the work week, it just me, myself, and I which makes me even less motivated to cook. Luckily, I enjoy cooking and sharing what I make with the world. I hope that my blog can help you reconsider the way you prioritize your dinners, and hopefully, inspire you to do some meals ahead of time to relieve the stresses of our every day lives.

For today’s recipe, I knew I wanted to use chicken because it is very cost effective, tasty, and is versatile. My secret weapon for today is to either…

1.) Make a large roasted chicken

2.) Buy a rotisserie chicken already cooked

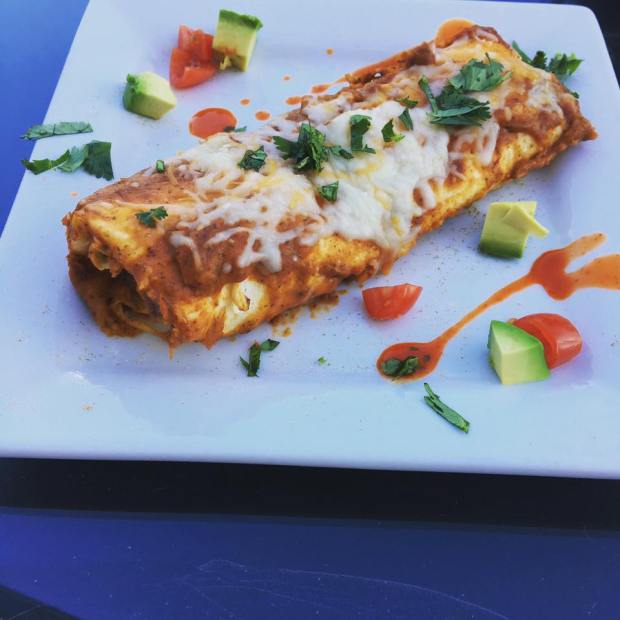
I will not judge you if you do the latter. I shred rotisserie chickens often times to make White Chicken Enchiladas with Green Chiles. It’s so good that it should be illegal. I use it in a pinch, but today, I wanted to make my own roasted chicken so I can control the seasonings.

My plan for today is to make my breakfast, lunch, and dinners ahead. I made snickerdoodle muffins so I can have a healthier* grab and go in the morning (healthier, yes, it’s not chia seed pudding or a kale shake). For lunch and dinner interchangeably, I made several spinach salads, and I cook the chicken to make some roasted chicken for dinner (duh), chicken enchiladas, and today’s blog post, Croissant Honey Dijon Chicken Salad with Split Red Grapes and Roasted Pecans. From one chicken, I am making three different types of meals and I am eating for the whole week. Winner, winner, chicken dinner! 😉

I don’t like chicken salad generally speaking, or any kind of “salad” that is ironically titled as such; there are usually no greens in sight, but mayonnaise reigns supreme.

I don’t like mayo. Go ahead and sue me, but I do use it as a binder for ingredients (like a crab cake). I will never use it as a condiment. Do not try to change my opinion on it–it’s nasty. But because there will be people who rally a petition against me if I say don’t use mayo when you prepare this recipe, I will allow it.

Instead of mayo, I used a healthy alternative by mixing Greek yogurt and sour cream. I totally left the mayo out because I’m a health nut, and it has nothing to do with my disgust for it–nope not at all. 🙂 If you are team mayo, feel free to replace my Greek yogurt for mayo, and the results should be the same.

I think what makes this chicken salad delicious (in addition to not having any mayonnaise in sight) is that it has elements of sophistication. I believe the chives and celery give a great flavor base; the honey and dijon mustard adds a classic French dimension; but most uniquely, it is on a buttery, flaky croissant, red grapes, and crushed roasted Pecans. I think the acidity of the fruit with the cool chicken is wonderful. It reminds me of an actual salad; in my opinion, the best salads have a balance of textures and taste. My favorite go to salad is grilled chicken, spinach, bleu cheese crumbles, dried cranberries, and pecans. The nuts, fruits, and cheese harmoniously balance each other out. I think that most sophisticated dishes incorporate more than one type of food group which is what brings it to that next level.

Similarly, this chicken salad has many different layers of flavor and textures. The best part? It’s super easy.

Make this chicken salad–you won’t regret it.

Step One: Roast Your Host (Please let it not be you as the cook–I meant the star of the show, your chicken…)

Roasted Chicken* 

1 whole chicken (about 4-5 pounds)

3 tablespoons of fresh thyme

1 tablespoon of salt (add more for the rub!)

1 tablespoon of pepper (add more!)

1 teaspoon of paprika** (optional)

1 lemon cut in quarters

3 tablespoons of Extra Virgin Olive Oil
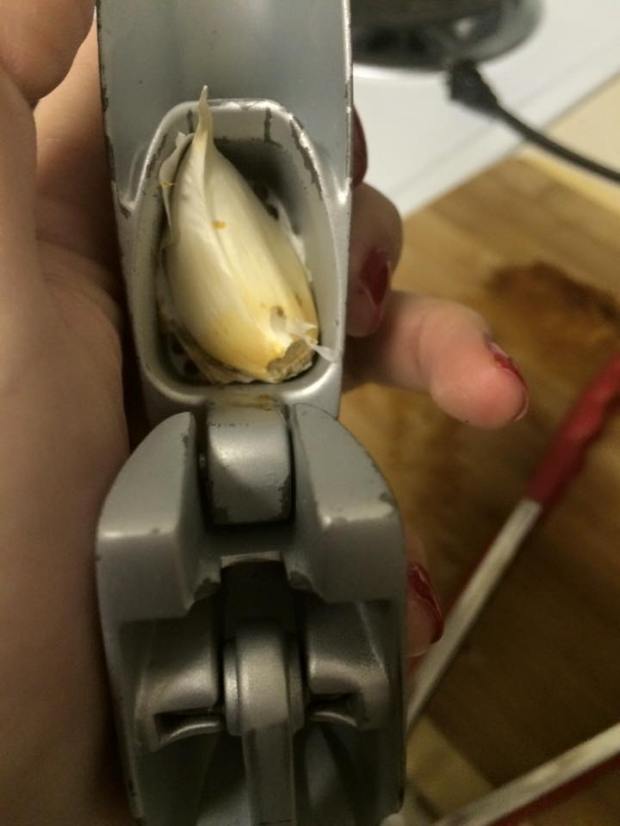
12 cloves of garlic

Julienned vegetables (carrots and celery)***

***-optional–only if you plan on making a chicken soup from the drippings.

*-Skip this step if you are purchasing a ready made rotisserie chicken. If you are not making your chicken, make sure it is as plainly seasoned; don’t get something too strong of one flavor as it would not be as versatile for other dishes for the week.

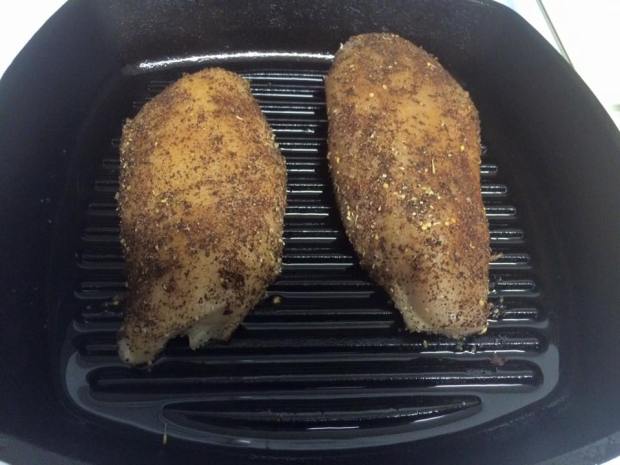
  1.  Preheat your oven to 375 degrees. Get a deep covered baker, or a roasting pan (just make sure you can cover your chicken for the first part) and spray with cooking spray or brush on olive oil.
  2. Remove giblets and excessive fat from the chicken (you know, that creepy bag with your chicken’s organs; please don’t cook it!) Dry your chicken with a paper towel. If you have time, let your chicken “dry out” in the refrigerator to get extra crispy skin (my favorite part of the chicken.)
  3. Pour about two tablespoons of extra virgin olive oil on chicken. You may use butter, if you prefer. Rub all on chicken and make sure it is evenly distributed.
  4. Grab a handful of thyme sprigs. Please use fresh thyme as dried thyme does not have the same “oomph.” Pick out the leaves and generously spread all over the chicken.
  5. Salt and pepper the chicken generously to create a light rub. If you like, you may add paprika as well.
  6. Quarter a lemon and shove inside the cavity of the chicken. Squeeze one quarter over the chicken, or more to your taste. Throw in some thyme sprigs into the cavity as well.
  7. Smash six cloves of garlic and throw whole cloves inside the chicken.
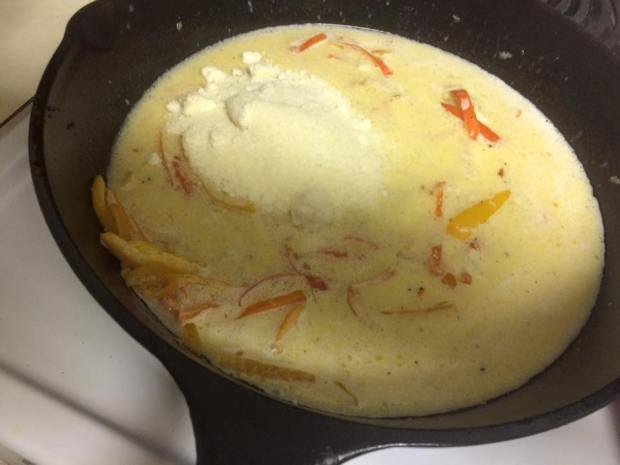
  8. Smash six more cloves and put around the chicken in the baker. **If you have carrots and celery, julienne these and put around the chicken as this would be a good base for chicken soup.**
  9. Roast your chicken in the oven for an hour covered.
  10. After an hour has passed, take off the lid and cook for about 35-45 minutes until chicken meat is white and skin is lightly browned and crispy. Once finished cooking, let cool before carving; do not carve immediately as you’ll lose all the juices and likely burn your fingers!

Step Two: The Cool Factor

2.5-3 cups cooked, shredded chicken

1 1/2 cups chopped celery (diced finely)

1 1/2 cups red grapes, halved

1/2 cup of roasted pecans (you can use sweetened ones like I did!)

3 tablespoons of diced chives, or alternatively, 2 green onions, thinly sliced*

1 cup Greek yogurt (I used Fage–and please get plain!)

1/4 cup sour cream

1 teaspoon black pepper *

1 teaspoon salt *

Two tablespoons of honey*

Two tablespoons of Dijon mustard*

*-start with this amount and add to taste

juice of 1 small lemon

4-5 croissants

  1. If you recently cooked the chicken, let it cool until it isn’t too hot to handle. Once chicken is cool, shred with a fork, hands, or combination if you’re like me. Be sure to sort through bones and be careful!
  2. Slice and dice thinly celery, chives (or green onions) and throw into a large mixing bowl. Also, slice red grapes in half and throw into the bowl.
  3. Scoop out the Greek yogurt and sour cream and place in mixing bowl.
  4. Throw shredded chicken into mixing bowl and squeeze lemon on top of the meat.  Stir to combine.
  5. Once throughly mixed, add salt, pepper, Dijon mustard, and honey. Mix again, and season to your liking. Tip: Rip a small piece of croissant and taste mixture to be accurate assess how it will taste “all together.”
  6. Ideally, you should let the mixture stay in the refrigerator overnight to let the flavors set. If you don’t have the time, a few hours chilled will do too.
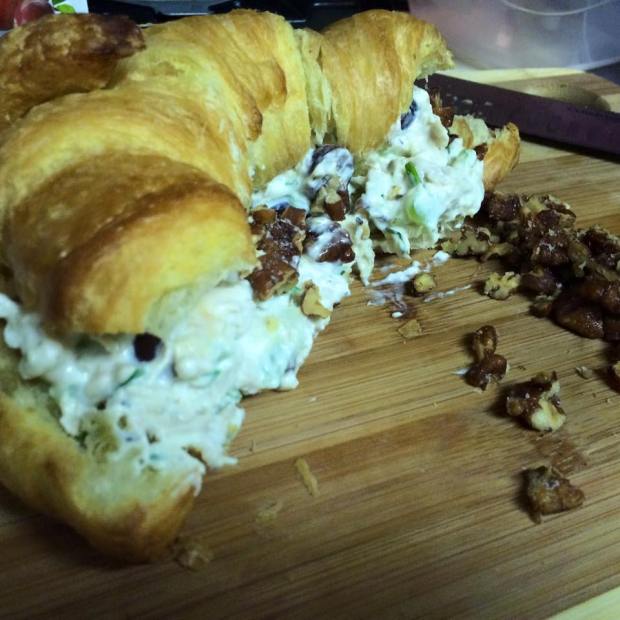
  7. When ready to make the sandwich, split a croissant in half. Put approximately half a cup on the bottom half of the sandwich. Roughly chop some roasted pecans and place on top of the chicken salad. Put the top of the croissant and admire its beauty.
  8. Eat it for the rest of your work week and be happy!

Enjoy the salad! Make sure you use all of your roasted chicken for multiple purposes in addition to this sandwich. Some recommendations: Chicken Noodle Soup, Chicken Enchiladas, and Pulled BBQ Chicken.

See you on Friday! Hopefully, my papers won’t completely deprive me of a life!


Cajun Chicken Alfredo with Sliced Bell Peppers and Peas

1044604_10205532235758465_4682752379146835536_n

I know, I know. It’s right after the holidays, and everyone’s pants are feeling tight (am I alone in saying that?) I should be posting a recipe on some kind of Kale Smoothie or a 30 Calorie Brownie made out of ice cubes. This is the time of year that everyone hits the gym and makes healthful decisions: quit smoking, drinking, fried chicken (ugh), chocolate chip cookies (no!)

But I want to start the New Year being candid for my resolution. I honestly love to eat decadent desserts and butter laden dinners. In fact, to make my colleagues tremble, I made cinnamon buns last night:

12509534_10205532240038572_7242923103692064995_n

I know–I’m cruel.

I believe that making cinnamon rolls yesterday and making Alfredo sauce today is quite metaphorical: I am representing the right eat well, and to not deprive one’s self.

And don’t get me wrong, healthful food can be very delicious. But let’s face it–there are only so many substitutes; at the end of the day, the chickpea crusted pizza just isn’t the melty, cheesy pizza delight you once knew.

Will I post recipes that are healthy? Of course, but this week, everything will be borderline gluttonous.

So let’s get back to business. I was inspired to make Cajun Chicken Alfredo for two reasons…

1.) I was just in New Orleans for New Years.

2.) I needed to make a guilty pleasure.

New Orleans will inspire me all week. Cajun food is so comforting, and I love how it blends so many cultures in one. I had a Blackened Red Grouper in a Pernod Cream Sauce that reminded me how much I love spicy fish that is cooled off with succulent cream. Oh, did I mention it came on a bed of homemade fettuccine? Oh my god. Someone please take me back!

Alfredo sauce has many variations, and I will not say that the way I make it is the only way. To make a good Alfredo sauce, you should have…

1.) Butter

2.) Olive Oil

3.) Grated Parmigiana Cheese

4.) Garlic

To make a greater Alfredo sauce, you should add to the previous list…

1.) Egg Yolk(s)

2.) Heavy Cream

Most people put cream in their Alfredo sauce, but technically, the cheese and the butter alone could suffice as they coagulate. Some people thicken their sauce with a flour/butter roux. In my experience, incorporating all of the above makes the Alfredo that you’ll crave.

For this Alfredo, you can modify as much as your heart desires. You don’t have any bell peppers? Just throw in some broccoli (in fact, I think broccoli is my favorite vegetable compliment to Alfredo.) You don’t have chicken? You are a vegetarian? Leave it out. You have chicken but don’t like spiciness? Just salt and pepper that bad boy. You make the rules!

Cajun Chicken Alfredo with Sliced Bell Peppers and Peas

Serves: 2 (easily could be turned into 4!)

Stage Crew:

Pasta Pot and Strainer

Cast Iron Pan

Cast Iron Grill Pan

Tongs

Santoku Knife (or any knife you like to cut veggies!)

Garlic Press* (not needed, but simply lovely)

Lovin’ Oven @ 350 Degrees

Tonight’s Cast:

Two Chicken Breasts (no need to pound thinly)

Half Box of Fettuccine

Five Mini Sweet Bell Peppers (Orange, Yellow, and Red)

Half Cup of Peas

Four Garlic Cloves

Blackened Seasoning (or you can use Chili Powder, Paprika, Granulated Garlic, Salt, Pepper, and Italian Seasoning)

Half Cup of Heavy Cream (or more if you’re feeling indulgent. Just look at the consistency, but I personally like more cheese than cream.)

Half Stick of Butter

1 cup of Parmigiana Cheese (freshly grated, if possible)

Stage Directions: 

1.) Preheat your oven at 350 degrees. While the oven is heating up, season your chicken liberally with blackening seasoning or a blend of the spices mentioned above. Make sure you coat both sides of the chicken.

2.) Put your burner on medium high heat and place the cast iron grill pan on the burner. Make sure your pan is coated in oil (either sprayed with Pam or a light layer of Canola oil.)

10330507_10205532235838467_8450929852110293373_n

3.) Once the grill pan is hot, place seasoned chicken breasts on top. Let them cook until grill marks appear, approximately 7-8 minutes. (P.S: Do not lift up the chicken; let it cook! If you pick it up pre maturely, you won’t get grill marks or the blackened crispy coloring!)

4.) While the chicken is grilling, fill your pasta pot with salty, salty water. Put your stove to high heat to get the water rolling.

5.) Don’t forget! Make sure you turned your chicken over at the appropriate time!

6.) While you’re waiting for the beautiful char to come onto the other side of the chicken, julienne (slice thinly) sweet baby bell peppers into 1/4 inch strips. The thinner, the better!12509818_10205532236118474_4554408398754110434_n

7.) On another burner with olive oil (about a tablespoon), put four cloves of garlic into a garlic press (or mince finely if you do not have a press.) While that is working, take out your chicken and put it in the oven to finish. Take out the chicken three minutes before serving.

Tip: If you have a garlic press, you don’t have to peel the garlic. Just throw the whole clove in there and the garlic will push out. Voila!

12438950_10205532236438482_6312352977362751752_n

8.) Stir around garlic (make sure you do not burn it–if you burn it, throw it out and start over) with sliced peppers.

9.) Once the peppers are softened (1-2 minutes), remove them and put on the side. Try to leave most of the garlic in the pan.

10.) In the pan, melt half a stick of butter on medium heat and stir garlic around. Then add a cup of grated parmigiana. Allow the cheese to form a bond with the butter. Once the mixture thickens, slowly add half a cup of heavy cream. If it looks thin and watery, raise the heat and then drop once it comes to a boil. The cooler temperature will make the sauce thicken. Also, you can add more cheese because you’re worth it (I mean, it’s for the sauce.)1931345_10205532237278503_5678273551620735294_n

11.) Once the mixture is thickened and the pot is not too hot (very important! it should be on a lower setting), add an egg yolk and stir around well. You will see that the egg yolk will make the sauce more rich and yellow (exactly what you want.)

12.) At this point, your pasta should be done (al dente–about 12 minute). Drain your pasta and throw the pasta in the pan and toss around with tongs. Take your chicken out of the oven and let it rest (otherwise it won’t be juicy–don’t be tempted!). Once the chicken has rested, slice into strips.

13.) Once your pasta is incorporated, you may throw your peppers back in, and the peas frozen (they will cook in the sauce.) Throw in the chicken. Just don’t throw a fit when your friend tells you that you should have eaten a salad. You know better.

12509032_10205532237438507_431423893764804464_n

10366216_10205532237758515_7227773630149939320_n

Enter a caption

Bon appetit! Cheers to increased waistlines! 🙂