Homemade Lamb and Beef Gyros (Sous Vide and Rotisserie)

46797617_10212997602387965_2037370788293640192_o

Click here to watch the Youtube video demonstration of this recipe!

Happy Tuesday!

Are you over turkey and leftovers? I am! I love Thanksgiving, but I get bored and want to go for something international immediately after. My husband and I love Greek food, so it came to me that I wanted to make my stuffed grape leaves. But that’s not all. I wanted a gyro in the worst way, too.

Recently, I acquired a Ronco Rotisserie. Do you remember the commercial from the 1990s-2000s? “Set It and Forget It!” Best slogan ever. My problem? I have an obsession with watching it go round and round! One of my best friends told me that I ironically “stalk my food.” I can’t help it–it’s truly mesmerizing. I made rotisserie chicken two weeks ago, and I contemplated even doing my turkey in it for oven space purposes. So you can say I have a bit of an infatuation.

For all of you who know me personally, you know I am also a huge Sous Vide fan. It’s the best for proteins, and the low and slow water bath makes the meat extra juicy. So I had to use my Anova as I do for all my meat cooking.

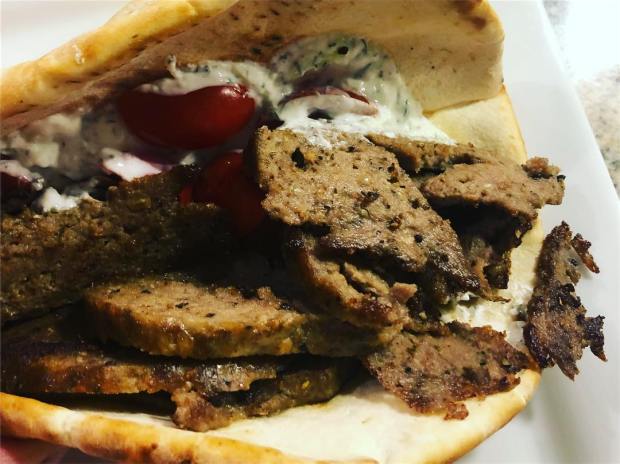
I decided to grind my meat, blend in a food processor into a paste (it sounds gross, but trust me, it needs to bind!), sous vided for two hours, and then I seared it for about 30 minutes in my rotisserie. Last final step? I carved the meat into thin slices into a sizzling hot cast iron pan for a little extra crispy edge. Absolute perfection.

The homemade Tzakiki sauce came together in a snap too. It’s creamy and indulgent and totally makes this classic Greek dish complete.

My husband said this is a “Top 5” meal–10/10. He isn’t wrong. It is perfect. Enjoy! 🙂

Ingredients for the Lamb and Beef Gyro Meat

  • 1.3-1.5 pounds of Ground Beef
  • 1 pound of Ground Lamb
  • 1 1/2 Tablespoons of Garlic Powder
  • 1 1/2 Tablespoons of Salt
  • 1 1/2 Tablespoons of Dried Oregano
  • 1 1/2 Tablespoons of Black Pepper
  • 1 small White/Yellow Onion (I used yellow)
  • 1 fresh garlic clove

Ingredients for the Tzatziki Sauce

  • 2 cups of plain Greek yogurt
  • 1 large cucumber
  • 2-3 tablespoons of garlic powder (to taste)
  • 1/2 small lemon, squeezed
  • 3 teaspoons of dried dill
  • Salt and pepper, to taste

Other Ingredients

White Pita Rounds (4-6)

Vegetable Toppings (Lettuce, Tomato, Red/White Onion–your choice!)

  • **Feel free to make the pita rounds too, but the store bought ones, if heated up properly, taste great!) This recipe serves 4-6, so you would need at least 4-6 pita rounds.
  • ***You may also add in any vegetable you want. Some people like sliced onions, most people like tomato. I sliced up only a few small grape tomatoes for mine as lettuce has a bad reputation as of late (thanks Romaine outbreak!)

Special Equipment

  • 8-10 cup Food Processor (I have a Cuisinart 8 Cup)
  • Sous Vide (Immersion Circulator)–I have an Anova; Joule works well, too!
  • Rotisserie Machine (**optional, but it’s what I used. You can also simply broil the outside and rotate in the oven if need be.) <–P.S: I bought my rotisserie for $20 on Facebook Marketplace, so fear not!
  • Cast Iron Pan (Somewhat optional–this is for the extra searing at the end. I guess you could use another pan, but cast iron is highly recommended!)

Directions to the Pantheon of Street Food (How To Make the Gyro Meat)

  1. First, take out your food processor. Pulse until finely diced your onion and garlic clove.
  2. Next, add the ground meats (lamb and beef), salt, pepper, garlic powder, and oregano.
  3. Grind the meat mixture into its a paste (it looks gross, but trust me, it’s divine). If you find it’s not all evenly getting mixed, stop the machine and use a spatula to push down the meat to make sure everything is ground evenly.
  4. Once it’s a “meat paste,” dump onto a piece of parchment paper.
  5. Next, transfer it to a large piece of plastic wrap. If you need another piece of plastic wrap, that’s fine! You are using the plastic wrap to mold the meat into a round log.
  6. Once you have rolled the meat into a log, portion out a large enough bag with your vacuum sealer. I have a Food Saver. **Make sure you remove the plastic wrap when the “log” is inside the vacuum-sealable plastic bag.**
  7. Once you have the meat sealed, you are ready to heat up your water!
  8. Get a large pot/sous vide container of water big enough to cover your meat. Fill the water between the minimum and maximum water lines that are listed on your circulator.
  9. Preheat your Sous Vide (Anova, Joule) machine to 150 degrees F. Once your water is heated up to temperature, put the meat log (is there a nice way of saying this?) into the water, and set a timer for two hours.
  10. As your Sous Vide is heating up/cooking your meat, go make your sauce!

Note: If you don’t have a Sous Vide, you can try putting the meat into a loaf shape on a sheet pan and put it in the oven at 325-350 like you would a meatloaf, but I have never tried it this way. Plus, if you don’t have a Sous Vide, I am not sure what you are waiting for. It’s the best! It’s worth the $100 investment!

Making your Tzatziki Sauce

  1. Scoop out two cups of plain Greek yogurt into a medium-sized mixing bowl.
  2. Peel your cucumber and then Microplane/grate your cucumber (not too finely nor too thick) into the yogurt.
  3. Next, slice open half a lemon. Squeeze the lemon into your yogurt mixture (make sure there are no seeds!)
  4. Add salt, pepper, garlic powder, and dried dill to your yogurt mixture.
  5. Stir all ingredients and taste. Add more salt and pepper as needed.
  6. When you’re satisfied, leave the mixture out to homogenize. The flavors will improve as it sits.

Putting It All Together

  1. Once your meat has finished cooking in the Sous Vide, it’s time to get it nice and browned on the outside.
  2. If you have a rotisserie, put the meat onto the prongs and put it into the machine and set for 30 minutes. If you don’t have, you can try carefully broiling the meat, rotating to ensure even browning on all sides. Alternatively, you can sear the meat whole in a cast iron pan/dutch oven. Again, I used a rotisserie as most gyros you order out are “gyrated” (if you go to a Greek place, you’ll likely see the vertical Doner Kebab machines).
  3. Once the meat is browned evenly on all sides, let the meat rest.
  4. Heat up your cast iron (preferably) skillet to medium-high heat. Put about a tablespoon of olive oil on the pan, spinning the pita round in the pan to help coat the oil.
  5. You will first heat up your pitas on both sides. You want the pita to be a little browned, but soft and pliable. About 1-2 minutes per pita (30 seconds to a minute per side).
  6. Once the pitas are warmed, you should slice the meat very thinly and cook in the same pan. You want a golden brown texture. Flip the meat often not to overcook.
  7. Assembling the pita: On the warmed pita, apply about a tablespoon of Tzatziki sauce and spread all over the pita. Then add your “salad” toppings of choice. Add the hot, seared meat on top.
  8. Fold and eat. Enjoy. Devour. Your life just may change today. 🙂


Mongolian Beef Noodles

Mongolian Beef Noodles.jpg

Happy Sunday!

I go on kicks each and every time I eat something amazing. I’ll eat sushi, and I will want it for a week straight. I have lasagna one day, and I’ll want ricotta for years. I become obsessive, and I’ll fall in love so deeply in that moment.

It kind of reminds me of teenaged infatuation; I have my “flavor of the week,” but eventually get over it and find something better. 🙂

Today, I had absolutely no inspiration whatsoever. I also knew I had to blog this weekend–eep. I decided that I needed to, after spending an hour in the grocery store roaming, just make something quick and delicious–and bam–I thought about making Mongolian Beef Noodles.

Stir frying is my go-to weeknight strategy because everything cooks so quickly. It’s also great for when I have a temptation to call for some take-out Chinese. I think that many people feel that they cannot make Chinese food themselves, and I am really not sure why. Chinese food isn’t difficult to make at all! Make a bucket list of your favorites from your local joint, and then go figure it out. One of my personal favorites is what I am making today.

Mongolian Beef Noodles has a perfect balance of sweet and salty. I like to add mini sweet bell peppers to get some natural sweetness in my vegetables, and it gives the dish a nice bright flair. I also add honey, mandarin oranges, and brown sugar to enhance the sweet flavor. The salty, savory factor comes from the green onions, garlic, and ginger. In terms of vegetables, you can use whatever you want. I like to throw in broccoli as beef and broccoli are an amazing pairing in the Chinese realm. I have seen people make it with coleslaw mix (note: NOT mayonnaise-laden prepared coleslaw, but rather, the vegetables). You could add whatever vegetables you like! Seriously! If you’re not too creative, think about what vegetables you actually enjoy eating when you dig through that white take-out container.

In terms of the beef, use flank steak, and make sure the meat is sliced thinly. To expedite the cooking process, the meat needs to be cooked not only thinly, but in smaller pieces (go for bite size.) I am also a big fan of marinating your meat whenever possible. Flank is not particularly tender, so I think it needs to sit for a little bit. More time is best, but if you don’t have all the time in the world, look to marinate your meat in the soy sauce/corn starch slurry immediately while you prep your vegetables–the half an hour bath will do just fine. The soy sauce, rice vinegar, and sesame oil will tenderize the meat.

There are two reasons why you want to add cornstarch to your meat: 1.) it thickens the sauce to make a succulent brown sauce, and 2.) it prevents the meat from overcooking and becoming tough. If you don’t have cornstarch, you can use flour, but I think cornstarch is the best way to get the traditional Chinese results.

Alright, enough talking–let’s get to dinner.

Marry the Meat

  • 1 pound flank steak, cut across the grain into 1/8″ thin slices, then cut into 2” length pieces (think bite size)
  • 1 tablespoon soy sauce
  • 1 tablespoon of rice wine vinegar (if you don’t have it, skip it–but I like it!)
  • 1 tablespoon of sesame oil* (Again, you could skip, but it’s another step closer to authentic Chinese)
  • 1 Mandarian orange (Cuties, Halos, whatever brand), juice squeezed** (optional, but I   like the acidity and sweetness; alternatively, pour in 2 tablespoons of orange juice!)
  • 1/4 cup cornstarch

Fry on the Fly

  • 2 tablespoons of canola oil
  • 3 cups broccoli florets (I just microwaved a bag of frozen florets)
  • 6 mini bell peppers, sliced thinly (no seeds, please!)–you could also used 1 whole bell pepper so long as its sweet!
  • 6 green onions, chopped (2 green onions reserved for garnish, the rest is for the stir fry itself)
  • 6 garlic cloves, minced
  • 1 tablespoon freshly grated ginger (If you don’t have any, you can leave it out, but ginger is another authentic Asian aromatic!)
  • 1 box of Rice Noodles (cook to directions)–if you’re really in a bind, you can use pasta (shhh!) or white rice

The Slurry in a Hurry

  • 1 Mandarian orange, juice squeezed** (optional, but I like the acidity and sweetness; alternatively, pour in 2 tablespoons of orange juice!)
  • 1/2 cup low sodium soy sauce
  • 1/2 cup water
  • 1/3 cup brown sugar, packed (add more if you like sweeter sauces)
  • 1/4 cup Asian sweet chili sauce (optional–I just used Sriracha because I ran out of Sambal Oelek)
  • 2 tablespoons mirin/sweet Japanese rice wine or rice wine vinegar
  • 1 tablespoon hoisin sauce
  • 1 teaspoon salt
  • 1/4 teaspoon pepper
  • 2 teaspoons cornstarch
  • 1-2 teaspoons Sriracha
  • 2 tablespoons of honey
Directions
  1. Make your rice noodles to the package’s directions. You can cook them by boiling water (like pasta) in ten minutes, or you can soak them in cold water (takes longer, but is a traditional method) for about 45 minutes.
  2. Next, slice your beef on a diagonal to the size specifications above. Add the meat to a large freezer bag along with 1 tablespoon soy sauce,. Toss to evenly coat. Add 1/4 cup cornstarch and toss to evenly coat. Let sit at room temperature 30-60 minutes at the very minimum.
  3. Slice your peppers thinly, and slice the green onions. Take out garlic cloves and  1 inch piece of ginger; press both through a garlic press. Alternatively, mince garlic and ginger finely with a chef’s knife.
  4. Once your ingredients are prepped, then begin your sauce. Whisk the sauce ingredients together in a small bowl. Set aside.
  5. Heat 1 tablespoon canola oil a large nonstick skillet or a wok (I prefer using a wok) over high heat until very hot and sizzling. Add beef to the skillet and break up any clumps; cook without stirring for 1 minute, then stir and cook until beef is browned and almost cooked through, about 1-2 minutes (it will cook more in the sauce). Don’t overcook or it won’t be as tender! Transfer beef to a large plate and cover it up so it doesn’t get cold.
  6. Add 1 tablespoon oil to the pan and saute the peppers. Throw the meat back in and add the garlic (use a garlic press, if you have one.) Stir frequently with tongs. Throw in almost all of the green onions (reserve some for garnish.)
  7. Microwave the broccoli to the directions on the package (about 5 minutes), and once it is cooked, add it to the pan. Once the noodles are cooked and drained, add to the wok/skillet, too.
  8. Return the beef to the skillet and toss to combine. Whisk the sauce to recombine then add to the skillet. Cook, stirring constantly with tongs, until the sauce is thickened, the beef is cooked and vegetables are crisp tender, about 1-2 minutes. Taste and add additional sriracha, sweet chili sauce, if you would like. Add the rest green onions as a garnish. If you have sesame seeds, you could add these also! Tip: If the sauce isn’t thickening, turn the heat up to a simmer, and then drop it low. Also, you may need to add more cornstarch. 
  9. Eat immediately. Try to use chopsticks without making a mess. 🙂 Slurp away!