Dolmades (Stuffed Grape Leaves) with Tahini Sauce

IMG_3009.JPG


Happy Wednesday!

I went to a Greek restaurant with my mother-in-law a few weeks ago, and we had Dolmades, stuffed rice grape leaves, as an appetizer. I totally forgot about how much I love these little bundles of joy! A week later, I made them at home. It was a great rainy day project as it took about an hour and a half, but my husband and I have been eating them all week.

I love wine, so grapes and I are definitely good friends, but often the leaf of the grape is forgotten–it is a wonderful vessel for stuffing filling whether it be rice, ground beef/lamb, or an exciting combination of both!

They’re healthy, summery, and versatile. The ones I made have ground beef in them as well, but these are just as good simply with rice. You have the vegetarian/vegan flexibility with stuffed grape leaves. They’re paleo, low-carb, gluten-free, and all other hyphenated diet terms galore. These are good for you and taste good–often times, the both are not possible, but this is one fabulous exception.

Grape leaves are found abound in the Middle East/Mediterranean regions of the world. I’ve had the Greek, Turkish, Lebanese, and Palestinian versions, and they all have the slightest variant that makes the grape leave uniquely their own.

Greek Style (Dolmades, Dolmathakia): Lots of lemon, typically prepared with mint and dill

Turkish Style (Dolma, Sarma): Warmed spices (Currants, cinnamon, all spice) and a bit of sugar

Lebanese Style (Warak akish) : Usually lamb and/or ground beef, lemon juice, tomato paste/pomegranate molasses, some warm spices

Palestinian Style (Warak enab mehshi): Mainly Lebanese style with ghee (butter), sometimes parsley

**And I think Armenians do a stuffed cabbage roll similar to a grape leaf, so it’s an international delight!***

For my grape leaves, I went in the Greek direction with an Indian and Lebanese approach. I know Indians do not make grape leaves, but I decided to add Garam Masala to my sauteed onions to incorporate my version of the aforementioned “warmed spices”.

These are great to make for a party and/or picnic as a make-ahead dish. You can eat these cold, room temperature, or hot. Again, regional approaches vary here–I find that cold is popular among the Greeks and Turkish whereas the Lebanese and Palestinian people tend to serve them warm to hot. It’s totally up to you.

You can use fresh grape leaves if you can find them, but it’s just as easy to use jarred grape leaves. Fresh grape leaves must be boiled, and they must have the main stem removed–this is not edible! If your local grocery store does not carry grape leaves, I ordered mine online through Amazon.

Some people find the preservatives/brine off-putting, which makes some people not want to eat these. But if you properly rinse off each leaf before you roll it, it should take away most of the acidity. Besides, squeezing a lemon right before serving is the right tang it needs–not from sodium benzoate. The fresh lemon really brings it together, and if you make a Tahini sauce (or buy it from a reputable place, such as Trader Joe’s), you’ll get this delicious lemony and garlic combination that is perfect.

Ingredients

  • 7-8 cups of chicken broth (you may use water, but chicken broth will impart more flavor)
  • 3 lemons
  • 1 teaspoon sea salt
  • 1 teaspoon pepper
  • One 16-ounce jar fresh small grape leaves in brine (about 70 leaves)
  • 1 cup uncooked short-grain rice (I use Basmati–it’s the best!)
  • 1-2 medium-large onions, finely diced
  • 5 tablespoons olive oil
  • 1 pounds lean ground beef or lamb (or a mixture of both)
  • 1 bunch fresh dill, chopped (you may add some mint, but I did not)
  • 1 tablespoon of Garam Masala (optional, but it was my own Indian twist)

Let’s get rollin’!

  1. Remove grape leaves out of the jar. Place all leaves in a colander and rinse/drain very well in warm water. In addition to draining off all the liquid, I individually wash off each leaf before I roll it. If you have leaves that are damaged or ripped, set those aside for layering on the bottom of the pot.
  2.  Sauté the onions in 1 tablespoon of olive oil until translucent, not browned. Throw in the rice into the pan and toast the rice a bit. You are not cooking the rice–you are simply imparting flavor. The rice will cook inside the leaf, so you could also not saute the rice and simply mix it with the meat if you’re short on time, but go the extra mile. 🙂
  3. In a bowl, combine the onions, ground beef/lamb (if you’re using) rice, remaining olive oil, dill, juice of 1 lemon, and pepper. Mix well by hand.
  4. Once the filling is well incorporated, gently separate one leaf and place it shiny-side down on a work surface. Place a pinch (up to a teaspoon) of the filling on the leaf at the point where the stem joined the leaf. DO NOT OVERFILL YOUR LEAVES–THEY WILL EXPLODE!
  5. Roll the leaf like you would a cigar.  You are folding the mixture up and then folding in the sides, tucking them in. Fold up the bottom of the leaf over the filling, then each side inward in parallel folds, and roll up the leaf. The roll should be firm, not tight, as the filling will expand during cooking. Repeat until all the filling has been used.
  6. Repeat this about 70 times (I am not kidding–ask for help!)
  7. Layer the torn/damaged leaves until all are in the pot so that the bottom is covered. Place the rolled up grape leaves all along the bottom and stack them in alternate directions for the most support.
  8. Once you have all your leaves in the pot, place a plate on top to keep the leaves from floating.
  9. Add the chicken stock to the pot to cover the leaves. Add more or less as needed.
  10. Bring the liquid to a gentle boil, add the remaining juice from the 1 1/2 lemons, reduce heat to low and simmer for approximately 50 to 70 minutes. Keep the lid on–otherwise, they will not properly steam.
  11. Check to see if done–if the rice has cooked, they are done. If not, continue cooking for another 10 minutes and check again.
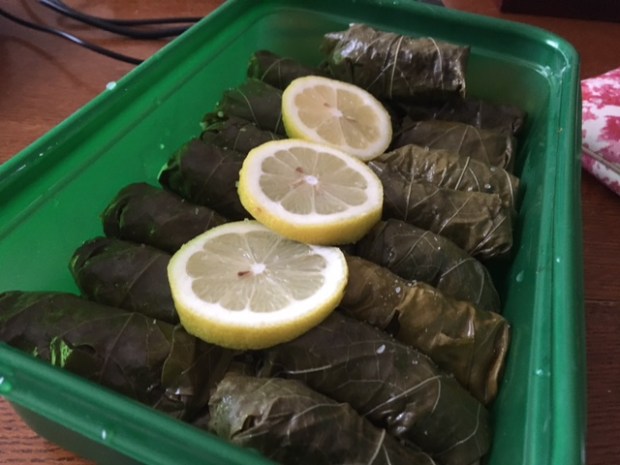
  12. Enjoy while they are warm, leave out for room temperature, or refrigerate. My husband and I like them cold for a picnic. 🙂
  13. Serve with a fresh squeeze of a lemon slice, and dip into garlic tahini sauce (or hummus like sauce).

Garlic Tahini Sauce (If you want to make it versus buy it in the store)

Ingredients


  • 1 cup tahini sesame seed paste (I prefer the paste made from light colored seeds)
  • 3/4 cup lukewarm water, or more for consistency
  • 3 cloves raw garlic (or 5 cloves roasted garlic for some sweetness–mmm!)
  • 1/4 cup fresh lemon juice (or more to taste)
  • 1/4 tsp salt (or more to taste)

Directions

Combine above ingredients in blender or food processor, adding the liquid gradually to make a smooth consistency.


Pork and Poblano Stuffed Mini Bell Peppers with Melted Jack Cheese

Pork and Poblano Stuffed Mini Bell Peppers with Melted Jack Cheese.jpg

Update 5/5/20: I made a Youtube Tutorial making these peppers. Check it out by clicking here!

Happy Saturday!

I am not making excuses, but I have not blogged in a while because I have been super overwhelmed with life. I’ve moved back to Pennsylvania from North Carolina; this consumed a lot of my free time. I also started teaching summer school and have been booked up with weddings galore! In fact, my best friend is getting married tomorrow, so I need to finish this post quickly so I can attend to her needs. I have to be ready on standby!

Speaking of celebration, I think the best foods to eat are hor d’oeuvres which to me simply means fancy finger food. There’s something to be said about food that requires no silverware or linen. These peppers are a great appetizer for a crowd mainly because of their size! If you have never worked with a mini bell pepper, I highly recommend it. They are colorful, fun, and they cook in no time at all. They have all the sweetness of your conventional bell pepper, but they are “fun-sized.” They are quite the party.

The flavor can be as intense or as relaxed as you want it to be, but if you like regular stuffed peppers, you know that spiciness is not necessarily a requirement. I use a poblano pepper and ground pork to stuff these peppers. I have also done a rendition of this recipe adding leftover saffron rice and some corn, so if you have any of these handy, by all means, add it! These peppers are small, so they can’t contain too much, but if you’re like me, you’ll do open heart surgery and make sure each pepper is maxed out in its capacity.

I will say that if you don’t have dainty fingers, you might find stuffing these peppers to be slightly tedious. A conventional stuffed pepper takes hardly no time to prepare because the pepper is about the size of a hand. Stuffing these little guys are a bit of an art form, but it’s worth it. This would be a fun recipe to make with a friend–divide and conquer!

I made these for a fourth of July party; I tamed the spices to a mild taste level so people wouldn’t have sweat more than they would already on a 90 degree day; however, if you like spicy food, go ahead and chop up a jalapeño or a habanero alongside with the poblano to bring up the heat. You could also add more spices to your taste level. Make sure you taste your filling before you put it in the pepper! Tasting is key.

I think what also makes these peppers very tasty is the fact they have a roasted flavor from being first sautéed in a bath of olive oil in a frying pan. Cooking the peppers first, not just throwing them in the oven, assures perfect tenderness and flavor development.

Let’s get this party started! These would be perfect for a Mexican themed party; I first made these for a Cinco de Mayo recipe, but these are perfectly suited for any summer celebration. 🙂 I doubled the recipe when I made this last to make about 50 peppers, but this is the scaled down version for a smaller gathering.

Ingredients
3 tablespoons extra-virgin olive oil
1 pound assorted baby bell peppers (about 24)
1 small onion, diced
1 poblano chile pepper, seeded and diced (Remember–you can add a jalapeño or habanero to kick these up!)
3 cloves garlic, minced
1/2 teaspoon ground cumin
1/2 teaspoon dried oregano
1/2 teaspoon ancho chile powder**
1 teaspoon chipotle chile powder**
Kosher salt
1/2 pound ground pork
1/4 cup chopped fresh cilantro (optional–I personally am not a HUGE fan of cilantro, but it fits here)
3 ounces jack cheese, diced (about 3/4 cup)**(Feel free to use more cheese. That never hurts

**-(The ancho and chipotle powders are very distinctive in flavor, but I will say they are optional if you don’t feel like running to the store–you can use regular chile powder, but these two have more authentic Mexican profile)

Directions

1.) First, prep your ingredients. Dice your poblano (or other spicy peppers) and onion finely. Next, mince your garlic finely.

2.) Once your ingredients are prepped, heat the olive oil in a large nonstick skillet over medium heat. Add the baby bell peppers (whole) in a single layer and cook, turning, until the skins blister and start browning. Depending on your stovetop, it could take anywhere from 5-10 minutes. You don’t want to overcrowd the pan. Make sure you flip them and see a slight char. You should also towards the end be able to feel with a fork if they are soft and tender (not overly soft, but enough to bend and not be raw.)

3.) Once you’re done cooking the peppers, use the same pan and add the onion and poblano. If you need more olive oil, add it before sautéeing the onion and poblano. Make sure the onion is translucent before adding the garlic, cumin, oregano, ancho and chipotle chile powders and 1 teaspoon salt to the skillet. The whole mixture should be tender in a little under ten minutes.

4.) Next, raise the heat to medium high and add the pork. Cook, breaking up the meat with a wooden spoon, until no longer pink, about 6 minutes. Remove from the heat and let the final mixture cool.
5.) While the mixture is cooling, preheat the oven to 425 degrees.

6.) Here’s the fun part: stuffing the peppers! Make a slit in each baby bell pepper with a knife, cutting from stem to tip. Once slit open, use your index finger to scoop out the few seeds that are in there and to carefully make a little room for the filling.

7.) Crumble the meat mixture into small bits, then stir in the cilantro. Stuff 2 to 3 teaspoons of the meat mixture into each pepper using your fingers or a small spoon; transfer to a baking sheet.

8.) Put a piece of jack cheese on top of each individual pepper. Cut each piece of cheese so it fits inside the pepper(cubes work well or long strips). You may stuff the cheese so that it is tucked all inside, or you may just put the slice cheese right on top and have it melt all over if you’re in a rush.
9.) Bake until the peppers are hot and the cheese melts, about 10 minutes. Once the peppers come out, sprinkle kosher salt on the peppers (just a pinch.)

10.) Eat these peppers immediately. Have a margarita with salt on your rim to complement this fiesta

. 🙂

Southern Style Crab Cake Melt with Cheddar, Remoulade, and Roasted Asparagus

SouthernCrabCake.jpg

Happy Tuesday!

I apologize for not posting; I’ve been overwhelmed between preparing to move, ending my school year, and so on. But no more excuses–I am here to stay!

I prepared this recipe yesterday to help my neighbor Jennifer with her “Surf and Turf” themed Memorial Day party. She was dead set on us making a ceviche, but I know that I am not one that likes to experiment on a large group of people. The little experience I have with ceviche tells me that I should 1.) get the freshest seafood ever and 2.) I need enough acid/time to marinate the fish. And so, I encouraged her to let me go with one of my favorite things to eat instead…crab!

I love crab cakes, crab legs with drawn butter, soft-shell crab, she-crab soup, or a crab gnocchi bake; Zach and I could devour Snow Crab, in particular, for days. Crab has such a distinct sweetness and flavor that it is totally undeniable. Crab cakes are definitely a weakness of mine, but they’re often…mediocre. I’ve had them out and have been disappointed. They can be dry, loaded with fillers (and thus, very little crab), and quite frankly, unaffordable for the average person dining out.

It’s one of the more expensive items you can purchase in a restaurant, and it may be an item you are afraid to make yourself because..

1.) It’s costly–chicken, anyone?

2.) It’s seafood–frightening for some.

But trust me when I say it isn’t that scary at all! And while I agree it’s not the cheapest meal to make, it’s so worth it. For this recipe, I use good quality canned crab (Phillips’). Yes, you could use fresh crab. Sure, you can cook your own crab and pick them to pieces, but you’ll die of starvation by the time you’re finished. Good quality canned crab is appropriate for this dish!

You should make this if you’re a crab lover and/or you’re looking to impress. Even if you’re not entertaining a few guests, this recipe can be easily even made for a single person (yes, you read that right), so that you can make yourself a 15 minute meal that tastes divine.

Now I have a “holiday” crab cake recipe I make, and I also make a salmon cake that is similar to the recipe I am providing here. This crab cake melt, however, is less fuss. When you’re cooking for a crowd, you don’t want complicated. You want tasty and easy, and this is perfectly that.

From all my experiences making seafood cakes (I’ve made tons), the best base has…

1.) Creamy components (Mayo, Sour Cream, and/or Remoulade)

2.) Butter Crackers (Like Club or Ritz)

3.) Sautéed Diced Peppers and/or Onions

Sure, you can make a deep fried one with typical breading (Panko or Italian-Style), but I don’t think that does anything to actually accentuate the natural taste of the crab cake. I personally (and for this recipe) broil, not fry the crab cakes. The flavor is much more prominent, and I believe the crushed cracker breading approach creates the right texture.

Now what heightens this dish (without taking away the excellent seafood flavor) is the cheddar that is melted. This crab cake melt, as the name implies, involves smothering the crab cake in gooey cheese on top of a split English muffin. It’s amazing! The first time I had a Crab Cake Melt was in Downtown Wilmington, NC. Not only was it fantastic, but it was only $9.99 at an awesome place called Paddy’s Hollow.

For the price of two crab cakes at the aforementioned restaurant, you can serve a hearty appetizer for 12, so let’s get started! Again, this recipe can easily be scaled down to a romantic meal for two, so don’t feel the need to invite company over…

Because I doubt you’ll want to share. 🙂

Ingredients for Side Dish: Roasted Asparagus

  • 1 bunch of fresh Asparagus
  • 1-2 tablespoons of Extra Virgin Olive Oil
  • Salt and Pepper

Ingredients for Remoulade (Make first to add to your crab cake mixture!)

    • 3 cups mayonnaise (or sour cream!)
    • ½ cup Dijon mustard
    • 1 tablespoon Worcestershire
    • 1 tablespoon hot sauce (I like Cholula!)
    • 1 teaspoon Cajun seasoning blend** (optional)
    • 1 teaspoon paprika
    • 1 tablespoon freshly squeezed lemon juice
    • 1 tablespoon prepared horseradish
    • 1 tablespoon ketchup, plus more if needed
    • 1 tablespoon finely minced garlic
    • 2 tablespoons chopped capers
    • 2 tablespoons sweet pickle relish
    • 2 tablespoons finely diced celery
    • 2 tablespoons finely chopped flat-leaf parsley
    • 1 tablespoon finely diced green onion tops
    • Kosher salt and freshly ground black pepper

Ingredients for Crab Cake for 2 (Multiply most ingredients by 6 to create 12!)

  • 2.5-3 ounces of lumped crab meat (canned)
  • 3 tablespoon of sour cream (or mayo)
  • 1 tablespoon Worcestershire
  • 1 tablespoon hot sauce (Cholula or Sriracha works for me!)
  • 1 tablespoon Dijon mustard
  • 1/6th of a sleeve of Club Crackers, crushed finely (if you’re making for 12, use a whole sleeve)
  • 1 beaten egg** (for 12 servings, I only needed 2-3 large eggs to bind!)
  • 3 sliced and diced jarred roasted sweet bell peppers OR 3 sliced and diced sweet MINI bell peppers (you must sauté beforehand) FINELY DICED
  • Salt and pepper, to taste
  • 1-2 tablespoons of homemade Remoulade (P.S: If you don’t have time, you can buy this, too–but fresh is best!)

For serving…

  • 1 split English muffin (or 1 package of English muffins for company; I recommend Thomas’ English muffins)
  • 2 slices of Cheddar cheese


Directions for Side Dish: Roasted Asparagus

  1. Slice off woody ends of fresh asparagus.
  2. On a sheet pan, evenly spread out asparagus. Coat with olive oil, salt, and pepper.
  3. Once oven is preheated to 400 degrees, cook for 10 minutes. Do not cook it any longer than that! If you’re serving this for company, cook the asparagus last.

Remoulade Directions

  1. In a large mixing bowl, add the mayonnaise or sour cream. Whisk in the mustard, Worcestershire, hot sauce, seasoning blend, paprika, lemon juice, and horseradish. Add the ketchup and whisk together. Add more ketchup as needed to get the pink coloring necessary.
  2. Once the color is achieved, add in the garlic, capers, relish, celery, parsley, and green onion. Stir to combine and add salt and pepper to taste. Cover and refrigerate for at least an hour.

Crab Cakes Directions

  1. First, slice and dice your sweet bell peppers very finely. If your peppers are not jarred (in other words, fresh peppers), sauté them in 1 tablespoon of extra virgin olive oil and 1 teaspoon of Worcestershire. Stir until soft and fragrant. Put aside to cool–do not add to mixture until cooled as you are adding them to eggs! You don’t want scrambled eggs, do you now? 🙂
  2. Once the peppers are cooled (or if they’re jarred, simply diced), add them to a bowl. Next, add the canned crab, hot sauce, Dijon mustard, mayo/sour cream, beaten egg(s), and remoulade. Over the sink, pulverize your cracker sleeve finely. You may use a food processor if you don’t feel like smashing the crackers yourself. Tip: Use your index finger and thumb to break up large pieces! Once the crackers are crushed, add them to the mixture. Stir lightly to combine; don’t overmix! Make sure your mixture looks nice and moist. If it doesn’t look super moist, add a little bit more remoulade, sour cream, and Dijon mustard.
  3. Next, split your English muffins in half. Toast your English muffins about halfway.
  4. Once the English muffins are toasted, place sliced cheddar on the bottom of each English muffin half.
  5. On top of the cheddar, scoop out a generous amount of crab cake mixture  that will eventually be distributed on each English muffin slice. You don’t have to shape it with your hands–simply plop on top.
  6. **Alternatively, you can place the cheddar on top of the crab cake depending on how particular you are about presentation! If the cheese slice is too large, you’re better off putting the cheese on the bottom.
  7. When ready to serve (and remember, these can be made ahead), broil for about 10 minutes until golden brown.
  8. Serve with remoulade on top!


Fried Chicken and Belgian Waffle Sliders with Arugula, Tomato, and Avocado and Maple Dijon Sauce

13165960_10206335818207524_8884107941874790437_n

Happy Sunday!

So I have this tradition I’ve had for quite some time since I’ve lived on my own…I make waffles on Sunday. Some people find solace in attendance of church services, others take long drives–me? I make waffles. It gives me a sense of inner peace, and it’s something I look forward to by the week’s final end. My fiancé bought me an awesome Waring professional Belgian waffle maker for my birthday last year, and I have used it religiously with utter delight. I am a lover of brunch with champagne, and I think that to be a proper brunch host, I just needed to have a solid waffle maker. Thanks, Zach!

I made my Belgian cuties as usual today for my love and me…except it’s just two of us, and I slipped by making extra batter. It was probably the best mistake I made today. The worst mistake I made was going to Michael’s (the crafts store) thinking that I could only buy one thing…ugh. My credit card is officially whacked for the month. 🙂

13177799_10206331925590211_5924864210540749297_n

I could eat these for the rest of the week, but that might get old. I decided to make them as sandwiches…genius! I recalled a Pinterest post and thought that today would be the day to give it a go. I didn’t follow the recipe for the waffle batter like they specified as I used my waffle recipe from this morning. The recipe in the Pinterest post is excellent for a savory waffle, so when you go make this yourself, feel free to use that one, but just know that you don’t necessarily need a savory waffle for this awesome sandwich. I believe the chicken, avocado, tomato, and arugula add enough savoriness, but to each their own!

If you are a southerner, or if you have a southern palate, you know how amazing fried chicken and waffles is. It’s a wonderful balance of sweet and savory, and it’s an excellent brunch item as it encompasses the best BUTTERMILK items. Ladies and gents–I do require you use buttermilk for your chicken, and preferably also for your waffles. Buttermilk does absolute wonders, and it is my secret weapon for today. Tip: If you don’t feel like running out and buying buttermilk, you can always add a little vinegar to regular milk and bam! The chemistry experiment will suffice as your vice.

This recipe is relatively simple, but if you have time on your side, go for the overnight yeast waffles versus my fast waffles (especially for breakfast). They are both good, but the yeast waffles are superb.

Same thing for the chicken–it’s best to let the chicken marinate in buttermilk overnight, and dredged so that the outside dries out and the inside remains moist (you know, the crispiest fried chicken ever.) Time is your friend, but if you’re short on time, you can always take short cuts. Heck, you can even buy fried chicken to not make a mess. I just won’t allow you to make Eggo waffles in lieu of a homemade batter. If you do want simple box mix, I like to use Aunt Jemina in a pinch. But please, let go of that EGGO. 🙂

This post is going to look really long, but that’s because I included three options for waffles. First, pick your waffle you want to make. I offer the savory version that has cheddar and scallions from Candid Appetite, my easy waffle, and my overnight waffle (which is great when time is on your side.) They’e all good–it just depends on your need.

After you make your waffles, then work on your chicken.

Lastly, ASSSSSSEEEEMMMMMBBBLLLEE!

STEP ONE: Waffle Batter Ingredients and Instructions (Pick One!)

Savory Version from Candid Appetite:

Ingredients

2 cups (250 grams) all-purpose flour

¼ cup (55 grams) light-brown sugar

1 teaspoon (8 grams) baking soda

1 ½ teaspoons (6 grams) baking powder

½ teaspoon (4 grams) salt

2 teaspoons (14 grams) freshly cracked black pepper

3 large eggs, room temperature

Instructions: 

  1. Preheat waffle iron.
  2. In a large bowl stir together the flour, brown sugar, baking soda, baking powder, salt and black pepper. Make a well in the center of the bowl and set aside.
  3. Crack the eggs into a small bowl and whisk together. Pour into the center of the dry ingredients. Add the melted butter and buttermilk. Using a wooden spoon, stir the waffle batter until just combined. It should be sightly lumpy. If the batter appears to be too thick, add a splash of buttermilk and stir until pouring consistency is reached. Fold in the cooked chopped bacon, shredded cheddar cheese, and sliced green onions.
  4. Lightly grease the waffle iron with cooking spray or melted butter. Pour in about ½ cup batter in each waffle cavity, more or less depending on size of waffle iron. Cook until the waffles are golden brown and crispy.

Easy Weekend Waffle from Lei Mangia :

2 cups  flour

4 teaspoons  baking powder

1⁄2 teaspoon  salt

1⁄4 cup  sugar

1 teaspoon pure vanilla extract 

2 eggs (you could separate yolks from whites, whip up whites until fluffy and add to batter if you have time, but again it’s the easy waffle!)

1⁄2 cup of Canola oil

2 cups milk (but buttermilk, preferably!)

Instructions: 

  1. Preheat waffle iron.
  2. Sift the dry ingredients together in a large bowl.
  3. Separate the eggs.
  4. In small bowl, beat egg whites until stiff.** (or to make it simple,  don’t separate the eggs–the whites will make your waffle fluffier, though.)
  5. Mix together the egg yolks, milk and oil and stir slightly.
  6. Add to dry ingredients and mix well.
  7. Fold in beaten egg whites.
  8. Put 2/3-1 cup of waffle mixture in the center of the waffle iron. Do not close your iron until all the mixture is properly distributed! Cook for about 5 minutes (depending on your waffle maker’s setting.)

Perfect Overnight Belgian Waffles (Based off of Barefoot Contessa and modified by Lei Mangia):

½ cup warm water (110 to 115 degrees) 
1 package (1/4 ounce) active dry yeast, at room temperature 
2 teaspoons sugar 
2 cups lukewarm whole milk (90 to 100 degrees) 
¼ pound (1 stick) unsalted butter, melted
plus extra for the waffle iron** (Or use cooking spray like Pam)
2 tablespoons honey  (I usually leave the honey out–it’s up to you!)
1 teaspoon pure vanilla extract 
1¼ teaspoons kosher salt 
2 cups all-purpose flour 
2 extra-large eggs 
¼ teaspoon baking soda 

Instructions: The night before, combine the water, yeast, and sugar in a very large bowl (the batter will expand enormously).

  1. Allow it to stand for about 5 minutes, until the yeast dissolves and the mixture has started to foam, which tells you the yeast is alive. Stir in the milk, butter, honey*, vanilla, and salt. Add the flour and whisk until the batter is smooth.
  2. Cover the bowl with plastic wrap and allow it to sit overnight at a cool room temperature.
  3. The next morning, preheat a Belgian waffle iron according to manufacturer’s instructions and brush the top and bottom with melted butter (or use cooking spray, which is easier).
  4. Beat the eggs together with the baking soda and whisk them into the batter until combined.
  5. Pour just enough of the batter onto the hot waffle iron to cover the grids (1/3 to ½ cup each, depending on your waffle maker), close, and cook for 5 to 6 minutes on medium heat, until the waffles are golden brown. Remember: It’s always best to go on a lighter setting and leave it in longer versus overcooking!

STEP TWO: Make Your Finger Lickin’ Chicken!

1 pound chicken breast cutlets, cut in half

1½ cups buttermilk

1 tablespoon of hot sauce, optional (but recommended, and I love Cholula!)

1½ cups all-purpose flour

1 teaspoon salt

1 teaspoon cayenne pepper

1 teaspoon garlic powder

1 teaspoon black pepper

canola oil for frying (fill a cast iron skillet!)

Instructions;
  1. Place the chicken in a large bowl. Cover with buttermilk and add the hot sauce, if using. Toss together until evenly mixed and all the chicken is submerged in the buttermilk. Cover with plastic wrap and place in the fridge for at least 30 minutes. If you don’t have the time, this step is not crucial but it will help make the chicken tender and juicy. You can leave it up to overnight, which if you’re doing this ahead, I totally recommend!
  2. In a shallow dish combine the flour, salt, cayenne pepper, garlic powder, and black pepper.
  3. To coat the chicken, grab a piece from the buttermilk bowl, slightly drain off, and throw into the flour.
  4. Pat the flour into the chicken, on both sides. Return to the buttermilk bowl (with the rest of the chicken) and coat both sides.
  5. Place the chicken back into the flour, once more, and coat both sides. We’re double dipping the chicken. Lay the coated chicken on a rack placed over a baking sheet. Repeat in this manner until all the chicken is coated.
  6. Allow the coated chicken to rest for at least 10 minutes, this will allow the fry to dry a bit and stick to the chicken.
  7. In the meantime, heat about 2 inches of oil in a heavy duty pan, such as a cast iron skillet.
  8. Once the oil is hot, fry the chicken in batches. Cook for about 5 minutes on the first side, turn over once golden brown and crispy, continue to cook for another 4 minutes on the other side.
  9. Drain the chicken and place on a separate rack set over a baking sheet. You can keep the cooked chicken warm in a 200°F oven until all the chicken is fried and you’re ready to serve.

Or, you can buy fried chicken and save yourself the fuss. 🙂

STEP THREE: Assembling Your Sandwich

Ingredients

1 cup of arugula

1 thinly sliced tomato (preferably off the vine)

1/2 slice of ripened avocado

1/4 cup of pure Maple syrup

3-4 tablespoons of Dijon Mustard

Prepared Waffle and Chicken

The Finale…

  1. Take your waffle and divide it into sections (mine has four sections per waffle which makes two sandwiches per waffle.)
  2. Slice avocado and tomato. Rinse arugula.
  3. Mix maple syrup and Dijon mustard together to create sauce.
  4. Put thin avocado slices on the bottom piece of the waffle.
  5. Place chicken on top of the avocado. Drizzle sauce.
  6. Put sliced tomato on top of avocado layer. Put a half a handful of arugula on top of the tomato. Slightly dress the arugula with more sauce.
  7. Place another waffle piece on top. You may use a toothpick to keep it together, if you like.
  8. Eat! You may need a knife and fork, but that’s only half the fun. 🙂