Spinach, Mozzarella, and Ricotta Pie


SpinachMozzarellaandRicottaPie.jpgHappy Monday!

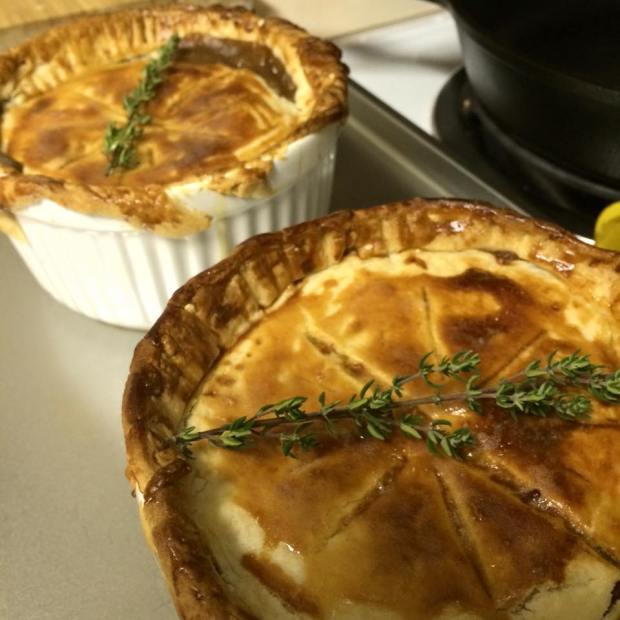
If I could eat one thing for the rest of my life, it would be Spanakopita, the Greek spinach pie that is layered in heavily buttered phyllo. I will post that recipe…eventually. That’s almost like my tiramisu recipe: it’s top secret. I need to see some real commitment on behalf of my viewers before I unveil this Greek aristocracy.

I seriously have an obsession with spinach! I eat it often as a salad (one of my favorites is grilled chicken, goat cheese crumbles, crushed walnuts/pecans, and dried cranberries/orange cutie pieces with pear gorgonzola dressing). I eat it as a side dish (like a classic creamed spinach), and I’ll eat it in a pie–any pie–phyllo or Pillsbury. I don’t discriminate when it comes to Popeye and I’s favorite.

Speaking of Pillsbury, I took a shortcut today and used a ready made crust. I am all for making homemade everything, even when it’s not necessary. Feel free to be complicated like I usually am, but unfortunately, time is my kryptonite today!

I am not going to say that this Spinach pie replaces my aforementioned, beloved, Spanakopita, but if you’re looking for comfort and ease, this is the recipe for you.

  • 1 box of Pillsbury refrigerated pie crust (alternatively, you could use another brand, or your own homemade)–make sure you have two crusts!
  • 1 yellow onion, diced
  • 4 cloves of garlic, minced
  • 2-3 tablespoon flour
  • 1 10-ounce package frozen chopped spinach, thawed, and squeezed out dry (I also added two cups of fresh spinach because I had some leftover! Spinach always wilts, so feel free to add more if you have it!)
  • Salt and pepper (to taste–approximately 1.5 tablespoons of each)
  • 1 teaspoon of nutmeg (optional–it’s an acquired taste! Please don’t add too much!)
  • 1 15-ounce container ricotta cheese
  • 1 cup mozzarella cheese, shredded (maybe more)
  • 1/3 cup grated Parmesan cheese (I always do more–oops)
  • 2 large eggs, beaten- plus 1 extra egg for brushing on the pastry crust.

Directions:

  1. Preheat oven to 350°F.
  2. In the meantime, prep your onion (diced) and garlic (minced).
  3. In a saute pan, heat to medium high heat and add combination of olive oil and butter for onions. Stir occasionally.
  4. Add small amounts of water every two minutes (about two tablespoons) so the onions become translucent more quickly.
  5. Once the onions are almost caramelized and translucent, add the minced garlic. Stir around–don’t burn the garlic! It’s a sin.
  6. Next, add your spinach. If you’re using fresh, cover the saute pan with a lid for a minute–it’ll expedite the wilting process of the spinach. Be sure to stir the spinach, onions, and garlic so nothing burns. If it gets too hot, take it off the burner.
  7. Cool the mixture for a few minutes (or if you have no time, add everything below EXCEPT the egg–you don’t want to cook eggs.)
  8. In a bowl, mix the spinach, ricotta, mozzarella, Parmesan cheese.  Fold in the 2 beaten eggs and blend well. Set aside. Add salt, pepper, nutmeg** (nutmeg is acquired) to taste.
  9. Unfold the pie crusts. Butter your pie pan/cast iron pan. Sprinkle surface with flour and press or roll out fold lines with rolling pin.  If crust cracks, wet fingers and push edges together to seal. Place crust, floured side down, in 9-inch-diameter glass pie dish to cast iron pan.
  10. Spoon mixture into pie crust. Top with second crust, fold edges under and crimp decoratively. I seriously used a nightlight (that I bought at the dollar store) to create a design. Feel free to use a cookie cutter to make it more elegant (like an open face pie with leaves over the top; I think that would be beautiful!)
  11. Beat the extra egg with a teaspoon of water then brush (with pastry brush) the outside of the crust with the egg mixture. You do not need the whole egg mixture!
  12. Place on the middle rack in the oven and bake until brown on top, about 40-50 minutes (but check on it every 10-15 minutes.) Let stand at least 15 minutes before cutting. Devour politely. 🙂


Kahlua and Bacardi Tiramisu

KahluaandBacardiTiramisu.jpg

This is my absolute favorite dessert I make. Seriously. It’s one of those recipes that your grandmother makes on special occasions, but never will tell you quite everything that’s in it when everyone asks. Grandma does not want her notoriety to vanish for the sake of appeasing your curiosity. It’s so alluring and delicious that as grandma, you are expected to make it, and as the envious family member, you are expected not to be able to ever learn how to make it!

This is my traditional, go-to-and-impress-him dessert for Valentine’s Day, but don’t feel the need to wait for a holiday. Make this because it’s Wednesday. Make this because you love chocolate and coffee. Make this because you love yourself-you don’t need a special occasion at all. There’s something about its layered espresso goodness that makes everyone smile. Tiramisu, which literally means “pick me up,” has plenty of coffee, espresso, liqueur, and rum to keep you going!

Once she starts making Tiramisu, she will be just fine!

What’s the best thing about making Tiramisu? It’s fancy and tasty without the need for an oven. There is technically no baking involved, but you will need a good stand mixer (or regular electric mixer) because you will need to make sure you get the consistency of the mascarpone and whipped cream mixture right. Other than that, this is the perfect dessert to make for your sweetheart. You can make it in about forty minutes of prep work, leave it overnight, and wake up to a decadent treat.

Cast of Characters (Ingredients):

2 cups strong brewed coffee, room temperature
1 1/2tablespoons instant espresso powder
6 1/2 tablespoons Kahlua, divided, 2 1/2 tablespoons Bacardi Rum
6 egg yolks
2/3 cup sugar
1/4 teaspoon salt
3/4 cup cold heavy cream, divided
24 ounces mascarpone cheese
14 ounces dried ladyfingers (savoiardi) <–Typically, two boxes worth.
3 1/2 tablespoons Dutch-processed cocoa powder <–Go for unsweetened! I used Hershey’s Cocoa Unsweetened.

The most expensive and probably difficult ingredients to find if you do not live in an Italian neighborhood are mascarpone and ladyfingers. When I asked for the mascarpone cheese in my neighborhood grocery store, the attendant asked me if it was similar to parmigiana cheese. Uh, no! This is a sweet, Italian cream cheese! Although he could not help me, I eventually found what I was looking for by the chocolate covered strawberries. Maybe other people see that this, too, is the best Valentine’s Day/anniversary/romantic occasion dessert? The secret must be out…

Can you use regular Philadelphia cream cheese instead? No. If you need to order it from Amazon.com because you live in Minnesota, then so be it. It’s worth the wait. I will say that if you are feeling extra creative, you can make your own savoiardi (ladyfingers), but the ones that come from Italian bakeries are more than excellent.

Okay, as with any baking where you are whipping a cream, you need to make sure your bowls that you are mixing with are chilled. If you really are short on time, throw them in a freezer and start to prepare everything else in the meantime. Cold bowls will help get the nice, fluffy peak you need out of your mixture.

To begin, you need the following:

A stand-mixer (or electric mixer–DO NOT MIX BY HAND WITH A WHISK)

Two mixing bowls (chilled)

A 13 x 9 inch Pyrex (you can do any similar size if needed, but you may have more or less mixture needed)

A rubber spatula

Get on the Grind

1. Prepare the ladyfinger coffee mixture. Brew two cups of coffee (and if you have, you can also brew one shot of espresso) and pour into a large bowl. Measure 2 1/2 tablespoons of Kahlua, 2 1/2 tablespoons Bacardi Rum, and  1 1/2 tablespoon of Instant Espresso Powder. Stir all ingredients into the espresso powder has dissolved.

2. Crack eggs and separate whites from yolks. In bowl of standing mixer fitted with whisk attachment, beat yolks at low speed until just combined. Gradually add sugar and salt and beat at medium-high speed until pale yellow, 1 1/2 to 2 minutes, scraping down bowl with rubber spatula once or twice. Add 1/3 cup of the heavy cream to yolks and beat at medium speed until just combined, 20 to 30 seconds, and then scrape bowl. Do not over beat!

***If you have pasterurized eggs and want to eat Tiramisu traditionally, proceed. For those of you who are bothered by the concept of a raw egg, you can do this optional step to cook the eggs lightly.***

OPTIONAL: Set the bowl with yolks over a medium saucepan containing 1 inch of gently simmering water; cook, constantly scraping along bottom and sides of bowl with heatproof rubber spatula, until mixture coats back of spoon and registers 160 degrees on instant-read thermometer, 4 to 7 minutes. Remove from heat and stir vigorously to cool slightly, then set aside to cool to room temperature, about 15 minutes.

3. Whisk in remaining 4 tablespoons Kahlua until combined. Transfer bowl to standing mixer fitted with whisk attachment, add mascarpone, and beat at medium speed until no lumps remain, 30 to 45 seconds. Transfer mixture to large bowl and set aside. DO NOT OVERBEAT! IF IT IS LIQUIFIED, YOU CANNOT FIX IT.

4. In now-empty mixer bowl, beat the remaining heavy cream at medium speed until frothy, 1 to 1 1/2minutes. Increase speed to high and continue to beat until the cream holds stiff peaks, 1 to 1 1/2minutes longer. Using a rubber spatula, fold one-third of the whipped cream into mascarpone mixture to lighten, then gently fold in remaining whipped cream until no white streaks remain. Set mascarpone mixture aside.

5. Assemble your lady fingers by soaking them first, one-by-one, into a 13 x 9 Pyrex. Grab one ladyfinger, drop and roll in the coffee/rum mixture for about two seconds. Do not let it get soggy! Because it will be sit overnight, it will continue to get very moist. In fact, by the third day of leftovers, it may be almost “too wet.” It’s just an excuse to eat it all right away.

6. For each ladyfinger you soak, you must put the cookie on the bottom of the Pyrex. You are making one layer with just soaked ladyfingers first. You may have to break some in half to fit perfectly for your individual pan.

7. Apply the first half of mascarpone mixture over ladyfingers; use rubber spatula to spread mixture to sides and into corners of dish and smooth surface. Place 2 tablespoons cocoa in fine-mesh strainer and dust cocoa over mascarpone or simply sprinkle it on. You can also sprinkle a little espresso powder for more oomph!

8. Repeat dipping and arrangement process of ladyfingers by placing the newly soaked ladyfingers on top of mascarpone mixture; spread remaining mascarpone mixture over ladyfingers and dust with remaining 1 1/2 tablespoons cocoa. Cover with plastic wrap and refrigerate overnight or at least 6-8 hours. Cut into pieces and serve chilled. Leftovers can be stored, tightly wrapped, in the refrigerator for up to 3 days.

Chicken Parmigiana with Homemade Plum Tomato Basil Sauce

Happy Valentine’s Day!

chickenparm

Sorry I am late in posting; between traveling by plane and catching up with last minute grading, I have been swamped!

I believe that Valentine’s Day is perfect for trying to impress your loved one; however, sometimes simple is best. My best friend’s (soon-to-be) husband loves chicken parmesan, and really wouldn’t be craving something gourmet or fancy. He has simple taste and there is nothing wrong with that. If anything, you should be glad. Your life is much easier knowing you don’t have to break the bank or that you don’t need to be particularly talented in cooking to make what he or she wants.

I, on the other hand, requested for Zach to make lobster tail, crab legs, and lamb. Valentine’s Day, and any other special, intimate occasion (such as an anniversary) requires you to know what your significant other desires. Whether this person has a simple palette, or an extremely expensive one does not matter. To show your love, you need to make something that will be impressive, but more importantly, thoughtful. Make a dish that shows that you were thinking of what he or she would love most. Impressive is not always expensive–it’s all about effort and thought. Period.

I made this chicken parmigiana (or parmesan for you non-Italian people) last night for my best friend, her fiancé, Zach, and me, but I figured it would be nice to share this for those of you who need last minute ideas to enjoy your Valentine’s Day in. You could alternatively go out to eat today, but as a former waitress, I can assure you that there is nothing worse than going out today. Your food will take forever to come out, the service will be subpar, and you might feel rushed by the massive amounts of people waiting for you and your honey to scoot. I say stay in for this day. Besides, nothing says love like effort, right? It could be equally romantic to eat-in, if not, more so. 🙂

Stay tuned for tomorow’s post! For those of you who are looking for the ultimate Italian dessert,  I will be posting my infamous tiramisu on Monday. Unfortunately, it is not a dessert you can make last minute; you need to make it the night before, but is absolutely divine! 🙂

The Sawwwwce

  • 1 (28 ounces) can whole tomatoes (Please try to get plum tomatoes–and if available, San Marzano!)
  • 1 {28 ounces) can diced tomatoes
  • 1 (28 ounces) can crushed tomato
  • 1 stick of butter
  • 1 yellow onion finely diced
  • 4 cloves of garlic, minced (use a garlic press if you have it!)
  • 12-18 leaves of fresh basil chiffonade
  • 1 tablespoon of dried oregano
  • 1 tablespoon of garlic powder
  • 1 tablespoon of onion powder
  • 1/2 tablespoon of crushed red pepper
  • 1/3 cup of sugar (do it in small increments! This is to counteract the bitterness of the tomatoes, but too much sugar isn’t good either!)
  • 1/2 cup of dry red wine
  1. Mince up your garlic cloves, and dice up your onion finely.
  2. In a large pot, pour some olive oil and sauté your onion. Stir around frequently.
  3. Once the onion becomes aromatic, add the garlic. DO NOT BURN THE GARLIC. It’s an Italian sin. Stir baby, stir!
  4. Now that the garlic and onion have been cooking together for about two minutes, add your half a cup of dry red wine and reduce for 3-5 minutes.
  5. Next, add your crushed tomatoes. Stir. As the sauce is bubbling, hand crush the tomatoes (whole tomatoes) so they are chunky, and add the diced tomatoes. As you stir, mush up the tomatoes (diced) with the back of a wooden spoon.
  6. Throw in all the spices (reserve the butter towards the end of the sauce process.)
  7. Leave the sauce to simmer on medium for at least an hour. The longer, the better.
  8. Towards the end, add sugar (small bits at a time) until the acidity is counteracted. Right before you’re about to fry the chicken at the end, add the butter and more fresh basil, if desired. Taste your sauce–always! Leave the sauce to simmer on low while you’re making the pasta and chicken.

The Pollo

  • 2 1/2 cups of Seasoned Italian Bread Crumbs
  • 6 skinless boneless chicken breast (buy them thinly sliced or pound them thinly!)
  • 3 large eggs
  • 1¼ cups all-purpose flour
  • 3 tablespoons of garlic powder (divided in two: 1 1/2 in seasoned breadcrumbs and 1 1/2 in with whisked eggs)
  • 1 tablespoon of salt
  • 1 tablespoon of pepper
  • 6  tablespoons extra-virgin olive oil, divided
  • 6 cups of my sauce, your sauce, or the jarred sauce (eep!)
  • 3 cups coarsely-grated, well-drained fresh water-packed mozzarella, divided
  • 1 cup freshly-grated Parmesan cheese, divided
  • 1 cup freshly-grated Pecorino Romano cheese, divided** (optional, but recommended)
  1. Pre-heat your oven 350 degrees, set up your dredging stations, and get your chicken out of the refrigerator.
  2. Place chicken breast halves between sheets of plastic wrap.  Using a meat mallet, pound chicken breasts to 1/3-inch thickness.  Alternatively, go to the butcher/grocery store and purchase chicken breasts that are thinly sliced. Sprinkle both sides of chicken with salt & pepper.
  3. Place flour in a large dish and add salt and pepper.  Whisk eggs to blend in a separate large dish. Add parmesan cheese and garlic powder to the eggs and whisk. Place breadcrumbs in yet another large dish.  Add more parmesan and garlic powder to the breadcrumbs. Coat each chicken breast with flour, then eggs, then breadcrumbs. Make sure you have a dry and a wet hand!
  4. Preheat oven to 350°F.  Heat 2 tablespoons of the olive oil and 1-2 tablespoons of butter in a large cast-iron or non-stick skillet over medium-high heat. (Make sure you use butter as that will counteract the high smoking point). Working in batches, add chicken to skillet and cook until browned (about 4 minutes per side, adding more butter as needed). Transfer chicken breasts to a platter, and drain the oil by placing a paper towel underneath (change the paper towel as needed.)
  5. Spread 1 cup of tomato sauce in the bottom of a large roasting dish (I used a 9 x 13). Arrange 1 layer of browned chicken breasts over the sauce.  Spoon 2 cups of sauce over that layer, or you may do what I do which is do about 1/3 cup of sauce per chicken cutlet. Sprinkle half of the mozzarella, Parmesan & Pecorino over.  Repeat with remaining chicken, sauce, mozzarella, Parmesan & Pecorino.
  6. Bake until cheeses melt and chicken is cooked through, about 30 minutes. If you are making pasta, now would be the time to boil water and make spaghetti (once the water boils, it takes about 10 minutes.) Make sure you stir your pasta and make salty, salty water for the pasta!) Drain and add a few ladles of your sauce.
  7. Serve the spaghetti with sauce on a plate. Throw some grated cheese on top. Next, put the chicken parmigiana cutlet on top. Add more grated cheese (you get the idea). Eat immediately and enjoy!


Spinach Ricotta Lasagna Cupcakes

spinachcupcakes

Happy Monday!

Did you make my tortellini filling last week and find yourself in a similar conundrum to me? You know, you made so much that you could start an assembly line akin to the Model T? If you made the tortellinis and also had leftover Won Ton Wrappers, then this is the recipe for you! Even if you have no idea what recipe I am talking about, make these cupcakes; they are two-three bite lasagnas that are too cute and tasty to pass up.

Leftovers are often boring; instead, you should look to repurpose your ingredients. Create last night’s extra ingredients into something else you would not expect. Surprise yourself, or if you’re too nervous, troll through Pinterest and hope you find something worth while.

Speaking of inspiration, you may want to consider this for the Hallmark holiday that is embarking. As Valentine’s Day is around the corner, I really think this would be a great recipe to make for your loved one. Nothing says love like lasagna. The problem is that lasagna isn’t really an intimate dish; when you make lasagna, it’s usually to feed a family…and then some.

This recipe can be made as fast or as slowly as you want; if you have a tomato sauce on hand and a filling created, you can assemble your cupcakes in about five minutes, and you only need to bake them for about 10-12 minutes; dinner could be ready in less than a half an hour. If you’re feeling ambitious and want to make an elaborate sauce/filling, go for it. I promise you that it will still be easier than traditional lasagna. This is a great weeknight recipe for its speed, and it’s a great special occasion recipe (I think particularly for an appetizer) because of its elegant presentation (that takes no creativity at all!)

This recipe makes intimate, individual lasagna cupcakes for you and your honey bun. Now, I will not sell this recipe as equivalent to its homely counterpart. It is certainly not as hearty and hefty in its layers.  The recipe I am providing is meatless for you vegetarians out there unlike a typical lasagna that has crumbled sausage and/or ground beef. Feel free, however, to change the filling so it can resemble Garfield’s guilty pleasure. 🙂 And if you’re still dieting from the holidays, you’ll be happy to know that these bad-boys are fairly good calorically; these lasagna cupcakes fare at about 180 calories a piece. These are practically guiltless so you eat all the chocolate you want!

One day, when I am looking for that Sunday project, I will post a recipe for my family’s tried and true family-style lasagna.

Stay tuned–P.S: I will be going Italian the rest of the week: Chicken Parmigiana with Homemade Plum Tomato Basil Sauce and Kahlua and Bacardi Tiramisu (my absolute favorite recipe of Tiramisu; I almost don’t want to tell you about it 🙂 )

Spinach Ricotta Filling

  • 12 ounces Whole Milk Ricotta
  • 1-1/2 cup Freshly Grated Parmigiana (I always add more!)
  • 1/2-3/4 cup of Finely Shredded Mozzarella
  • 1 whole Egg
  • Salt and Pepper to your taste
  • Pinch of nutmeg (optional, but recommended)
  • 3-4 cups of arugula or spinach (your choice! you can do it without leafy greens)
  • 3-4 cloves of garlic** (only if you are sautéing spinach or arugula; I prefer spinach of the two for the filling)
  • 3 tablespoons of parsley and/or basil (mixed is fabulous: and fresh is best!)

Spinach Ricotta Filling Instructions…

  1. In a pan, heat up 1-2 tablespoons of Extra Virgin Olive Oil.
  2. Mince some garlic (3-4 cloves) and put in the pan that has olive oil.
  3. Throw in spinach (handfuls at a time) until it wilts. Repeat until all spinach is incorporated. Be sure to be stirring often so garlic doesn’t burn.
  4. Put spinach aside and give it about 5-10 minutes for cooling.
  5. Next, get a large mixing bowl. Take ricotta out of the container and add the cheeses. Stir.
  6. Next, throw in the sautéed spinach and mix. Next, beat one egg and throw into mixture.
  7. Mix well. Taste a small bit and add salt and pepper to taste. Throw in nutmeg, if desired.

Quick Meat Filling

  • 1 tablespoon olive oil
  • 2 Italian sausage links, casing removed
  • 1 cup marinara sauce, homemade, or store-bought
  • 1 1/2 cups ricotta cheese
  • Kosher salt and freshly ground black pepper, to taste
  • 2 tablespoons chopped fresh parsley leaves

Quick Meat Filling Instructions…

  • Heat olive oil in a large stockpot or Dutch oven over medium heat. Add Italian sausage and cook until browned, about 3-5 minutes, making sure to crumble the sausage as it cooks; drain excess fat and stir in marinara sauce.
  • Season ricotta cheese with salt, pepper, and parsley to taste.  I would also add grated parmigiana cheese (about 1/2 cup.) Nutmeg works nicely here as well (very sparingly.)

Speed Demons (use in both recipes)

  • 24 2-inch won ton wrappers (I use the round Gyoza wrappers)
  • 1 1/2 cups shredded mozzarella cheese
  • 1/2 cup of grated parmigiana cheese
  • Optional: Fresh/frozen basil and/or flat-leaf Italian parsley (approximately a teaspoon per cupcake)

All Together Now

  • Preheat oven to 375 degrees. Lightly oil a 12-cup standard muffin tin or coat with nonstick spray like Pam.
  • Create your choice of filling (see above.) Keep this aside.
  • Fit wonton wrappers into each of the 12 muffin tins, pressing carefully to make sure there is an opening in the center. Fill each cup with 1 tablespoon ricotta cheese. Top with 1 tablespoon marinara mixture and 1 tablespoon mozzarella cheese; repeat with one more layer.
  • Place into oven and bake for 10-12 minutes, or until the cheese has melted and the wonton wrappers are golden brown.
  • If available, place chiffonade basil on top while the cupcakes are cooling. This will add last minute flavor. Alternatively, if you have frozen basil, you could add a small amount to each cupcake. Additionally, sprinkle with some grated parmigiana to cover the top layer.
  • Serve immediately, garnished with some parsley, if desired (or just basil is fine–you need something green.)

Note: Do not reheat these; the won-ton wrapper gets soggy, so this must be eaten immediately and not wait the next day! If you want something sturdier, you can alternatively purchase a no-bake lasagna noodle and invert one noodle vertically around the inside of the cupcake for support of the filling.


Yellow Curry Shrimp with Garam Masala Spiced Coconut Milk

YELLOWCURRY.jpg

Happy Saturday!

Zach told me I had to make something Indian last night. I haven’t been feeling well and didn’t necessarily want to be a slave at the stove last night. How did I meet in the middle? I made my yellow curry in a hurry!

What make this so simple is that I am cooking shrimp as my protein; feel free to substitute chicken or another light fish, but shrimp complements this dish well and cooks in approximately 3 minutes.

This dish does not require anything absurdly obscure to make delicious. Yes, I used good ol’ fashioned McCormick curry powder; nothing “authentic” or specific to make you feel discouraged from making this. The optional ingredients here you may have handy, or you may not, but don’t feel the need to go out of your way. To make the sauce, you essential need curry powder, sautéed onion and garlic, honey, hot sauce, and coconut milk. These are all what you may already have or very accessible. The prep time is minimal, and the taste is fabulous. From start to finish, you could have dinner done in 20 minutes. Because my post is all about speed, I will stop writing about how wonderful it is and let you get to it! 🙂

In a Flash

  • 2 tablespoons butter or olive oil
  • 1 1/2 pound peeled and deveined shrimp (shoot for larger shrimp for maximum flavor)** (also they could be frozen)
  • 1 whole medium yellow onion diced finely
  • 4 cloves of garlic, minced
  • 1-2 tablespoons of minced/finely grated ginger root
  • 1 tablespoon or more of curry powder (to taste)
  • 1-2 teaspoons of Garam Masala (optional, but I love it!)
  • 1 can of coconut milk (make sure it’s full fat and from a can–you need the thick consistency)
  • 2 tablespoons of honey (but probably if you like sweeter curries)
  • 1/4 teaspoon Kosher salt (or more)
  • 1/4 teaspoon of freshly cracked pepper (or more)
  • 1 -2 teaspoon(s) of red pepper flakes (to taste)
  • 1 bag of frozen broccoli florets** (you can use any green vegetable you like such as peas, but I like the florets with the sauce)
  • 1 lime juiced (optional, but I like it!)
  • 1 tablespoon or so of Sriracha or any other hot sauce
  • 12 whole basil leaves chiffonade (sliced thinly into ribbons)
  • 2 cups Basmati rice (any rice is fine, but basmati screams Indian!)

The Need for Speed

  1. First, get a cold bowl of water and put frozen shrimp in the bowl. If desired, add some salt to water. This is a great way to thaw the shrimp will retaining tenderness through a light brine. In the meantime, measure out two cups of Basmati rice and cook to directions (usually a 1:2 ratio) with salt and butter (or olive oil).
  2. Meanwhile, do your prep: diced your onion finely and mince garlic and ginger.
  3. Heat up a pan with olive oil or butter on medium high heat. Cook the shrimp about 2 minutes or so until they turn pink and are no longer translucent. Make sure you don’t overcook the shrimp! Put the shrimp aside on a plate while you prepare the sauce in the same pan.
  4. Next, add the diced onions and sauté for a few minutes. Add about a tablespoon or so of water to the pan to make the onions extra soft. Repeat as necessary (but do not add too much water!) Next, add the ginger and stir around for a minute. Lastly, add the garlic (do not burn the garlic.)
  5. Once all of the aromatics are in the pan, throw curry powder on them and stir. Cook for a minute, and then open up a can of coconut milk. Stir around to incorporate everything. Turn the heat up on the stove to medium high to let the sauce bubble up. Once the sauce is heated through, put on a lower setting. While the sauce is cooling slightly, heat up frozen microwave to directions (I did about 3 minutes). Throw shrimp and broccoli into the sauce.
  6. Stir into your sauce chiffonaded basil, honey, squeeze lime, Sriracha sauce, salt, pepper, and red pepper flakes. Stir around and adjust seasonings to taste. Right before serving, add optional Garam Masala (if you add it too early, it will lose all flavor so make sure you do it at the end.)
  7. Add rice to the bottom of a bowl and pour on top the sauce and shrimp. devour immediately.

Hoisin Sesame Beef Lettuce Wraps with White Rice and Sriracha Cream

hoisin

Happy Monday!

Often times, people ask me how I manage to cook after teaching all day. Like anything else, it’s all about priorities. How do people make it to the gym in the morning? (I’ll never know.) Cooking and blogging are my hobbies and I am dedicated, but even I get tired and unmotivated…

Today is a good post for three reasons:

1.) It’s low-carb for my dieting audience; it’s practically guilt-free.

2.) Dinner in a flash: it is truly a 15 minute meal.

3.) It’s cheaper and tastier than take-out (so long as you have Asian staples in your pantry!)

For some reason, I have been craving lettuce wraps. I know it sounds ridiculous; it’s not fried or fat-laden. Maybe I am secretly feeling guilty about all my pasta creations. I seriously ate tortellini almost every day last week, and believe it or not, I am actually tired of it. Lettuce wraps are very light without feeling boring or tasteless. Now I hate to be a pain, but you really can’t just use any lettuce you have laying around. You need a sturdy lettuce in the butter lettuce family: Bibb, Butter, or Boston lettuce works just fine. If you use any other lettuce, it may not be able to withhold the filling.

Many different regions of Asia offer a slightly different take of the lettuce wrap. In particular, different proteins are incorporated. I’ve had chicken, duck, shrimp, beef, and pork in my lettuce wraps. In Korea, bulgogi-marinated chicken is trendy, and probably some brine-filled kimchi on top. They’re also not called “lettuce wraps” but rather are called Ssam or Bossam (popular varieties). Ssam looks like a typo to us Anglo-speaking Americans, eh? 🙂 There is usually some sort of combination of textures to compliment the meat, such as a purple shredded cabbage, shredded carrots, nuts, green onions, etc.

Depending which region of Asia I want to channel will determine what I put in my wrap; for example, if I want Thai, I’ll add some sweet chiles, shrimp, and peanut sauce. Today, I was craving Korean and Chinese, and the answer to my craving is this: use Hoisin sauce. Hoisin is technically Chinese, but to me, it’s perfect for a base of a Korean BBQ Style sauce.

If you don’t already have Hoisin sauce, go get it. It is great sweet and sour Asian BBQ. There are so many intense flavors that a very little bit goes a long way. I like to use Hoisin for my favorite Sticky Garlic Chicken…delicious.

The Sriracha Cream sauce is optional, but I think it really compliments the Hoisin sweet and sour profile well. These wraps are addicting as there is a balance of spice from the Sriracha and red pepper flake, sweetness from the honey and Hoisin, and coolness from the lettuce and the sour cream.

Dieters, time-crunchers, and take-out lovers rejoice for this deliciously easy 15 minute dinner. Feel free to make substitutions and additions; make this wrap yours. Enjoy!

Gym Rats

  • 1 pound ground beef (I prefer 80:20 or 85:15 fat ratio, otherwise, you’ll need a bit of oil)
  • 2 -inch piece ginger, peeled and finely grated
  • 2 scallions/green onions, chopped** (I ran out today, so this is optional)
  • 2 cloves garlic, minced
  • 2 tablespoons soy sauce
  • 1 tablespoon of sesame oil
  • 1 tablespoon of honey
  • 1 teaspoon red pepper flakes
  • 1/4 cup hoisin sauce
  • 1/4 cup of sesame seeds (toasted, if available)
  • Salt and freshly ground black pepper
  • 1 head Boston, Bibb, or Butter lettuce; leaves separated, cleaned and dried
  • 1/4 cup of Sriracha sauce (you could make more or less depending on your needs; make sure it’s equal to the amount of sour cream/mayo for heat)
  • 1/4 cup of Sour Cream (you may use mayonnaise if you want, but I never have it around. I hate it!)
  • 1 cup of white rice

The Circuit 

  1. Start the beef: In a skillet over medium-high heat, sauté beef until brown.
  2. Prep: While your beef is cooking, prep your ginger, scallions, and garlic. Also, make your sauce (if desired). Mix equal parts of Sriracha and sour cream (or mayo–you need a creamy consistency.) If you rather there be less heat, add more cream and less Sriracha. If you rather there be more spice, add more Sriracha and less sour cream.
  3. Make the rice: In a separate pot, portion out one cup of rice to two cups of water on high heat. Once the water is boiling, cover the pot and do not open for 10-15 minutes. Be sure to drop the heat to low once you put the lid on (that makes my rice perfect every time.)
  4. Back to the beef: Stir in ginger, scallions, garlic, soy sauce, red pepper flakes, and hoisin and cook for 1 minute. Remove from the heat and stir in the sesame seeds. Season with salt and pepper (taste first: Hoisin and soy sauce are salty!).
  5. All together: Once meat and rice are cooked, pull a lettuce leaf for each serving. Put rice on the leaf first, then top it with the beef. Feel free to add the green onions/scallions and other toppings of your choice (shredded purple cabbage, shredded carrots, peanuts, etc.) Wrap it tightly like a mini-burrito and enjoy! 🙂


Tortellini Two Ways: Brown Butter Sage Sauce and Béchamel, Ham, and Peas

tortellinitwowaysHappy Saturday! Today’s post is about making your own pasta filling and quick sauces without breaking the bank or being boring. I have a few tricks up my sleeve to help foster creativity and prevent wallet rupture. 🙂

In my previous pasta posts, I talked about Alfredo, pesto, and ya-ya. Those are all delicious creamy sauces. When I want a creamy sauce, I am a sucker for all of the sauces listed above and vodka sauce. The problem with Alfredo, pesto, ya-ya, and vodka sauce is that they all require heavy cream. Heavy cream is not something I always have in my refrigerator, although I probably should! It can be pricey, and if I buy it, I often waste it; it expires quickly and isn’t something I use every day. What do I do if I want something creamy without running to the grocery store? I go for a béchamel. A béchamel is a white roux (equal parts of milk, flour, and butter); it is just and rich and decadent.

Let’s tweak the scenario that was listed before: I want something delicious, but I only want to use what I have on hand without making a special trip to the grocery store. What do I do then? I go for a brown butter sauce. As the name implies, all you need is butter and time: you let the butter brown over a consistent heat. It’s fabulous, and only more complex when heightened with sage. Sage is one of my favorite spices to use in cooking; it’s not implemented enough, and has such a unique, earthy profile. The marriage of sage and brown butter is simply perfect.

Making pasta is a lot of fun…for a rainy day. It’s very hands-on, which I love, but it’s definitely not something I can whip up quickly. The dough is simply pantry ingredients (flour, olive oil, salt, water, egg yolks), but getting the dough portioned and flattened is a pain. Pasta making can be finicky even for the most experienced. So here’s my secret weapon: Won Ton Wrappers.

For those who know me, I love Asian food and making my own: I am a sucker for any kind of dumpling (potsticker, shame, wonton), so I always have Won Top/Gyoza wrappers around. They are perfectly portioned and cost effective (about $2.00 for 52 pieces). But what many people may not realize is that a won ton and pasta are made of the same ingredients; therefore, when you are in the mood for something Italian, repurpose those wrappers and turn them into ravioli and tortellinis. You won’t regret buying a few. P.S: You can freeze these, so buy as many as you can so you’re always well-stocked. 🙂

The only bit of work that is required today is shaping the tortellini. I can say that you’ll get nicer edges with the square wonton wrapper, but if all you have is a Gyoza wrappers (the round ones), you will have a slightly less traditional looking tortellini. Don’t worry; it will be equally delicious! And if all else fails and all tutorials are useless, feel free to change dinner to Raviolis with Brown Butter Sage Sauce or Raviolis with Béchamel, Ham, and Peas. 😉

Whichever sauce or filled-pasta you choose, you will do no wrong. Go get ’em, tiger!

Basic Tortellini/Ravioli with Ricotta Filling 

  • 12 ounces Whole Milk Ricotta
  • 1-1/2 cup Freshly Grated Parmigiana (I always add more!)
  • 1/2-3/4 cup of Finely Shredded Mozzarella
  • 1 whole Egg
  • Salt and Pepper to your taste
  • Pinch of nutmeg (optional, but recommended)
  • 3-4 cups of arugula or spinach (your choice! you can do it without leafy greens)
  • 3-4 cloves of garlic** (only if you are sautéing spinach or arugula; I prefer spinach of the two for the filling)
  • 3 tablespoons of parsley and/or basil (mixed is fabulous: and fresh is best!)
  • 1 Tablespoon Olive Oil
  • 24-30 whole Wonton Wrappers

Make the Filling

  1. In a pan, heat up 1-2 tablespoons of Extra Virgin Olive Oil.
  2. Mince some garlic (3-4 cloves) and put in the pan that has olive oil.
  3. Throw in spinach (handfuls at a time) until it wilts. Repeat until all spinach is incorporated. Be sure to be stirring often so garlic doesn’t burn.
  4. Put spinach aside and give it about 5-10 minutes for cooling.
  5. Next, get a large mixing bowl. Take ricotta out of the container and add the cheeses. Stir.
  6. Next, throw in the sautéed spinach and mix. Next, beat one egg and throw into mixture.
  7. Mix well. Taste a small bit and add salt and pepper to taste. Throw in nutmeg, if desired.

Assemble the Pasta (Original Way)

  1. Place one wonton wrapper on a floured work surface.
  2. Use your fingers or a brush to moisten 2 adjoining sides of the wrapper.
  3. Place a little more than a teaspoon of filling in the corner opposite the moistened sides.
  4. Fold the moistened half of the wrapper to cover the other.
  5. Use your fingers to remove as much air as possible while pressing to seal the edges.
  6. Use a fork’s tines to press and further seal the 2 sides.

You now have a ravioli. Want to take it to the next level? Make a tortellini:

  1. Use you finger to make an indentation in the middle of the filling pushing up.
  2. Bring the two opposing corners together, moisten one, and press together to seal.
  3. Bend backwards the remaining corner.
  4. Please seal everything
  5. Reserve on a separate plate for later cooking or freezing.
  6. When ready to cook, get a pot of water salted and boiled. Pasta takes 3-5 minutes to cook; you’ll know they are ready when they begin to float on top.

Assemble the Pasta (New, Easy Way)

In the production of this post, I found an easy way to create a tortellini. <–silly video demonstration is here.

  1. With a Gyoza/Potsticker wrapper (round not square), put half a teaspoon of filling on the edge, not the middle. You do not want to overfill.
  2. Wet your finger lightly and circle the outer edge of the potsticker wrapper. This is how you will seal the filling on the inside–no egg wash is necessary!
  3. Slowly roll the potsticker until it looks like a skinny log.
  4. Once you have a log, bend both ends and try to seal them
  5. Pinch the one end onto the other to make a ring.

Pick Your Sauce…or do both.

Brown Butter Sage Sauce

  • 8-10 fresh sage leaves, chiffoned (sliced thinly) or 2 teaspoons dried sage
  • 6-8 tablespoons of butter (depends how much pasta you’re making)
  1. Melt the butter in a large skillet over high heat.
  2. Cook, stirring, until the butter develops brown flecks and smells nutty.
  3. Watch it closely to keep the butter solids from burning. Remove from the heat and add sage.
  4. Stir and place on top of freshly prepared pasta and eat immediately.

Béchamel, Ham, and Peas Sauce

  • 1 stick unsalted butter (4 ounces)
  • 2-3 cloves of minced garlic (optional, but interesting!)
  • 1/2 cup and 2 tablespoons all-purpose flour
  • 1 quart whole milk, at room temperature
  • Pinch fresh nutmeg
  • Salt and white pepper* (Black pepper is fine, too)
  • 1 cup grated fontina or parmigiana
  • 1/2 of pound of ham, diced or for a more delicate palate, thinly sliced prosciutto julienned
  • 3 tablespoons unsalted butter, diced
  • 1 cup of frozen peas (or more to taste–I love peas!)
  1. In a 2 quart saucepan, melt the butter over medium heat. Add minced garlic and stir, if desired. Add the flour and whisk until smooth, about 2 minutes.
  2. Always stirring, gradually add the milk and continue to whisk until the sauce is smooth and creamy.
  3. Simmer until it is thick enough to coat the back of a spoon. This will take approximately 10 minutes. Towards the end, throw in frozen peas (they don’t need much heat to cook)
  4. If the sauce is not thickening, lower the heat/remove from heat.
  5. Remove from heat and stir in nutmeg, 1/2 cup fontina, ham (or prosciutto) and season with salt and white pepper.


Beef Bourgnoine Pot Pie with Thyme

12540670_10205635552181311_1745134031796119099_n

Tonight, I am channeling my inner Julia Child; you know, the ultimate American chef who was largely inspired by France; she is the brilliant author of Mastering the Art of French Cooking. Many culinary masterminds of today revere Julia the same way I do; we bow down to her like she is a shrine. I don’t really believe in buying cookbooks in the modern era (we have Pinterest, blogs, Food Network), but if you’re looking for a worthy investment, buy Mastering the Art of French Cooking. Although her recipes are time-consuming, they are worth every minute of effort, and I have yet to make something of Julia’s that has ever failed.

My goal for this blog is to provide the same sort of confidence in my readers; I don’t want to intimidate readers with the concept of making fancy French food, but I would not really be able to feel like I am offering any true help if all I do is post recipes that are so simplistic that the meals yield tasteless results that barely qualify as “sustenance.” I really love French food, and I believe most people do love it too, but they may not realize that the very flavors that they love is inherently from France. Almost all mirepoix-based recipes (onions, celery, carrots), essentially anything garlic-based, and entirely anything that is braised/reduced from wine is French. Tonight’s dinner, Beef Bourgnoine Pot Pie with Thyme, does all of the above and is fancy without being snobby; it’s comforting without being complicated, and it’s a hybrid of hands on and hands off that this would be suffice for a wintery weekend project.

No, it’s not a “dump” dinner; there are no cans of condensed soup, and there are not any typical shortcuts, but you can use a Crock Pot (happy now?) or simply a dutch oven if you like. There is enough work in this to feel rewarding, and there is enough time waiting to watch a Netflix series or two.

So the classic Boeuf Bourguignon is a beef stew that is enhanced with time and a burgundy wine that is usually paired with noodles. Now as much as I love Julia Child’s Beouf (BOOOF: it’s funny to say, isn’t it?), it needs the carb of all carbs to heighten its deliciousness: A pie crust. Tell me what is better than a flaky, buttery pie crust? I am sure that there is nothing that is reigns supreme. I have always loved pot pie growing up, especially chicken pot pie (which, I will eventually post, but I am so tired of cooking chicken the past few weeks), but there is something about making beef the star of the show that makes this feel elegant and special. Again, this is a great recipe for a wintery night in, and it could be made for individuals (like I did through ramekins), or it could feed a family (like the size of an army). There is enough flexibility in this recipe that it can be romantic or practical: it’s your call. Although I am not offering too many shortcuts, I will offer alternatives in case you’re not feeling like giving it your all: the option for a slow cooker, vegetable swaps, slack on some ingredients, and already prepared pie crust. You can make this what you want, but you will not skimp on anything unless I tell you, okay? 😉

If you like Beef Pot Pie, but want to heighten flavor (or want to stop yourself from drinking too much red wine), this is the recipe for you. This is a slightly upscale and downright comforting pot pie that I hope you’ll enjoy for years to come. Bon appetit!

Tools and Ingrédients (did you know that the latter was a French word?)

Tools

  • Cast iron skillet* (or a regular frying pan is fine)
  • Slow cooker or dutch oven–your choice!
  • Tongs
  • Slotted spoon
  • Chef’s knife
  • Pastry brush
  • Ramekins/Pie plate (depends on whether you’re making for individuals or a crowd)

Ingrédients

  • Two strips of bacon** (optional–didn’t do it this time, but it would be awesome!)
  • 2-3 tablespoon extra virgin olive oil
  • 2-3 lbs lean stewing beef, cut into 2-inch cubes (I like Chuck Roast; it’s inexpensive and the perfect meat to cook low and slow)
  • 1-2 carrots, peeled and sliced (or diced)
  • 1 yellow onion, peeled and diced finely; alternatively, you could use a bunch of pearl onions so you don’t have to cut anything at all!
  • 4 red potatoes (or two full-sized potatoes of your choice: Yukon Gold would be good, too), diced
  • 1-2 cups of peas (less or more to taste–please don’t add until the end!)
  • 1 teaspoon salt for stew, general covering for meat (more to taste, but preferably sea salt)
  • 1⁄4 teaspoon pepper, general covering for meat, freshly ground (more to taste)
  • 2-3 tablespoons flour (more depending on thickness preference of gravy)
  • 3 cups dry, red wine (I used Pinot Noir, but typically you would use a full bodied wine like Bordeaux, Burgundy, or Chianti–make sure it’s good enough to drink, not cheap red wine)
  • 2 -3 cups beef stock
  • 1 tablespoon tomato paste (I didn’t have any, so I used some sauce because my sauce was thick enough)
  • 6 garlic cloves, mashed (you may choose to add more–I also roasted mine for a more mellow flavor, but that’s optional too)
  • 1-2 tablespoons of Dijon mustard
  • 1-2 cups of finely shredded Cheddar cheese** (optional, but it’s cheese–that’s your conscience)
  • 1-2 tablespoons of low-sodium soy sauce
  • 15-18 sprigs of fresh thyme (dried is not allowed; it doesn’t have the same effect)
  • 1-2 bay leaves preferably fresh (optional–I didn’t use it this time; just make sure you remove it before you serve the food!)
  • 1  prepared pie crust (your own, this awesome recipe, or refrigerated/Pillsbury goodness); you could use puff pastry as well!
  • 1 beaten egg (for egg wash on pie crust)

Mode d’emploi (or simply  say “directions”–yes, another French word–you know more than you thought! Oui!)

  1. Prepare all your vegetables (and meat if you are cubing before searing) before doing anything below! Slice and dice for bite size eating!
  2. Place a rack in lower third of oven; preheat to 400° (whether you are roasting garlic, using a dutch oven, or crock pot–you will either use the oven the whole time or part of the time!)
  3. Optional: put six cloves of garlic in aluminum foil and put half a tablespoon of olive oil. Wrap up cloves and roast in the oven for 40 minutes until golden yellow. Once garlic is done roasting, stuff into the crevices of the meat. Alternatively, you may skip this and use sliced garlic cloves that aren’t roasted and insert similarly.
  4. To begin searing the meat, heat olive oil in a large, heavy pot (dutch oven) or cast iron skillet (if using slow cooker) over medium-high.
  5. Season Chuck Roast liberally with salt and pepper. You may cut the roast in pieces now or later; I left it whole to get the equal coating, and then cut later. It doesn’t matter.
  6. If desired, add light amount of flour to beef and toss to coat; shake off excess.
  7. Working in batches as needed to avoid steaming meat, cook beef, turning often with tongs, until browned all over, 8–10 minutes per batch or 8-10 minutes per side (when not cut up and meat is left whole).
  8. Transfer to a plate. Make sure you have a sear–don’t lift the meat too early! It should be really cold and rare on the inside, but have a caramelized brown on the outside.  If you haven’t cut your meat yet, now is the time; cut it into 2 inch cubes, skimming off excessive fat.
  9. Optional (bacon is not required): Cook bacon in same pot, stirring often, until brown and crisp.
  10. Dutch Oven: After frying bacon (or not using bacon but just searing meat), add ¼ cup of red wine to deglaze the pan, scraping up browned bits, then add onion, potatoes, and carrots and cook, stirring occasionally, until vegetables start to soften, about 5 minutes. Once softened, add meat back into the dutch oven. Go watch an episode or two of your favorite show on Netflix.
  11. Slow Cooker:  After frying bacon (or not using bacon but just searing meat), add ¼ cup of red wine to deglaze the pan, scraping up browned bits, then throw deglazed liquid into a slow cooker that is turned on low.  After a brief sauce, add onion, potatoes, and carrots. After about a half an hour, add meat back into the slow cooker. In addition, take the leaves off of 10 thyme sprigs, soy sauce, tomato paste/sauce, and Dijon mustard. Stir all of the ingredients. Lastly, add the beef stock and rest of required red wine to cover.  Watch an entire season or two on Netflix.
  12. Cover pot and braise in oven until beef is very tender, 1½-2 hours if in a dutch oven. If using a slow cooker, the meat should be ready in about 6-8 hours on low–DO NOT USE THE HIGH SETTING–it will make the meat very tough! Low and slow, baby!
  13. Depending on your method, check on your meat (do not check too often as this will slow down the cooking process) and determine taste and gravy thickness. If you would like a thicker gravy, get equal parts of flour (1-2 tablespoons) and water and whisk. Add floury mixture to the pot and stir contents of the pot until you achieve your desired thickness of gravy. If your gravy is too thick, add more wine or beef stock to reclaim.
  14. Once your meat, vegetables, and potatoes are tender and tasty enough, get out ramekins (individual portions) or pie plate. Also, get our your pie crust from the refrigerator. If you’re using already prepared crust, microwave/thaw to your package’s directions.
  15. Once the puff pastry/pie crust is thawed and ready (and I hope your oven is still pre-heated and ready to go), turn your pie plate or ramekins upside down. Trace slightly outside of the shape in order to cut an appropriate pie portion. If you like, you can cut out shapes with the excess and design your pies.
  16. Put filling (about 3/4ths of the way) inside ramekins/pie plate. Add one sprig of more thyme leaves per individual portion (if using a ramekin, do one per ramekin, eight for a pie). After thyme is placed, throw in some frozen peas. Next add shredded cheddar cheese to coat the top of the mixture.
  17. Next, put pie crust on top with a slight overhang. If you cut too short, you can add an overhang with leftover pie crust.
  18. Crimp the pie crust edges, and use a fork to adhere. Once desired pie crust design is done, beat a single egg and use a pastry brush to egg-wash your pie crust. You need this to get it golden brown! Make sure you paint that whole pie golden yellow with egg wash!
  19. Bake until crust is deep golden brown, 30–35 minutes. Let pie cool for about 15-20 minutes before consuming.
  20. Be glad that you made this. P.S: Leftovers are even better; it’s a gift that keeps on giving! 🙂

Blueberry Crumb Cake with Streusel Topping

12401029_10205626593717355_4276957506519400865_n

Happy Friday! It seems to be that everyone I know is experiencing some sort of insane weather, so this might be the perfect recipe if you’re stuck inside like many of us are! I would also save this for a “rainy/snowy/icy day” because there are a lot of dishes involved (sorry), but not really any more fuss than that. I love recipes that involve one mixing bowl, but generally speaking, this rarely happens because of the importance of having wet and dry ingredients separated. What adds another “bowl” to your dish load is the cream cheese layer, which should justify the elbow grease!

I am not really one for rules, but with baking, I have to conform. Separate dry and wet ingredients, level when you measure (make sure your cup and a half is actually a cup and a half), and make sure that your butter and eggs are actually room temperature (for as long as possible–the longer they are authentically room temperature, the better the flavor!) Of course these rules are not only applicable to this baked good, but all of them. All the rules stress me out in baking, but the results are usually always perfect. Predictability is rather comforting.

Speaking of predictability, I had to improvise an oven situation for today because I used a new oven cleaner in my main oven, and when I turned it on, the solution did not come off as I thought it did and started to smoke and smell chemical-laden. Blah. I think I’ll stick to my old ways of oven cleaning. I figured that NH3 (ammonia) at 350 degrees would not really make my cake so delicious, so I turned on my toaster oven and pulled out the racks to make way for my crumb cake. I couldn’t believe that I had enough room in there to put in my springform pan! I was scared it wouldn’t cook evenly (what if my Black and Decker isn’t the right temperature?), but it all worked out fine. The recipe is infallible.

Going back to this cake in particular, it is technically a “coffee cake,” which is very misleading because there is no coffee in it. However, coffee is the perfect compliment, and if you’re a coffee lover, make sure you have your java ready to go. I like calling it a crumb cake because of the streusel topping. Normally, when I eat streusel topping, it’s overly sweet and overpowering. This cake and topping is not excessive in its sugar content which I think makes it great to eat any time of day (particularly, breakfast). There are blueberries in it which makes it antioxidant-filled and less guilty. So yes, even resolutionists can eat this cake with moderate ease.

Let’s get started!

The Usual Suspects

You’ll basically need a stick of butter, three eggs (one of which will be divided by egg yolk and egg white), sour cream,  cream cheese bar or Neufchâtel, vanilla extract, flour, baking soda, baking powder, salt, vanilla, blueberries (fresh or frozen). You have most of these within your pantry and refridgerator, and here’s a fun tip: get blueberries at the dollar store (yes, I have and they’re great for baking!)

Filling:
  • 8 oz. cream cheese-softened (if you’re feeling healthy like me (ha), you can use Neufchâtel cheese because there is less fat and no taste compromise)
  • ¼ cup sugar
  • 1 egg white
  • 1 cup blueberries (fresh or frozen)**(if frozen, please coat those suckers with flour so they don’t sink! Also, do not defrost blueberries!)
Cake Layer:
  • 1 ½ cups all-purpose flour
  • ½ teaspoon baking powder
  • ½ teaspoon baking soda
  • ¼ teaspoon salt
  • 5.5 Tablespoons unsalted butter- softened at room temperature
  • ½ cup sugar
  • 1 egg
  • 1 egg yolk
  • 1 teaspoon vanilla extract
  • ¾ cup sour cream
Streusel layer:
  • ⅓ cup sugar
  • ½ cup flour
  • 3 tablespoons butter-chilled and cubed (very, very cold!)
Start Your Engines 
  1. Preheat oven to 350F. Grease 8 or 9 inch springform pan; you may use parchment paper if you have it, but if you butter the bottom enough, you won’t need it. Make sure you grease the sides of the springform pan!
  2. Filling: Mix together the cream cheese/Neufchâtel and sugar on medium-low speed until creamy. Add egg white towards the end of the process; mix on low just to combine. (Please save the egg yolk from this for the cake batter!) You may add vanilla in here, if you wish (but it’s not necessary.) If you don’t have another mixer bowl, wash it out and put mixture aside in a separate bowl.
  3. Cake: In a bowl, begin your dry ingredients. Whisk together flour, baking powder, baking soda, salt, and set aside. With an electric mixer cream together the butter and sugar on medium-low speed until fluffy. Slowly add egg, egg yolk, and vanilla. Slowly mix in the flour mixture alternating with the sour cream carefully. Transfer the batter into the prepared pan and smooth with a spatula. Next, spread the cream cheese filling on top.  Coat blueberries (if frozen) in flour, and shake off excess (make sure it looks like they’re covered). Arrange blueberries onto cream cheese filling on top. You may add more than a cup of blueberries, if you wish. You could alternatively make a blueberry jam and spread it on for a twist, but the whole blueberries here are just fine.
  4. Streusel: Combine sugar, flour and chilled cubed butter in a bowl. Stir with a fork or pastry blender until the mixture is crumbly. I personally use my hand as I think the heat transfer and a gentle hand makes this process easier (I scrunch my hand and lightly use my thumb against my ring, middle, and pointer finger to crumble.) Make sure the streusel is in pea-sized crumbs. Sprinkle the streusel on top of blueberries.
  5. All together: Bake for 40-45 minutes until a cake tester inserted in the center comes out clean. Cool on a rack.  Once cooled, run a thin knife (butter knife) around the cake and loose ring of springform pan (if you buttered enough, this won’t be necessary.) Store in the refrigerator as it tastes better chilled. Serve with a cup of coffee, duh.

Navratan Korma (Vegetable Korma) and Jasmine Rice

12565405_10205605181862072_3872479665134238214_n

Happy Martin Luther King Day! I very much needed today off. And to help spread the word of peace as per MLK, I decided to think of the most peaceful country of all–India.

I love the flavor of Indian food; the problem lies, however, in its presentation: it looks like mushy baby food. It’s truly hard to get a wonderful presentation out of the saucy curries, but if you put looks aside, you’ll enjoy one of the most unique flavors known to the world. Another fear lies in that it can also be overwhelmingly spicy if one is not cautionary. Again, put your fears aside, and know that even the wussiest eater could indulge in certain dishes, particularly this one!

Often times people are afraid of Indian food; they rarely eat it out, and even more seldom, cook Indian at home. Honestly, the largest obstacle is getting the authentic ingredients. If you go on kicks like I do, you’ll eventually stock up enough spices to make every thing.

But in case you want Indian and you don’t want to invest like I have, today’s post is a popular dish with simple ingredients. I have seen recipes with even more authentic ingredients, but the issue is that it’s not very accessible even for the Indian spice hoarder like me.

No, I am not an Indian historian, but the little I do know I will tell–firstly, Navratan means “nine gems” and, if I’m not mistaken, korma is the cooking process, which is “braised.” Korma is not exclusive to Indian; for example, Turkey has their own version called “kavurma.” Countries within this region have variations of this curry with yogurt/cream sauce.  While we are not literally eating an array of rhinestones, the dish is loaded with assorted vegetables and possibly fruits.  In theory, you should have nine different vegetables and/or fruits. I will provide a suggested list in case you’re not feeling too daring.

Another reason I am posting this recipe is that there are very few rules; you can add whatever vegetables (even fruits) you have in your refrigerator and pantry.  Do not be afraid to make it your own. I will advise, however, that you eat Navratan Korma (or Chicken Korma) out at a reputable Indian restaurant to make sure you have some sort of reference point when making your own Korma. It’s always a good to be inspired!

To me, this dish is comparable to a beef stew (without the meat, but the meat is welcome–chicken is your friend here). It’s saucy and comforting to eat; similar to stew, it is best soaked up with a carbohydrate. This dish is excellent (and I will almost like to say it is required) with jasmine rice, and even more divine with garlic naan to mop up the sweet deliciousness. And while the consistency, appearance, and vegetables are akin to a “beef stew,” the flavors are simply distinct. There is this sweetness that comes from the Garam Masala, a purely Indian flavor. There is a creaminess from the coconut milk that is married with curry. The vegetables take on all the gold (as the color, if you’re not like me and put too much curry powder, could be a yellow) that this sauce has to offer.

Before I begin, I want to say there are some ingredients on my list that are not negotiable. I know, I told you I would be flexible, but without some of these, it’s no longer a korma. It might still be a curry, but it’s not a korma if you don’t have…

*Cashews

*Coconut Milk (you can use heavy cream, but more authentic approaches would be coconut milk)

*Garam Masala

*Curry Powder (I don’t care if its simply McCormick Curry Powder–it’ll work here! You need the yellow from the Tumeric)

Okay, simple enough? Here we go…

Non-Protesters

  • 1 1/2 tablespoons of Extra Virgin Olive Oil (or any other oil)
  • 1 small yellow onion, diced
  • 1 teaspoon of minced fresh ginger root (add more if you want)
  • 4 cloves of garlic, minced
  • 2 potatoes cubed ***
  • 4-8 ounces of tomato sauce (this depends on how much you’re making–you may need to add sauce as you go–I recommend the sauce you don’t need to open with a can so you can throw it back in the refrigerator)
  • 2 teaspoons of salt
  • 1 teaspoon of pepper
  • 2-3 tablespoons of curry powder
  • 2-3 tablespoons of garam masala
  • 1-2 tablespoons of white sugar
  • 1 cup of frozen peas ****
  • 4 carrots cubed ***
  • 1 can of canned corn***
  • 1 can of coconut milk (full fat if possible!)**You can also use heavy cream; it won’t hurt!
  • 1/4 cup of cashews, crushed finely (plus more whole)
  • 1 cup of Basmati rice

*** = you can leave out and substitute with whatever you want/have

Vegetables I highly recommend in addition to the ones above: green beans, broccoli, cauliflower, bell peppers (green, yellow, and/or red). I believe that peas, corns, and potatoes are very standard as well as cauliflower.

Fruits I recommend: I believe dried fruits are very authentic; often times golden raisins  are put in this dish by traditionalists; however, I did not have any so I threw in craisins (dried cranberries.) Also, diced pineapple can complement the dish and is used in some recipes! I would stick to dried fruits  and try to keep the fruits in similar taste profiles.

In addition to fruits and vegetables, you could certainly add chicken (or any other white meat); chicken korma is equally popular as Navratan Korma! 

A Peaceful Demonstration

  1. Heat the oil in a skillet over medium heat.
  2. Stir in the onion, and cook until tender. Tip: If your onions are taking a while to become translucent, throw a small (I mean a very little amount) of water to the pan with onions; the onions will sizzle and sweat faster!
  3. Once the onions are translucent, mix in ginger and garlic, and continue cooking 1 minute. You may add the curry powder at this point, if you wish. 
  4. While the onions are becoming aromatic, parboil (or microwave) your vegetables; at the very least, cook your potatoes!
  5. Also, either food process the cashews or mash up with a hammer in a plastic bag. They should be pulverized!
  6. Mix potatoes, carrots, cashews, and tomato sauce. Add sauce as needed (if vegetables are not well coated.) Season with salt and curry powder. Cook and stir 10 minutes, or until potatoes are tender. Leave mixture covered to 
  7. Meanwhile, measure out one cup of Basmati rice to two cups of water. Add a little bit of oil/butter and salt. Bring to a rolling boil, and immediately cover to release steam. Rice should be done in about ten minutes (make sure you take the heat down to low so you don’t burn your rice, and whatever you do, DO NOT OPEN THE LID.) Once the rice is almost finished steaming, throw in some frozen peas. Fluff rice with a fork and keep covered to stay warm.
  8. Going back to the sauce, stir in peas, corn, and cream (coconut milk) into the skillet. Reduce heat to low, cover, and simmer 10 minutes. The longer you simmer, the better. I recommend even putting this into a crock-pot if you would like to want until the next day, too.
  9. Before serving, throw in garam masala and sugar (garam masala should be saved towards the end as cooking can take away the flavor). Adjust seasonings to your taste. Sprinkle whole cashews, dried raisins, and other desired toppings.
  10. Serve rice with the Navratan Korma; you should also have garlic naan for the leftover sauce. Get those brownie points! 🙂