Charleston’s Cafes: Best Breakfast Joints in the Low Country

Happy Sunday,

Last weekend, I took an impromptu girl’s trip to Charleston, South Carolina. I am always enchanted by this city each time I go. There is always something to do, and there is always something good to eat! I could go on and on about where to eat dinner, but when I was searching some travel blogs, very few wrote about breakfast. I know that some hotels include your breakfast, but c’mon! You’re on vacation. Treat yourself like royalty!

The two places I am suggesting are not in historic downtown (sorry), but they are right over the Arthur Ravenel Jr. Bridge. They are very close to downtown, however! Interestingly, both of the places I love are in strip malls (looks are deceiving.) These joints have a blend of tourists and locals alike, and they clearly use the freshest, local ingredients. I go to both these places each time I go, and so should you!

Three Little Birds, 65 Windermere Blvd., Charleston, SC 29407

http://www.threelittlebirdscafe.com

IMG_7686

This place is where my friend Jen and I went first upon arriving to Charleston. Upon walking to this restaurant, you’ll see this unique ivy sprawled all around the front of the restaurant. The name, Three Little Birds, is likely an allusion to Bob Marley, and it has a very simple island vibe to it. This is the hipster/hippie’s paradise. They have mason jars (my weakness) and colorful coffee mugs with plates that are equally vibrant. Upon walking in, you’ll smell the freshly pressed juice (how rare is to find that these days?) and freshly ground coffee. Speaking of juice and coffee, please get both–the coffee is from a local vendor and is probably one of the least bitter coffees I have had (excessive cream and sugar not needed–it’s that good on its own), and the juice is refreshing and almost therapeutic.

Now let’s talk food! Last year, I had this “out of this world” Crab Cake Benedict; however, that was only a daily special for the time. I instead ordered the Sweet Potato Benedict which had Poached Eggs, Ham, and Hollandaise over Sweet Potato Biscuits with Cheese Grits. It only cost me $8.95, and boy did it satisfy. I will admit that I am partial to the special they had last year (that would be a 15/10), but as an aficionado of all foods with Hollandaise, I have to tip my hat off to Three Little birds again–it was spectacular. The eggs were perfectly poached and runny upon breaking their “love seal.” The ham was crisp but tender, and the homemade sweet potato biscuit was a great substitute for a tradition English muffin. The grits were good–the cheese were a bit thick of a shred for my taste, but once it melted in, it was great!

13138878_10206290822802667_4454136562039154453_n

Rating 9 out of 10

This is Jen’s breakfast, and she was very satisfied. Because she comes from California, I know that Jen is a good judge of fresh food. Jen is very used to eating local everything. Featured here is a daily special; it was a Scrambled Egg Burrito with Potatoes and Peppers with Fresh Salsa, Sour Cream, and fruit (strawberries and orange slices).

She was impressed with the whole dish, but she was especially impressed with the pressed seal of the burrito and the salsa. Sometimes, when you order any burrito out, it falls apart because it’s overstuffed and/or not wrapped properly. There was just the right amount of filling, and it was clearly pressed (similar to a panini) for the crisp texture of the tortilla on the outside as well as for maintaining all ingredients inside. She said this salsa she had (a regular item they have–don’t worry) was the best she has had since she has moved to the Carolinas. You know what that means–it competes with California! 🙂

13151778_10206290822762666_3873977049984390089_n

Rating 9 out of 10

**The next restaurant I am going to talk about I absolutely fell in love with last time; however, this time, there was definitely poor execution of our food (a few send backs on our behalf as well as others), but it does not mean I wouldn’t recommend this place. They had an off day, but once our food came back correctly, it was salvaged. Every place has its moments. I still recommend this place, but I am going to maintain integrity with my review. 🙂

Charleston’s Cafe, 1039 Johnnie Dodds Blvd., Mount Pleasant, SC 29464

www.charlestonscafe.com

cafe_edited_5-e1407771531297

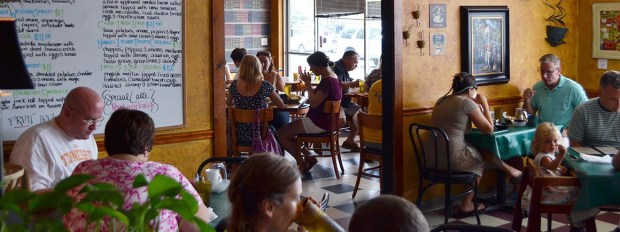
It sounds really tourist-y to go to a place in Charleston with a name like “Charleston’s Cafe.” It almost sounds like a trap, but I promise you, this place has impressed the locals as well. When we arrived here on our way out of Charleston, it was relatively early on a Sunday (around 9 am), and we had to wait about 25 minutes. You know a place is good when there’s a wait for breakfast. And you also know its good as the outside of this place is brandished with awards locally as well as reputable companies like TripAdvisor and Zagat.

Upon walking in, you’ll feel like you’re walking into a mom and pop’s place; it has a very inviting family feel to it. There are always specials on the white board that are intriguing, but I know when I come here just what I want—A DEEP FRIED CINNAMON ROLL. And it comes at a reasonable price to clog your arteries with delight; it’s only 5 bucks! I told Jen (as I was salivating) how much I was looking forward to eating this Cinnamon Roll. It was one of the best things, if not the best things I ever ate dessert wise.

13103546_10206290822522660_700713694593935152_n

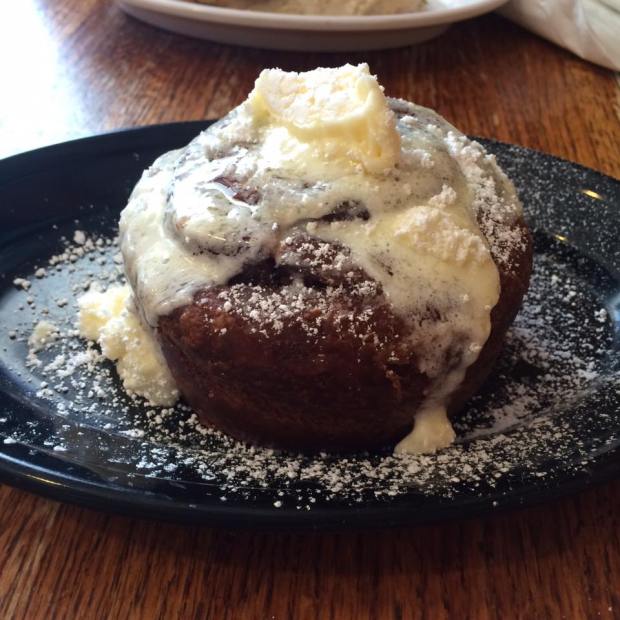
Everyone loves a cinnamon roll; it can only get exponentially better by its preparation method and its icing. It is deep fried, which is dangerous, but makes it crispy on the outside but extra warm and gooey on the inside. The melted butter/cream cheese icing maintains that authentic nostalgic taste of a cinnamon roll and distributes decadence to each and every bite.

I probably gave it too much hype; I know it was all I could talk about for the 15-20 minutes we had to wait for our food, but it had been an entire year without this delectable dessert, and I was needing it. Yes. Need. And so, I ordered breakfast but wanted to order one to go (I considered buying two), and Jen ordered one to eat for breakfast, and one to go home. Yes, it is worth it.

But unfortunately, this time we both had to send back our rolls because they were overfried the first time. As you can see in the picture, it is slightly overcooked; it should be a golden brown not–“oh crap! I left it in the fryer too long” brown. It definitely was still good, but we needed to send it back because I have absurdly high expectations for it. Once we had the new rolls, we were much happier.

I do require (yes–REQUIRE) you to order this if you are in the Charleston area. It will change your life…and maybe your pant size too, but it’s worth it!

On that note, before I stop talking about this cinnamon roll that I could never get tired of discussing–the cinnamon roll actually tastes better if you let it sit. Seriously! If you order it and eat it about an hour or two later, you’ll hit the money spot. The butter and cream cheese melts into the cinnamon roll and makes it so moist and flavorful. So if you grab it, try to wait. If you can’t wait (which I totally understand), have a bite or two freshly fried and then force yourself to put it away. Slap yourself out of it.

Rating (ordinarily) 10 out of 10. (Our experience initially would give it a 7 out of 10)

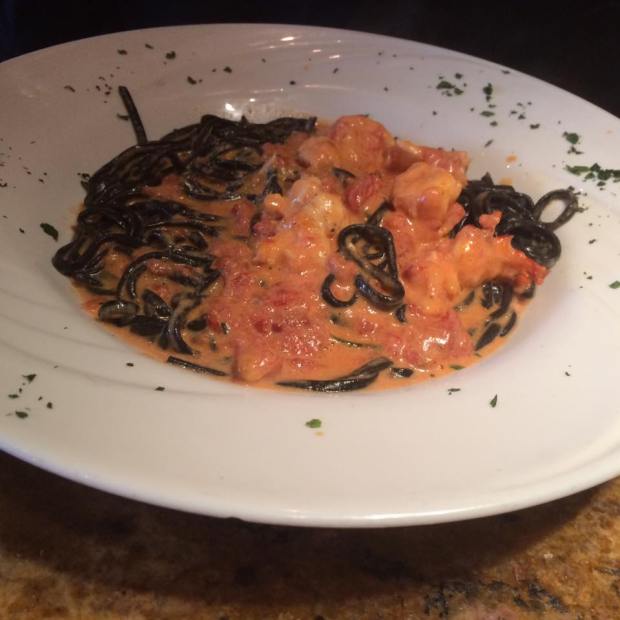
So to try to balance out my palate, I ordered the Amber’s Choice Benedict: It had crab cakes, shrimp, kiebasa, and delicious Hollandaise. I think I was on a Benedict kick this weekend! Anyway, I have to say that this was excellent. My favorite part of this was the kielbasa; it was perfectly crispy and was a great substitute for Canadian bacon. The Hollandaise was smooth and not too lemony, and the shrimp had a butter poached taste. The crab cakes were delicious; however, they were slightly salty. I noticed if I put the Hollandaise on the crab cake bite it would cut the saltiness, but it still needed a little bit of a cut back. Unfortunately, when I went to break my poached eggs, they were clearly soft boiled and had no runny yolk. I sent back my eggs (as so did a woman next to me), but once they brought me new eggs, this dish was a home run. Again, this place had poor execution today, but the flavors and quality are still totally there.

Rating 8.5 out of 10

13087409_10206290822442658_3273108224568967448_n

Go to Charleston today! And don’t be afraid of the strip malls; they have these great places that I am so glad that I found, and I am so glad I could share them with you!

🙂


Thyme and Rosemary T-Bone Steak with Potatoes and Broccoli

13000282_10206201178601618_8624191865594800461_n

Happy Saturday!

I don’t think there is a meal out there that is more satisfying than a steak. To be honest, I eat burgers more than I eat steaks, but when I do have a hunch for a steak, I just have to have it!

I have a fairly good amount of experience with steak and flavor combinations as I worked in a steakhouse as a waitress. I have had my share in making dry rubs, wet marinades, savory toppings like bleu cheese crumbles and caramelized onions. In addition, my father always had a keen sense for how steak should taste (he’s partial to Prime Rib).  Honestly, there isn’t much that is necessary for a delicious steak, but what will sure kill its flavor is overcooking it.

I apologize if I offend anyone, but you really should not be eating steak over medium rare. I love rare to medium rare (believe it or not–I range depending on the cut of steak!) I know that the blood for some people is too much, but really–eating carcinogenic charcoal is a lot more unnerving to me personally. To me, the flavor of the steak comes through when it’s prepared the proper way.

There are many cuts of steak I love to prepare, but I think one of the most romantic cuts (that is, a steak you can split for two), is a T-Bone steak. What I love about the T-Bone is that it’s two different steaks inside one. One half is a New York Strip and the other half is a Filet Mignon. The only problem with cooking a T-Bone steak is that the Filet Mignon, because it’s much smaller in proportion to the New York Strip, will naturally cook more quickly than its counterpart. This is only good is your significant other likes slightly more cooked meat and is partial to the Filet, but if you are sharing equally, you need to be thoughtful to how you prepare your steak with the challenges presented: two different meats, and a bone. Steak on the bone has definitely more flavor, but with the bone inside, the steak will be rarer near the bone and thus appear uneven.

I used to get really pissed off when customers would send a T-Bone back at my job; they would eat almost their entire steak, and then bam! They would cut near the bone and freak out when they saw a little blood. If only these patrons knew that the bone is blocking the distribution of heat hence the rarer inside. Ugh. At least now you know! Knowledge is power.

This meal is great if you are looking to cook a simple, romantic dinner for two.

I decided to make this mostly foolproof by using a few tricks…

1.) The steak is “reverse seared” which means it’s slow cooked in the oven for a short amount of time and THEN seared in a hot, cast iron skillet. Many times, people try to sear the outside first and then finish in the oven, but there is less consistency. If you want more control, this is the method for you.

2.) I used my microwave for my vegetables. Sue me. They taste wonderfully.

3.) Even though I use a few short cuts, I am ultimately using the freshest ingredients: the best meat I can find, fresh herbs versus dried (sorry!), and freshly cracked pepper and salt to form that wonderful crust.

Alright, enough talking. Let’s eat!

Ingredients

  • 1 1/2 pound T-Bone Steak (or any other steak of your choice)
  • 1 Steamable Potato Bag (go for petite potatoes or even red potatoes)
  • 1 Steamable Broccoli Bag
  • Four cloves of garlic
  • 2 tablespoons of olive oil
  • 1 tablespoon of Canola oil
  • 1 tablespoon of butter (salted or unsalted–your call)
  • Fresh thyme (at least 5 sprigs)
  • Fresh rosemary (at least two sprigs)
  • Freshly cracked salt and pepper (no table salt!)

Meat and Greet

  1. Take your steak out of the refrigerator so it comes to room temperature. Lay it out on a plate and add salt and pepper liberally. With a garlic press, smash four cloves of garlic and press them deeply into the steak.To infuse the steak with herby flavor, take off thyme leaves and rosemary leaves. You will remove these herbs before cooking.
  2. Preheat your oven to 250 degrees. Get a wire rack and baking sheet. Line the baking sheet with aluminum foil for easy clean up.
  3. While you’re waiting for the oven to pre-heat, make your potatoes. Get olive oil, thyme and rosemary leaves (about 1 sprig of each–more to taste) and rub them on all the potatoes before microwaving. Throw the potatoes in the microwave (it’s usually about 8 minutes) once they are all evenly coated. You may need to microwave them again to make them fork tender (about another 2-3 minutes.)
  4. Once the oven is pre-heated, put the seasoned steak on the rack (take off the herbs). Cook the steak in the oven (flipping mid way through) for about 30 minutes (could be more if the steak is really thick–look at it every 10-15 minutes to be careful!)
  5. Take the steak out and let it rest. In the meantime, heat up your cast iron skillet with 1 ounce of Canola oil (it has a high smoke point) on medium high heat.
  6. Once the skillet is hot enough, sear the steak on about 2-3 minutes per side until a crust forms (this will create a medium rare). Towards the end, melt 1 tablespoon of butter and throw in some whole thyme and rosemary sprigs for aromatics. Baste the steak in the melted butter. Remove the aromatics (the sprigs) after about two minutes.
  7. Let the steak rest. As the steak is resting on the rack, microwave your steamable broccoli. Once the broccoli is done (about 5 minutes), add salt and pepper.
  8. You may re-heat your potatoes in the microwave on a plate with leftover thyme/rosemary leaves, or you may crisp the potatoes up in the already hot cast iron skillet–your choice!
  9. Slice thinly to share, or you may split the Filet Migon from the New York Strip. Your choice! 🙂


Stuffed Porkchops with Jalapeño Popper Filling, Roasted Brussel Sprouts, and Petite Sweet Potatoes

12938287_10206132379921694_296138030822302642_n-2.jpg

Happy Tuesday!

I love jalapeño poppers…I don’t think I can ever get enough. It reminds me of a fiesta, football, and a fun time–each and every time.I actually don’t think I eat these enough. But when I do, I go crazy. I love the combination of moderate heat with the coolness of cream cheese. And to make matters better, they’re deep fried which almost guarantees perfection. I used to work at Texas Roadhouse as a waitress, and what I always loved most was when someone couldn’t handle the heat and sent back one of my favorite appetizers: “Snakebites.”

514.jpg

These were, contrary to popular belief, not made from actual snakes, and no–they have nothing to do with that awful liquor shot with Jack Daniels, Tequila, and Tabasco. These are the signature “jalapeño poppers” of Texas Roadhouse, and they are absolutely fabulous. They aren’t your typical whole jalapeño pepper stuffed with cheese; instead, snakebites are buttermilk dredged and fried cheese balls that are mixed with finely diced peppers (sweet bell peppers and jalapeño). I think the sweet peppers really complement the heat and flavor of the jalapeño without stealing the latter pepper’s limelight. They are absolutely perfect–be assured.

What we used to also do in the restaurant (please–if you go to Texas Roadhouse, do not ask them to do this for you because it is somewhat of a pain!) is order a custom early dine pork chop (hey–it was $8.99 between 4-6 and I got a 30% discount!). With this pork chop, I would want to “spice it up”, so I would butterfly the chop (if you are unfamiliar with the term simply means splitting it in half without fully cutting it) and add the snakebite filling inside. It is beyond delicious. I bet you it would be even better with a freshly fried “snakebite” on top too…ooh.

**Note: If you are not a pork chop fan, fear not! Some may think that pork too often dries out, but I assure you that if you prepare it well, you will change your mind. And if I am not going to convince you that pork chops can be made succulent and tasty, then at the very least make this filling for a stuffed grilled chicken breast, or maybe another protein of your choice. The options are endless, but I think chicken or pork would be best.

I haven’t had my custom pork chop in years, and I suddenly felt a need to re-create it again. I also knew that my freezer had a few lonely pork chops waiting to be defrosted. And when I want something, I will go to any length to have it. This recipe is cost efficient, tasty, and requires minimal effort. Go for the gold! Speaking of easy–my side dishes, the brussel sprouts and petite sweet potatoes, are cooked primarily in a microwave and you would never know the difference in taste–hey ho! For authentic caramelization on the brussel sprouts, however, I roasted them for ten minutes after cooking them in the microwave. Vegetables in those microwavable bags are your friends, people!

P.S: If you have extra filling, you may make your very own appetizer of “Snakebites” similar to Texas Roadhouse. Maybe I’ll post that later in the week…:) It’s always great to repurpose your ingredients! Let’s get started!

First–Yo’ Fiesta Filling for Yo’ Poppa’

Ingredients…

8 ounce package of cream cheese

1 cup of shredded Monterey Jack cheese

1 small, finely diced red bell pepper

1 small, finely diced yellow bell pepper

1 small, finely diced and deseeded jalapeño pepper

Directions: First, finely dice all the aforementioned peppers (really finely!) In a medium sized bowl, mix cream cheese, jack cheese, and peppers together. Make sure everything is well incorporated. Grab plastic wrap and form the cream cheese mixture into a log. Refrigerate immediately for later use.

Second–Get To The Choppa’

Ingredients…

1 package of pork chops (should be four in a package; I used boneless and centercut–preferably thick chops. You could alternatively get bone in chops–they are delicious too!)

1 bag of microwavable brussel sprouts** (Trader Joe’s makes an excellent product!)

1 bag of microwavable petite sweet potatoes**

4 tablespoons of olive oil, divided (some for pork, some for potatoes, some for brussel sprouts)

2 tablespoons of salt and pepper (more or less to taste) for pork and/or brussel sprouts

1 teaspoon of crushed red pepper (optional) for pork and/or brussel sprouts

**–only if you are making the side dishes

Start With Your Side Dishes: Brussel Sprouts and Petite Sweet Potatoes

  1. First, make your side dishes. Microwave your sweet potatoes first (they should take about eight minutes in the microwave.
  2. Before microwaving, coat the potatoes with olive oil in the microwavable –approximately two tablespoons. The sweet potatoes will not need any more preparation after being microwaved.
  3. Next, microwave the brussel sprouts (do not add any oil.) Let both items cool before handling.
  4. Pre-heat your oven (or toaster oven as brussel sprouts are small) so you can roast your brussel sprouts to enhance the caramelized flavor.
  5. On a small sheet pan, put a silicone liner or aluminum foil.
  6. Cut the ends of the brussel sprouts, and cut each sprout in half. Place halved brussel sprouts on the sheet pan.
  7. Drizzle olive oil, salt, pepper, and red pepper flake on brussel sprouts (about 1 tablespoon of olive oil–add more if you like, and about half a teaspoon of salt, pepper, and red pepper flake).
  8. Roast coated brussel sprouts in the oven for approximately 10-15 until caramelized and brown.

Finish Your Main Course: Jalapeño Popped Stuffed Pork Chop

  1. Start Your Base: Season your pork chop with remaining amounts of olive oil, salt, pepper, and red pepper flake (more or less to taste.)
  2. Begin to Butterfly: Place your left hand flat on the pork chop (if you’re right handed, vice versa for left handed) and using a sharp knife, butterfly the pork chop. Your opposite hand is essentially “sawing” the chop in half that it is split, but make sure you don’t cut all the way through and split the chop in two separate halves! If this is too difficult, you may grill the pork chops and put the filling on top, alternatively.
  3. Take the jalapeño mixture out of the refrigerator and portion about 1-2 ounces of the filling and stuff inside the pork chop.  DO NOT OVERFILL! IT WILL OOZE OUT. If you have cooking twine, you may tie the chop to keep the filling in, but this isn’t necessary.
  4. Heat up cast iron grill pan or outdoor grill. Make sure the grill is very hot!
  5. Once the grill is heated, please pork chop on grill. Make sure you get a nice brown sear and grill marks. You should cook each side about 5-6 minutes on each side (if appropriately thick, about 1 inch). Don’t forget to flip and make sure it has that great color!
  6. If you desire to use a food them orator, it should be done at 140 degrees Fahrenheit.)
  7. Reheat your side dishes lightly in the microwave and put on the plate with the pork chop. Devour immediately!


Restaurant Review: Sanducci’s Trattoria

bee51b0f-be31-4a1f-8925-317c6976a28a.jpg

Happy Thursday!

I apologize for not posting in a while; I haven’t had a minute to spare!

This week has been dedicated to wedding planning, and it is probably one of the most time consuming endeavors I have ever encountered. In addition, I have dividing my time seeing friends and family. I have been in New Jersey, New York, and Pennsylvania all this week (and sometimes, all three states in one day.) Even though I have been driving around like crazy, I am happy to be here to get my Italian/New York fixes.

Living in North Carolina for the past few months, I have missed out on a lot of great pasta, pizza, bagels (you know–the holy trinity of carbohydrates). While I am back “home,” I have to take advantage and eat them all–practically every day.

When I was visiting my friend Cassandra, author of Bottlesoup, she told me we should have lunch at her favorite local Italian restaurant called Sanducci’s Trattoria.

For me to review an Italian restaurant, it has to exceed my high expectations. As a native New Yorker, I did not need to go out often for Italian food growing up. It’s what my grandmother made, it’s what my mother made, and it’s obviously what I can do as well. I find myself disappointed often when I go out to eat for Italian–(except pizza: without the brick oven at home, the results can never be as good). There are a few gems, however, that are absolutely what I need from an Italian place: I need an upperscale interpretation of classic comfort Italian dishes with heightened complexity. This place can make what we all know and love but take it to the next level (all without totally breaking the bank: it’s a little bit more than going to your local pizzeria but less than going to a fine dining establishment.)  While I recommend this place, I will be honest about what I felt foot the bill, and what I could do without again…

Appetizer: Ginger Sesame Fried Calamari

This is definitely my favorite item here. I know what you’re thinking. Sesame and ginger are not Italian. But the way they fry the calamari is–it’s light and delicate, not rubbery or chewy. P.S: I am totally inspired to re-create this…

12932932_10206092381761765_6753725958021960775_n

Calamari must start with a flour based dredge; if you ever eat calamari with a heavy breading (breadcrumbs versus the latter mention of flour), move away. It is too light and delicate of a fish for all that! Also, calamari should always be lightly fried because if it is in oil too long, it will become greasy and tough to chew. This calamari clearly has perfect flour coating to get the crispiness necessary.

The sauce, like I said, un-Italian but rather Asian in its style, is absolutely delicious. It is a sweet chili base with hints of honey and red pepper flake (maybe some orange–that’s something I was sensing), and the sesame seeds really coordinate well with the crunch of the properly prepared calamari. The aroma is very floral and sweet from the glaze. The green onions also bring fresh, brightness to the dish by distributing just the lightest flavor of onion to the fish. By the way, if you want to sound like you’re an Italian New Yorker, say GAL-A-MAAAHD–the slang will give you some respect, or at least, will give you a laugh for a minute.

Rating: 10 out of 10

Soup: Pasta Fagioli

My favorite peasant food from Italy is Pasta Fagioli. I am obsessed with white beans (cannellini beans), and this soup is one of my favorite dishes my grandmother makes. But it’s not quite like my Nonna’s!

942547_10206092381561760_6317465968215179088_n

Pasta fagioli is a white bean soup; however, my grandmother always made it thick so it was more like a sauce for pasta. The way she makes it looks like vodka sauce versus liquid-y soup like this. So of course, there is a bias there, but I will happily give it a go.

I tasted the garlic notes and the broth had the right amount of seasoning herb wise, but I believe it fell short on the parmesan. I needed to add the cheese to take it to a new height, or at the very least, what I expect pasta fagioli to do for me. The onion notes in the soup were present, and it was good–but again–it needed the cheese! If you order this, make sure you put copious amount of cheese because the parmesan base is missing here.

Rating: 7.5 out of 10

Entree: Penne alla Vodka

The way to test an Italian restaurant is to eat a popular dish and see how it is prepared. The sauce was cheesy and creamy as expected; however, the meat (prosciutto) was a bit too large for the delicate pasta. This was very flavorful with a minor execution error.

12933153_10206092381441757_1353599105885798210_n

The tomato-y, creamy-base was very flavorful with the ham profile in the sauce. There was a balance of spice that was countered with the coolness from the area, without overwhelming the sauce. My only complaint of this dish is that the prosciutto was chunked almost like a piece of sausage. Prosciutto, dried, cured Italian ham, is an excellent complement to vodka sauce, but should be used sparingly. Thinly sliced prosciutto is better suited here. I also think more green would have made this great; I like vodka sauce with green peas!

Rating: 8.5 out of 10

Entree: Homemade Black Linguini with Chunks of Brazilian Lobster Tails in Pink Cognac Sauce

The last test of a good Italian restaurant is to see what they do beyond the expected–again, heightened complexity. This is Cassandra’s “go-to” that she orders often. As opposed to a typical “vodka sauce,” this blush rosa sauce is made with cognac which adds a touch of class and refinement. 

10390893_10206092381081748_8087021238209292961_n

This is one of those dishes you see on a menu and say, “Ooh–that sounds interesting!” One of the privileges that people should take advantage of when they go out to eat is to try something they could not readily make at home. Although making pasta isn’t necessarily difficult, fresh pasta should always be commended as it makes a world of difference for taste.

This pasta in particular is black in color; if this is off-putting to you, be comforted with the reason as to why: it is made this color from squid ink. Oh, you don’t like squid? If you like calamari, you like squid! The pasta has a very modern appearance when black–it does not look nor taste conventional. Although not overpowering, there is a slight seafood flavor that comes from the squid’s ink that is perfectly appropriate in this dish.

The sauce, because it has a cognac base, has a slight sweetness that pairs well with the tomato cream sauce. If you like vodka sauce, but want to kick it up a notch, this is the sauce for you to try. Cognac and lobster are the two ingredients that make this pasta become eligible as First Class. Brazilian lobster, when prepared properly, is excellent and succulent (I personally love Maine Lobster better as it is sweeter).

Cassandra mentioned that this dish usually has better lobster (she felt it was slightly overcooked the day we tried it); however, I could see how this dish is a favorite of hers, and how I will definitely look to order it again when I am back in Bergen county! This is Italian elegance with modern flair–a perfect, romantic meal.

Rating: 9 out of 10

Mongolian Beef Noodles

Mongolian Beef Noodles.jpg

Happy Sunday!

I go on kicks each and every time I eat something amazing. I’ll eat sushi, and I will want it for a week straight. I have lasagna one day, and I’ll want ricotta for years. I become obsessive, and I’ll fall in love so deeply in that moment.

It kind of reminds me of teenaged infatuation; I have my “flavor of the week,” but eventually get over it and find something better. 🙂

Today, I had absolutely no inspiration whatsoever. I also knew I had to blog this weekend–eep. I decided that I needed to, after spending an hour in the grocery store roaming, just make something quick and delicious–and bam–I thought about making Mongolian Beef Noodles.

Stir frying is my go-to weeknight strategy because everything cooks so quickly. It’s also great for when I have a temptation to call for some take-out Chinese. I think that many people feel that they cannot make Chinese food themselves, and I am really not sure why. Chinese food isn’t difficult to make at all! Make a bucket list of your favorites from your local joint, and then go figure it out. One of my personal favorites is what I am making today.

Mongolian Beef Noodles has a perfect balance of sweet and salty. I like to add mini sweet bell peppers to get some natural sweetness in my vegetables, and it gives the dish a nice bright flair. I also add honey, mandarin oranges, and brown sugar to enhance the sweet flavor. The salty, savory factor comes from the green onions, garlic, and ginger. In terms of vegetables, you can use whatever you want. I like to throw in broccoli as beef and broccoli are an amazing pairing in the Chinese realm. I have seen people make it with coleslaw mix (note: NOT mayonnaise-laden prepared coleslaw, but rather, the vegetables). You could add whatever vegetables you like! Seriously! If you’re not too creative, think about what vegetables you actually enjoy eating when you dig through that white take-out container.

In terms of the beef, use flank steak, and make sure the meat is sliced thinly. To expedite the cooking process, the meat needs to be cooked not only thinly, but in smaller pieces (go for bite size.) I am also a big fan of marinating your meat whenever possible. Flank is not particularly tender, so I think it needs to sit for a little bit. More time is best, but if you don’t have all the time in the world, look to marinate your meat in the soy sauce/corn starch slurry immediately while you prep your vegetables–the half an hour bath will do just fine. The soy sauce, rice vinegar, and sesame oil will tenderize the meat.

There are two reasons why you want to add cornstarch to your meat: 1.) it thickens the sauce to make a succulent brown sauce, and 2.) it prevents the meat from overcooking and becoming tough. If you don’t have cornstarch, you can use flour, but I think cornstarch is the best way to get the traditional Chinese results.

Alright, enough talking–let’s get to dinner.

Marry the Meat

  • 1 pound flank steak, cut across the grain into 1/8″ thin slices, then cut into 2” length pieces (think bite size)
  • 1 tablespoon soy sauce
  • 1 tablespoon of rice wine vinegar (if you don’t have it, skip it–but I like it!)
  • 1 tablespoon of sesame oil* (Again, you could skip, but it’s another step closer to authentic Chinese)
  • 1 Mandarian orange (Cuties, Halos, whatever brand), juice squeezed** (optional, but I   like the acidity and sweetness; alternatively, pour in 2 tablespoons of orange juice!)
  • 1/4 cup cornstarch

Fry on the Fly

  • 2 tablespoons of canola oil
  • 3 cups broccoli florets (I just microwaved a bag of frozen florets)
  • 6 mini bell peppers, sliced thinly (no seeds, please!)–you could also used 1 whole bell pepper so long as its sweet!
  • 6 green onions, chopped (2 green onions reserved for garnish, the rest is for the stir fry itself)
  • 6 garlic cloves, minced
  • 1 tablespoon freshly grated ginger (If you don’t have any, you can leave it out, but ginger is another authentic Asian aromatic!)
  • 1 box of Rice Noodles (cook to directions)–if you’re really in a bind, you can use pasta (shhh!) or white rice

The Slurry in a Hurry

  • 1 Mandarian orange, juice squeezed** (optional, but I like the acidity and sweetness; alternatively, pour in 2 tablespoons of orange juice!)
  • 1/2 cup low sodium soy sauce
  • 1/2 cup water
  • 1/3 cup brown sugar, packed (add more if you like sweeter sauces)
  • 1/4 cup Asian sweet chili sauce (optional–I just used Sriracha because I ran out of Sambal Oelek)
  • 2 tablespoons mirin/sweet Japanese rice wine or rice wine vinegar
  • 1 tablespoon hoisin sauce
  • 1 teaspoon salt
  • 1/4 teaspoon pepper
  • 2 teaspoons cornstarch
  • 1-2 teaspoons Sriracha
  • 2 tablespoons of honey
Directions
  1. Make your rice noodles to the package’s directions. You can cook them by boiling water (like pasta) in ten minutes, or you can soak them in cold water (takes longer, but is a traditional method) for about 45 minutes.
  2. Next, slice your beef on a diagonal to the size specifications above. Add the meat to a large freezer bag along with 1 tablespoon soy sauce,. Toss to evenly coat. Add 1/4 cup cornstarch and toss to evenly coat. Let sit at room temperature 30-60 minutes at the very minimum.
  3. Slice your peppers thinly, and slice the green onions. Take out garlic cloves and  1 inch piece of ginger; press both through a garlic press. Alternatively, mince garlic and ginger finely with a chef’s knife.
  4. Once your ingredients are prepped, then begin your sauce. Whisk the sauce ingredients together in a small bowl. Set aside.
  5. Heat 1 tablespoon canola oil a large nonstick skillet or a wok (I prefer using a wok) over high heat until very hot and sizzling. Add beef to the skillet and break up any clumps; cook without stirring for 1 minute, then stir and cook until beef is browned and almost cooked through, about 1-2 minutes (it will cook more in the sauce). Don’t overcook or it won’t be as tender! Transfer beef to a large plate and cover it up so it doesn’t get cold.
  6. Add 1 tablespoon oil to the pan and saute the peppers. Throw the meat back in and add the garlic (use a garlic press, if you have one.) Stir frequently with tongs. Throw in almost all of the green onions (reserve some for garnish.)
  7. Microwave the broccoli to the directions on the package (about 5 minutes), and once it is cooked, add it to the pan. Once the noodles are cooked and drained, add to the wok/skillet, too.
  8. Return the beef to the skillet and toss to combine. Whisk the sauce to recombine then add to the skillet. Cook, stirring constantly with tongs, until the sauce is thickened, the beef is cooked and vegetables are crisp tender, about 1-2 minutes. Taste and add additional sriracha, sweet chili sauce, if you would like. Add the rest green onions as a garnish. If you have sesame seeds, you could add these also! Tip: If the sauce isn’t thickening, turn the heat up to a simmer, and then drop it low. Also, you may need to add more cornstarch. 
  9. Eat immediately. Try to use chopsticks without making a mess. 🙂 Slurp away!

Pulled Pork and Smoked Gouda Cheddar Mac and Cheese with a Panko Parmesan Topping

pulledpork

Happy Monday!

Zach always wants macaroni and cheese. This past weekend in particular, he told me to make some. I haven’t made this Gouda Cheddar Macaroni and Cheese in over year; apparently, the last time I made it was around Valentine’s day. I say that’s too long for this decadent goodness. Who doesn’t love this childhood cult favorite? You know, the southern side dish that immediately increases waistlines upon impact?

I will tell you this–this macaroni and cheese recipe is a lot more work than its blue box counterpart, but this recipe makes plenty and is so rich. It’s worth it–otherwise, I wouldn’t post it! You’ll get at least ten heaping servings, and I made this only for Zach and me. You guessed it–I’ll be eating macaroni and cheese for the rest of the week. I am certain this is illegal. This is made with butter, heavy cream, milk, and four cheeses (cream cheese, cheddar, smoked gouda, and parmesan.) To me, the smoked gouda comes out the most flavor wise, the cream cheese helps smooth the sauce over, and the cheddar helps round out the gouda. This was made very diet conscious indeed…

This would be great to make for a potluck or for a holiday  I am sure between Lent and New Year’s that everyone will be craving something fattening!) I love the topping; the crunchy Panko and the salty Parmesan truly work wonders with the melted butter. I am not always a fan of macaroni and cheese with a topping, but this one does the trick. The flavors here are also more complex through the use of sautéed onions and (optional) bacon. If you don’t use bacon, that’s fine–just make sure you make pulled pork. There’s something about barbecued foods that make this mac and cheese really shine. If you don’t feel like making pulled pork, feel free to go to a reputable barbecue joint by you; Zach and I love Mission BBQ for a chain.  Again, if you want to just make the macaroni and cheese by itself, that’s fine too, but the hint of BBQ sauce that seeps through does pull this dish together.

Get Jiggy With It
The ‘Roni
  • 1 box of Rotini macaroni, cooked and drained (or any other pasta you want to use, like elbow)
  • 4 tablespoons of butter
  • 1 medium onion, diced
  • ½ cup flour
  • 1 cup chicken broth
  • 1½ cup milk
  • 1¼ cup heavy cream
  • 2 teaspoons kosher salt
  • 1 teaspoon ground black pepper
  • 1 teaspoon dry mustard powder
  • 2 teaspoons Worcestershire
  • ½ lb smoked gouda cheese, shredded
  • ½ lb sharp cheddar cheese, shredded
  • 8 oz cream cheese, cubed
The Topping
  • 2 cups Panko bread crumbs
  • 4 Tbsp butter, melted
  • 4-6 slices bacon crumbled *** (optional!)
  • ½ cup Parmesan cheese
  • ½ cup bacon crumbled** (optional!)

Jazzercise For Your Thighs!

  1. Prepare your macaroni according to package directions. Set aside in a large pan (9X13 or larger would work!)
  2. Do your prep work! Shred all your cheeses (except parmesan and cream cheese). Dice your onion.
  3. In a large pan, melt butter over medium high heat. Saute chopped onions until translucent and just starting to caramelize.
  4. Reduce heat to medium and sprinkle in flour. Next, whisk until mixed with butter and onion. Cook on medium heat for one minute. You need to form a roux.
  5. Combine milk, cream and broth in a large measuring cup and add all at one time to mixture in pan. Whisk over medium heat for 1-2 minutes. Mixture will thicken considerably. If it doesn’t thicken, raise the heat a bit until it does so, and then lower it once it bubbles up.
  6. Add salt, pepper, mustard and Worcestershire sauce. Then you should reduce the heat to low and continue to cook for 2-3 minutes.
  7. Add the cheeses to the pan and stir to thoroughly combine.
  8. Add cooked macaroni to cheese mixture and stir to combine; reduce heat and cook on low for 5 minutes for everything to meld together and get hot. Smooth top.
  9. Combine panko bread crumbs, melted butter, bacon and Parmesan cheese together and mix well. Sprinkle over the top of the noodle casserole and broil the dish until the top is just starting to brown. Mine broiled in less than five minutes–so make sure you keep your eye on it!
  10. Devour politely. 😉

Heart Shaped Strawberry Banana Bread

Heart Shaped Strawberry Banana Bread2

Happy Wednesday!

Banana bread is the ultimate breakfast/dessert that almost everyone loves, and yet, there are thousands among thousands of recipes. Banana bread is fantastic because it allows for people to use up those bananas that we forgotten about. The longer they’ve been sitting out, the better. If they are spotted brown or even black, use them up! The natural sweetness is truly enhanced over time. Please do not make banana bread with fresh bananas–it is truly a disservice to this delicious sweet bread.

Banana bread, in addition to being tasty, has almost no prep work. All you need is a mixing bowl, a whisk, and a spatula. Once the mixture is made, you plop it (nicely) in your pan of choice. It’s so easy it should be illegal.

The only thing I don’t like about banana bread is how long it takes to cook. I mean, who wants to wait an hour plus time for cooling? If you make banana bread in a different pan (like a muffin pan or my mini heart shaped cake pan, for example), it will cook faster and taste just as good. My banana bread took approximately 25 minutes (but be mindful–the larger the pan, the longer the cook time!) Personally, I used my heart shaped cake pan because I was one of those suckers that buys heart shaped everything. Just because it’s not Valentine’s day any more does not mean that I can’t express my love any other time…to banana bread, I mean Zach. Plus, if you use a smaller pan, you won’t have too many crumbs like you would if you were to use a loaf pan and had to cut individual slices.

Strawberries and bananas just go so well together. They’re really good buds. I was on a chocolate covered strawberry kick from Valentine’s day, so I bought two pounds of strawberries…for myself. Yes, I know, it’s absurd. Once I got the idea of chocolate covered strawberries out of my system, I realized I needed to make some better use out of the strawberries, and voila–strawberry banana bread was born.

The real peel

  • 1 large egg
  • 1/2 cup light brown sugar, packed
  • 1/3 cup canola or vegetable oil
  • 1/4 cup granulated sugar
  • 1/4 cup sour cream
  • 2 teaspoons vanilla extract
  • 1 1/4 cups all-purpose flour
  • 1/2  teaspoon baking powder
  • 1/2  teaspoon baking soda
  • 1/2 teaspoon salt
  • 1 cup mashed ripe bananas (about 2 large or 3 small bananas)
  • 1 1/2 cups fresh strawberries, quartered and tossed in 3 tablespoons all-purpose flour (helps prevent sinking to bottom of the pan)

Go bananas!

  1. Preheat oven to 350F. Spray your muffin/cake pan/loaf pan of choice.
  2. In a large bowl, mix egg, light brown sugar, canola oil, granulated sugar, sour cream and vanilla. Use a whisk!
  3. Once combined, add 1 1/4 cups flour, baking powder, baking soda, salt, and fold with spatula or stir gently with a spoon until just combine– don’t overmix. You don’t want to make your bread tough.
  4. Add the bananas and fold gently to combine. I squished the bananas with my hands, but feel free to mash them with a masher or fork beforehand.
  5. Quarter your strawberries. First cut across to take off the tops (if you’re using fresh). Next cut it lengthwise in half. Lastly, quarter each half piece. Toss strawberries in flour as you go (lightly); you will add the strawberries tossed in about 3 tablespoons flour or so and fold gently to combine.
  6. Turn batter out into the prepared pan , smoothing the top lightly with a spatula.
  7. Bake for about  25-30 minutes if you are using a mini cake pan. If you are using a traditional loaf pan, bake for 55 to 65 minutes (I baked 60 minutes) or until the top is golden and a toothpick can come out clean.
  8. Leave banana bread in its respective pan for about 15 minutes, and then transfer carefully to a cooling rack.
  9. Baking times will vary based on moisture content of bananas and strawberries, so be sure to check every ten minutes or so. Eat immediately or within the week; you may freeze the bread for 6 months, alternatively.

Spinach, Mozzarella, and Ricotta Pie


SpinachMozzarellaandRicottaPie.jpgHappy Monday!

If I could eat one thing for the rest of my life, it would be Spanakopita, the Greek spinach pie that is layered in heavily buttered phyllo. I will post that recipe…eventually. That’s almost like my tiramisu recipe: it’s top secret. I need to see some real commitment on behalf of my viewers before I unveil this Greek aristocracy.

I seriously have an obsession with spinach! I eat it often as a salad (one of my favorites is grilled chicken, goat cheese crumbles, crushed walnuts/pecans, and dried cranberries/orange cutie pieces with pear gorgonzola dressing). I eat it as a side dish (like a classic creamed spinach), and I’ll eat it in a pie–any pie–phyllo or Pillsbury. I don’t discriminate when it comes to Popeye and I’s favorite.

Speaking of Pillsbury, I took a shortcut today and used a ready made crust. I am all for making homemade everything, even when it’s not necessary. Feel free to be complicated like I usually am, but unfortunately, time is my kryptonite today!

I am not going to say that this Spinach pie replaces my aforementioned, beloved, Spanakopita, but if you’re looking for comfort and ease, this is the recipe for you.

  • 1 box of Pillsbury refrigerated pie crust (alternatively, you could use another brand, or your own homemade)–make sure you have two crusts!
  • 1 yellow onion, diced
  • 4 cloves of garlic, minced
  • 2-3 tablespoon flour
  • 1 10-ounce package frozen chopped spinach, thawed, and squeezed out dry (I also added two cups of fresh spinach because I had some leftover! Spinach always wilts, so feel free to add more if you have it!)
  • Salt and pepper (to taste–approximately 1.5 tablespoons of each)
  • 1 teaspoon of nutmeg (optional–it’s an acquired taste! Please don’t add too much!)
  • 1 15-ounce container ricotta cheese
  • 1 cup mozzarella cheese, shredded (maybe more)
  • 1/3 cup grated Parmesan cheese (I always do more–oops)
  • 2 large eggs, beaten- plus 1 extra egg for brushing on the pastry crust.

Directions:

  1. Preheat oven to 350°F.
  2. In the meantime, prep your onion (diced) and garlic (minced).
  3. In a saute pan, heat to medium high heat and add combination of olive oil and butter for onions. Stir occasionally.
  4. Add small amounts of water every two minutes (about two tablespoons) so the onions become translucent more quickly.
  5. Once the onions are almost caramelized and translucent, add the minced garlic. Stir around–don’t burn the garlic! It’s a sin.
  6. Next, add your spinach. If you’re using fresh, cover the saute pan with a lid for a minute–it’ll expedite the wilting process of the spinach. Be sure to stir the spinach, onions, and garlic so nothing burns. If it gets too hot, take it off the burner.
  7. Cool the mixture for a few minutes (or if you have no time, add everything below EXCEPT the egg–you don’t want to cook eggs.)
  8. In a bowl, mix the spinach, ricotta, mozzarella, Parmesan cheese.  Fold in the 2 beaten eggs and blend well. Set aside. Add salt, pepper, nutmeg** (nutmeg is acquired) to taste.
  9. Unfold the pie crusts. Butter your pie pan/cast iron pan. Sprinkle surface with flour and press or roll out fold lines with rolling pin.  If crust cracks, wet fingers and push edges together to seal. Place crust, floured side down, in 9-inch-diameter glass pie dish to cast iron pan.
  10. Spoon mixture into pie crust. Top with second crust, fold edges under and crimp decoratively. I seriously used a nightlight (that I bought at the dollar store) to create a design. Feel free to use a cookie cutter to make it more elegant (like an open face pie with leaves over the top; I think that would be beautiful!)
  11. Beat the extra egg with a teaspoon of water then brush (with pastry brush) the outside of the crust with the egg mixture. You do not need the whole egg mixture!
  12. Place on the middle rack in the oven and bake until brown on top, about 40-50 minutes (but check on it every 10-15 minutes.) Let stand at least 15 minutes before cutting. Devour politely. 🙂


Kahlua and Bacardi Tiramisu

KahluaandBacardiTiramisu.jpg

This is my absolute favorite dessert I make. Seriously. It’s one of those recipes that your grandmother makes on special occasions, but never will tell you quite everything that’s in it when everyone asks. Grandma does not want her notoriety to vanish for the sake of appeasing your curiosity. It’s so alluring and delicious that as grandma, you are expected to make it, and as the envious family member, you are expected not to be able to ever learn how to make it!

This is my traditional, go-to-and-impress-him dessert for Valentine’s Day, but don’t feel the need to wait for a holiday. Make this because it’s Wednesday. Make this because you love chocolate and coffee. Make this because you love yourself-you don’t need a special occasion at all. There’s something about its layered espresso goodness that makes everyone smile. Tiramisu, which literally means “pick me up,” has plenty of coffee, espresso, liqueur, and rum to keep you going!

Once she starts making Tiramisu, she will be just fine!

What’s the best thing about making Tiramisu? It’s fancy and tasty without the need for an oven. There is technically no baking involved, but you will need a good stand mixer (or regular electric mixer) because you will need to make sure you get the consistency of the mascarpone and whipped cream mixture right. Other than that, this is the perfect dessert to make for your sweetheart. You can make it in about forty minutes of prep work, leave it overnight, and wake up to a decadent treat.

Cast of Characters (Ingredients):

2 cups strong brewed coffee, room temperature
1 1/2tablespoons instant espresso powder
6 1/2 tablespoons Kahlua, divided, 2 1/2 tablespoons Bacardi Rum
6 egg yolks
2/3 cup sugar
1/4 teaspoon salt
3/4 cup cold heavy cream, divided
24 ounces mascarpone cheese
14 ounces dried ladyfingers (savoiardi) <–Typically, two boxes worth.
3 1/2 tablespoons Dutch-processed cocoa powder <–Go for unsweetened! I used Hershey’s Cocoa Unsweetened.

The most expensive and probably difficult ingredients to find if you do not live in an Italian neighborhood are mascarpone and ladyfingers. When I asked for the mascarpone cheese in my neighborhood grocery store, the attendant asked me if it was similar to parmigiana cheese. Uh, no! This is a sweet, Italian cream cheese! Although he could not help me, I eventually found what I was looking for by the chocolate covered strawberries. Maybe other people see that this, too, is the best Valentine’s Day/anniversary/romantic occasion dessert? The secret must be out…

Can you use regular Philadelphia cream cheese instead? No. If you need to order it from Amazon.com because you live in Minnesota, then so be it. It’s worth the wait. I will say that if you are feeling extra creative, you can make your own savoiardi (ladyfingers), but the ones that come from Italian bakeries are more than excellent.

Okay, as with any baking where you are whipping a cream, you need to make sure your bowls that you are mixing with are chilled. If you really are short on time, throw them in a freezer and start to prepare everything else in the meantime. Cold bowls will help get the nice, fluffy peak you need out of your mixture.

To begin, you need the following:

A stand-mixer (or electric mixer–DO NOT MIX BY HAND WITH A WHISK)

Two mixing bowls (chilled)

A 13 x 9 inch Pyrex (you can do any similar size if needed, but you may have more or less mixture needed)

A rubber spatula

Get on the Grind

1. Prepare the ladyfinger coffee mixture. Brew two cups of coffee (and if you have, you can also brew one shot of espresso) and pour into a large bowl. Measure 2 1/2 tablespoons of Kahlua, 2 1/2 tablespoons Bacardi Rum, and  1 1/2 tablespoon of Instant Espresso Powder. Stir all ingredients into the espresso powder has dissolved.

2. Crack eggs and separate whites from yolks. In bowl of standing mixer fitted with whisk attachment, beat yolks at low speed until just combined. Gradually add sugar and salt and beat at medium-high speed until pale yellow, 1 1/2 to 2 minutes, scraping down bowl with rubber spatula once or twice. Add 1/3 cup of the heavy cream to yolks and beat at medium speed until just combined, 20 to 30 seconds, and then scrape bowl. Do not over beat!

***If you have pasterurized eggs and want to eat Tiramisu traditionally, proceed. For those of you who are bothered by the concept of a raw egg, you can do this optional step to cook the eggs lightly.***

OPTIONAL: Set the bowl with yolks over a medium saucepan containing 1 inch of gently simmering water; cook, constantly scraping along bottom and sides of bowl with heatproof rubber spatula, until mixture coats back of spoon and registers 160 degrees on instant-read thermometer, 4 to 7 minutes. Remove from heat and stir vigorously to cool slightly, then set aside to cool to room temperature, about 15 minutes.

3. Whisk in remaining 4 tablespoons Kahlua until combined. Transfer bowl to standing mixer fitted with whisk attachment, add mascarpone, and beat at medium speed until no lumps remain, 30 to 45 seconds. Transfer mixture to large bowl and set aside. DO NOT OVERBEAT! IF IT IS LIQUIFIED, YOU CANNOT FIX IT.

4. In now-empty mixer bowl, beat the remaining heavy cream at medium speed until frothy, 1 to 1 1/2minutes. Increase speed to high and continue to beat until the cream holds stiff peaks, 1 to 1 1/2minutes longer. Using a rubber spatula, fold one-third of the whipped cream into mascarpone mixture to lighten, then gently fold in remaining whipped cream until no white streaks remain. Set mascarpone mixture aside.

5. Assemble your lady fingers by soaking them first, one-by-one, into a 13 x 9 Pyrex. Grab one ladyfinger, drop and roll in the coffee/rum mixture for about two seconds. Do not let it get soggy! Because it will be sit overnight, it will continue to get very moist. In fact, by the third day of leftovers, it may be almost “too wet.” It’s just an excuse to eat it all right away.

6. For each ladyfinger you soak, you must put the cookie on the bottom of the Pyrex. You are making one layer with just soaked ladyfingers first. You may have to break some in half to fit perfectly for your individual pan.

7. Apply the first half of mascarpone mixture over ladyfingers; use rubber spatula to spread mixture to sides and into corners of dish and smooth surface. Place 2 tablespoons cocoa in fine-mesh strainer and dust cocoa over mascarpone or simply sprinkle it on. You can also sprinkle a little espresso powder for more oomph!

8. Repeat dipping and arrangement process of ladyfingers by placing the newly soaked ladyfingers on top of mascarpone mixture; spread remaining mascarpone mixture over ladyfingers and dust with remaining 1 1/2 tablespoons cocoa. Cover with plastic wrap and refrigerate overnight or at least 6-8 hours. Cut into pieces and serve chilled. Leftovers can be stored, tightly wrapped, in the refrigerator for up to 3 days.

Spinach Ricotta Lasagna Cupcakes

spinachcupcakes

Happy Monday!

Did you make my tortellini filling last week and find yourself in a similar conundrum to me? You know, you made so much that you could start an assembly line akin to the Model T? If you made the tortellinis and also had leftover Won Ton Wrappers, then this is the recipe for you! Even if you have no idea what recipe I am talking about, make these cupcakes; they are two-three bite lasagnas that are too cute and tasty to pass up.

Leftovers are often boring; instead, you should look to repurpose your ingredients. Create last night’s extra ingredients into something else you would not expect. Surprise yourself, or if you’re too nervous, troll through Pinterest and hope you find something worth while.

Speaking of inspiration, you may want to consider this for the Hallmark holiday that is embarking. As Valentine’s Day is around the corner, I really think this would be a great recipe to make for your loved one. Nothing says love like lasagna. The problem is that lasagna isn’t really an intimate dish; when you make lasagna, it’s usually to feed a family…and then some.

This recipe can be made as fast or as slowly as you want; if you have a tomato sauce on hand and a filling created, you can assemble your cupcakes in about five minutes, and you only need to bake them for about 10-12 minutes; dinner could be ready in less than a half an hour. If you’re feeling ambitious and want to make an elaborate sauce/filling, go for it. I promise you that it will still be easier than traditional lasagna. This is a great weeknight recipe for its speed, and it’s a great special occasion recipe (I think particularly for an appetizer) because of its elegant presentation (that takes no creativity at all!)

This recipe makes intimate, individual lasagna cupcakes for you and your honey bun. Now, I will not sell this recipe as equivalent to its homely counterpart. It is certainly not as hearty and hefty in its layers.  The recipe I am providing is meatless for you vegetarians out there unlike a typical lasagna that has crumbled sausage and/or ground beef. Feel free, however, to change the filling so it can resemble Garfield’s guilty pleasure. 🙂 And if you’re still dieting from the holidays, you’ll be happy to know that these bad-boys are fairly good calorically; these lasagna cupcakes fare at about 180 calories a piece. These are practically guiltless so you eat all the chocolate you want!

One day, when I am looking for that Sunday project, I will post a recipe for my family’s tried and true family-style lasagna.

Stay tuned–P.S: I will be going Italian the rest of the week: Chicken Parmigiana with Homemade Plum Tomato Basil Sauce and Kahlua and Bacardi Tiramisu (my absolute favorite recipe of Tiramisu; I almost don’t want to tell you about it 🙂 )

Spinach Ricotta Filling

  • 12 ounces Whole Milk Ricotta
  • 1-1/2 cup Freshly Grated Parmigiana (I always add more!)
  • 1/2-3/4 cup of Finely Shredded Mozzarella
  • 1 whole Egg
  • Salt and Pepper to your taste
  • Pinch of nutmeg (optional, but recommended)
  • 3-4 cups of arugula or spinach (your choice! you can do it without leafy greens)
  • 3-4 cloves of garlic** (only if you are sautéing spinach or arugula; I prefer spinach of the two for the filling)
  • 3 tablespoons of parsley and/or basil (mixed is fabulous: and fresh is best!)

Spinach Ricotta Filling Instructions…

  1. In a pan, heat up 1-2 tablespoons of Extra Virgin Olive Oil.
  2. Mince some garlic (3-4 cloves) and put in the pan that has olive oil.
  3. Throw in spinach (handfuls at a time) until it wilts. Repeat until all spinach is incorporated. Be sure to be stirring often so garlic doesn’t burn.
  4. Put spinach aside and give it about 5-10 minutes for cooling.
  5. Next, get a large mixing bowl. Take ricotta out of the container and add the cheeses. Stir.
  6. Next, throw in the sautéed spinach and mix. Next, beat one egg and throw into mixture.
  7. Mix well. Taste a small bit and add salt and pepper to taste. Throw in nutmeg, if desired.

Quick Meat Filling

  • 1 tablespoon olive oil
  • 2 Italian sausage links, casing removed
  • 1 cup marinara sauce, homemade, or store-bought
  • 1 1/2 cups ricotta cheese
  • Kosher salt and freshly ground black pepper, to taste
  • 2 tablespoons chopped fresh parsley leaves

Quick Meat Filling Instructions…

  • Heat olive oil in a large stockpot or Dutch oven over medium heat. Add Italian sausage and cook until browned, about 3-5 minutes, making sure to crumble the sausage as it cooks; drain excess fat and stir in marinara sauce.
  • Season ricotta cheese with salt, pepper, and parsley to taste.  I would also add grated parmigiana cheese (about 1/2 cup.) Nutmeg works nicely here as well (very sparingly.)

Speed Demons (use in both recipes)

  • 24 2-inch won ton wrappers (I use the round Gyoza wrappers)
  • 1 1/2 cups shredded mozzarella cheese
  • 1/2 cup of grated parmigiana cheese
  • Optional: Fresh/frozen basil and/or flat-leaf Italian parsley (approximately a teaspoon per cupcake)

All Together Now

  • Preheat oven to 375 degrees. Lightly oil a 12-cup standard muffin tin or coat with nonstick spray like Pam.
  • Create your choice of filling (see above.) Keep this aside.
  • Fit wonton wrappers into each of the 12 muffin tins, pressing carefully to make sure there is an opening in the center. Fill each cup with 1 tablespoon ricotta cheese. Top with 1 tablespoon marinara mixture and 1 tablespoon mozzarella cheese; repeat with one more layer.
  • Place into oven and bake for 10-12 minutes, or until the cheese has melted and the wonton wrappers are golden brown.
  • If available, place chiffonade basil on top while the cupcakes are cooling. This will add last minute flavor. Alternatively, if you have frozen basil, you could add a small amount to each cupcake. Additionally, sprinkle with some grated parmigiana to cover the top layer.
  • Serve immediately, garnished with some parsley, if desired (or just basil is fine–you need something green.)

Note: Do not reheat these; the won-ton wrapper gets soggy, so this must be eaten immediately and not wait the next day! If you want something sturdier, you can alternatively purchase a no-bake lasagna noodle and invert one noodle vertically around the inside of the cupcake for support of the filling.